Previously, we’ve shared you how to enable Hyper-V in Windows 10. In Windows Server, you can install Hyper V role and start using it. In this article, we’ll learn about Virtual Switch for Hyper-V virtual machines (VMs) and how does it work.
Page Contents
Virtual Switch For Hyper-V VMs
To connect virtual machines (VMs) to networks that are external to the Hyper-V host, you’ll need a Hyper-V Virtual Switch. It allows VMs created on Hyper-V hosts to communicate with other computers. The main thing is that VMs gets virtual network adapters by Hyper-V, and these adapters communicate directly with the virtual switch.
Basically, there are three types of Virtual Switch you can create:
1. External Virtual Switch: It binds to the physical network adapter so that VMs can access a physical network. This means you can physical network to communicate with servers and clients on an external network.
2. Internal Virtual Switch: It can be used between VMs and physical computer on which switch is created. It doesn’t provides connectivity to a physical network connection.
3. Private Virtual Switch: This can be used only be VMs running on a physical computer on which the switch is created.
When you install Hyper-V role on Windows Server, you’ll be able to spot Hyper-V Virtual Switch Manager. You can use this manager to create a Virtual Switch, which is mentioned next in this article.
How To Create A Virtual Switch For Hyper-V VMs
If you’ve already installed Hyper-V server role, you can use these steps to create a Virtual Switch.
1. Open Hyper-V Manager using search.
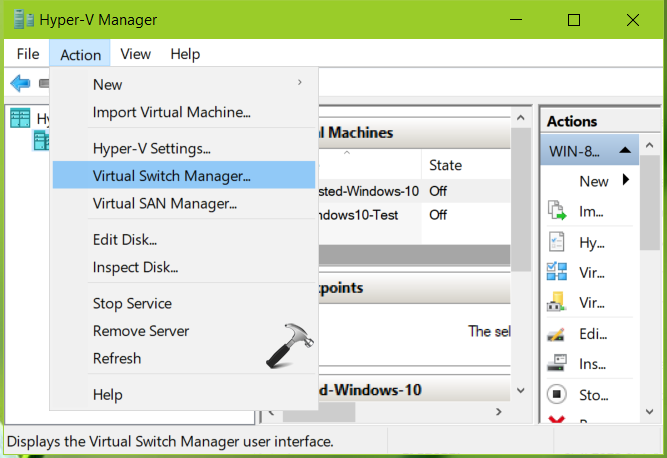
2. In Hyper-V Manager window, select Hyper-V host machine name and click Action > Virtual Switch Manager.
3. Next, select the type of Virtual Switch from External, Internal or Private. And click Create Virtual Switch.

4. If you’ve selected External Virtual Switch, select the network adapter or NIC. Check Allow management operating system to share this network adapter option, if you want to share NIC. If you want to allow virtual machine traffic to bypass the virtual machine switch and go directly to the physical NIC, check Enable single-root I/O virtualization (SR-IOV) option. In case if you want to isolate network traffic from the management Hyper-V host OS, you can check Enable virtual LAN identification for management operating system option. Click Apply.

5. You may then receive Apply Networking Changes prompt, click Yes on that.

Your virtual switch should now be created.
That’s it!