
If you’ve latest Windows 10 Version 2004 installed, you may see Get even more out of Windows screen while signing in or restarting your device. The main objective of this screen is to make new users aware of basic Windows features they can leverage power of. On some devices, you may get similar Let’s finish setting up your device screen instead.
Here is screenshot of Get even more out of Windows screen.
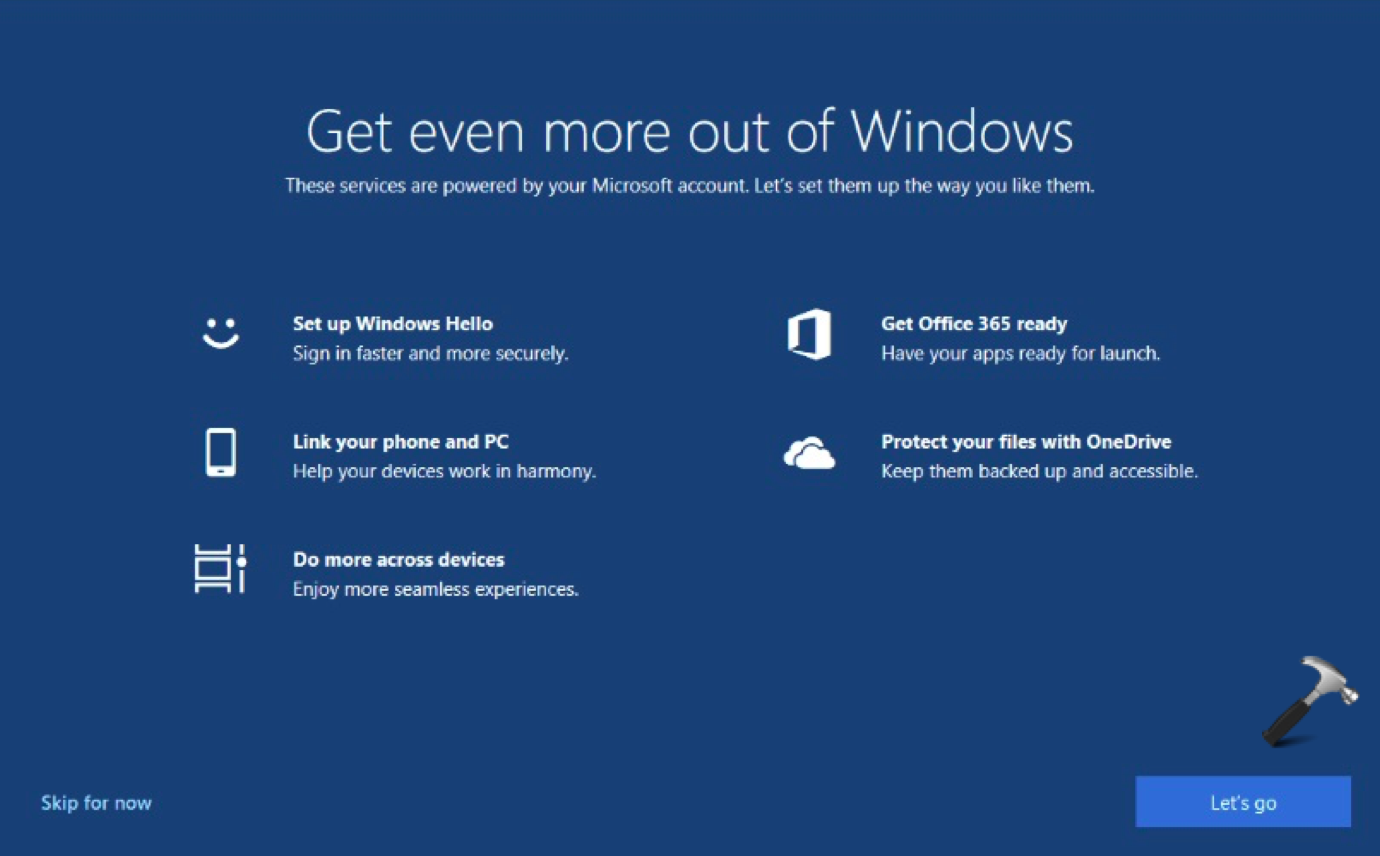
The screen provides following suggestions to users:
- Set up Windows Hello
- Link your phone and PC
- Do more across devices
- Get Office 365 ready
- Protect your files with OneDrive
These are the basic things users should go through. Of course, you can skip this screen, if you like. In case if you want to disable this screen from showing up, here’s how you can. Configure the relevant option is Settings app or using registry to turn off Get even more out of Windows screen.
Page Contents
How To Disable ‘Get Even More Out Of Windows’ Screen
Method 1 – Using Settings App
1. Right click Start Button or press  + X keys and select Settings.
2. In the Settings app, navigate to System > Notifications & actions.
3. In right pane of Notifications & actions, uncheck Suggest ways I can finish setting up my device to get the most out of Windows option.
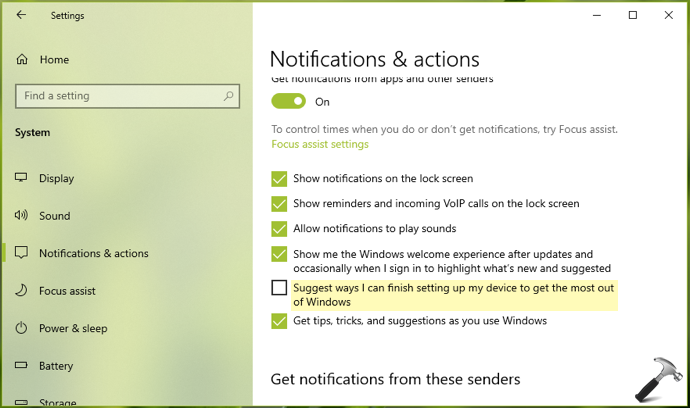
4. Close Settings app.
If Settings app not working, try changing this setting via registry, as mentioned in Method 2 below.
Method 2 – Using Registry Editor
1. Run regedit command to open Registry Editor.
2. In left pane of Registry Editor window, go to HKEY_CURRENT_USER\SOFTWARE\Microsoft\Windows\CurrentVersion\UserProfileEngagement.
3. Double click and set ScoobeSystemSettingEnabled to 0.
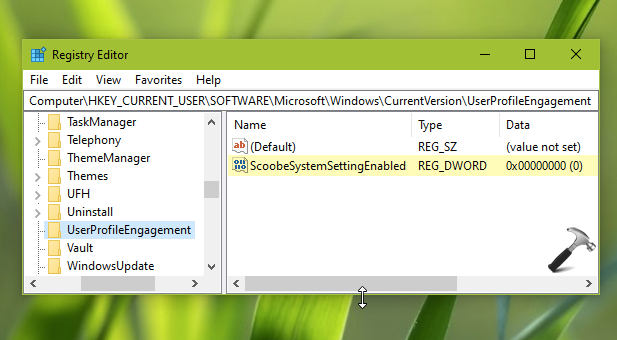
4. Close Registry Editor and reboot the machine.
To make changes, sign out and sign in back or simply reboot your system.
Check this video for more info:
That’s it!


In my (“refreshed”) WIndows10 there is NO “UserProfileEngagement”. THere is Uninstall, the next is “Video Settings”… They keep hiding it.. I Have searched the registry for ScoobeSystemSettingEnabled (and ScoobeSystem). Result: “Finsihed searching through the registry”. No result also for “UserProfileEngagement” at least nothing looking like the described key.
Note: I use english windows 10 Pro, but I am in Sweden. If that makes a difference.
Windows 10 Pro, installed 2020-10-25, OS build 18363.1139, activated.
KB4577671 (2) installed 2020-11-05
KB4578974, KB4580325, KB4023057
Sadly this does not work at all on my current Win10 setup- neither method. Microsoft keeps playing whack-a-mole with these settings to force people to go through the $%^& setup repeatedly.
The first method fails, as that particular option has disappeared (I used to have it unchecked).
The second method fails, as the prior poster noted, because they’ve eliminated the UserProfileEngagement keys. At least from my Win10 10.0.18363 Build 18363 that they just updated on me.
^^ Please read the article carefully! It already starts with ‘Windows 10 Version 2004’ and this applies to build Windows 10 build 18945 or higher. So if you don’t have build 18945 or later, it’s obvious that you won’t find that option. I checked it even on Version 20H2 and option is still there.
I don’t really know what those version number mean. My system is Version 10.0.18363 Build 18363 and it’s the very latest version that Microsoft just updated this week even though it’s a different number.
There is no mention from Microsoft’s System Summary of Version 2004 or anything remotely similarly formatted. Likewise version 20H2 is nowhere reflected in how Micrsoft reports their version number to me.
Searching on the web it appears you’re referencing some kind of Microsoft code numbers rather than their actual release numbers that one’s system reports.
None of which is your fault – except that you expect everyone to be conversant with code numbers rather than actual version numbers.
Bottom line is that none of this works on a currently updated Win10 system. May work on some, but definitively not all. FWIW.
^^ The version number reflects the last feature update you installed. Really odd to hear that version number is missing on your system. I suggest you to do a repair upgrade: https://www.kapilarya.com/how-to-repair-windows-10-using-in-place-upgrade. Then you can run winver command and version number should show up.
thank you, i found both the option in the system notification settings window, and also the registry
the article is spot on
the only solution that i haven’t been able to find is the one that fingers the culprit process
once the process that produces this virus is identified, it is simply a matter of replacing it with a null file with the same name, and setting it read only and system – my favorite hack
which process is responsible for this maltrusion
^^ Glad to help!
I have a very high level of understanding about Windows, and deep-level programming on it; but saying, “once the process that produces this virus is identified, it is simply a matter of replacing it with a null file with the same name, and setting it read only and system.”
It would be nice if you identify which file you replace, how to make a ‘null file’ that you rename (you create a txt file that has nothing in it and then rename it as .exe or .dll? and where is that file found? In the System32 folder?
So, it would be helpful to state the filename, path name, process you would use to create what you’re calling a ‘null file’ (are you meaning a file containing just a machine language program with one NOP (No Operation) command in it and a return from subroutine? Or are you meaning a file where you rename a .txt file as something. Then, it would be helpful to state HOW you set it to ‘system’ file (probably right-click, properties, then a checkmark?)
I added UserProfileEngagement, and then set the dword, and didn’t have the screen pop up on this reboot.
Remains to be seen if this will continue to work on the next patch.
^^ You’re all set! The screen would not appear again, IMO.
Lovely MicroSoft has removed the last container of the METHOD 2 regedit. This fix is no longer valid. They really don’t want you to control your own system anymore.