

The Server Message Block (SMB) protocol is basically a file sharing protocol present in Windows. It allows applications to read/write to files and urge requests for services from server manager for network connected computers. There are three versions of this protocol, SMB Version 1 (SMBv1), SMB Version 2 (SMBv2), SMB Version 3 (SMBv3). SMBv3 is the current version and SMBv1 is quite outdated on the present date. Windows comes with SMBv1 enabled by default.
With the increased ransomware attacks and due to most recent WannaCry ransomware hiccup, Microsoft has recommended users to disable the outdated SMBv1 protocol from their systems. As SMBv1 is much older technology so it is highly vulnerable and can be easily used by ransomware attackers to target the victim machines. However, Microsoft also recommends that you do not leave SMBv2, SMBv3 disabled, otherwise it will break functionality of your Windows.
So in this article, we’ll show you how to enable or disable these protocols on your Windows system.
Page Contents
How To Enable Or Disable SMB Protocols In Windows 10/8.1/8/7
WAY 1 – Using Windows Features Applet (Disable SMBv1 Protocol)
1. Using Cortana or Windows Search, look for term features. From results, click Turn Windows Features On or Off. See this fix, if you find Turn Windows Features On or Off applet blank.
2. In Turn Windows Features On or Off window, scroll down and look for SMB 1.0/CIFS File Sharing Support which must be checked by default. Uncheck this option to disable SMBv1 and click OK.
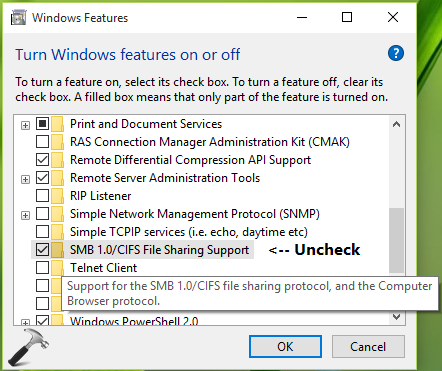
Using this way you can’t disable other SMB protocols such as SMBv2 and SMBv3. So for that, you can tweak registry as mentioned below.
WAY 2 – Using Registry (Disable SMBv1, SMBv2, SMBv3 Protocols)
Registry Disclaimer: The further steps will involve registry manipulation. Making mistakes while manipulating registry could affect your system adversely. So be careful while editing registry entries and create a System Restore point first.
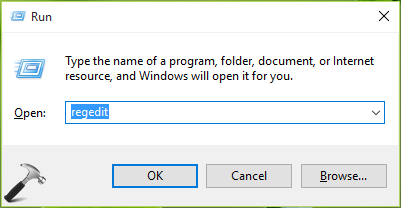
1. Press  + R and put regedit in Run dialog box to open Registry Editor (if you’re not familiar with Registry Editor, then click here). Click OK.
2. In the Registry Editor window, navigate to following registry key:
HKEY_LOCAL_MACHINE\SYSTEM\CurrentControlSet\Services\LanmanServer\Parameters
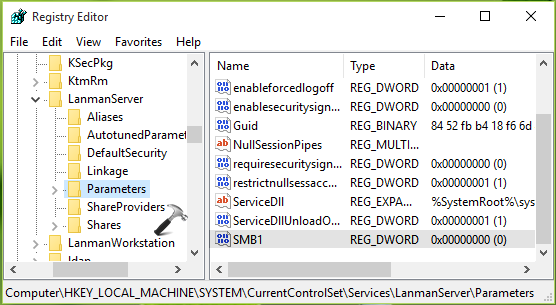
3. In the right pane of Parameters registry key, simply create a new registry DWORD (REG_DWORD) named SMB1 to disable SMBv1 protocol and set its Value data to 0. Similarly, to disable SMBv2 and SMBv3 protocols simultaneously, create SMB2 registry DWORD (REG_DWORD) and set its Value data to 0. Once done, close the Registry Editor and reboot to make changes effective.
You can re-enable SMBv1, SMBv2, SMBv3 protocols anytime in future, by simply deleting SMB1, SMB2 registry DWORDs created above. However, better if you keep SMBv1 disabled at all (in case if you’re on an older Windows edition/build). Also its worth to mention here, keep your system updated with latest security updates offered by Microsoft, to stay safe from Ransomware phenomenon.
That’s it!







Finally a way that worked. The registry edit method fixed my android/linux filesharing. Thanks.
^^ Glad to help 😎
How to enable smb2 or smb3? You failed to address that topic.
^^ Read step 3 and WAY 2 heading again :) Clearly mentioned that you can create SMB2 registry DWORD and similarly SMB3 registry DWORD just like SMB1 registry DWORD to enable corresponding protocols.
The windows 10 updated my TP-LINK AC1900 Router and I lost the access to UCB 3 hard drive because Router (hardware v1) support SMB1 only but windows10 turned it off. I turned on SMB1 according to your instruction.
Thanks a lot!
Leonid
^^ Happy to help 😊
Since loading the latest windows 10 all of my home pc’s I can see only the main pc and its drives and files. Homegroup is gone. The main pc it sees only itself and the other network pc’s see only the main computer. I’ve gone through setting the network discovery options and after two hours I don’t know what to do next. i’m disappointed in a product like this having such a basic problem as this. My son is having the same problem with his home network as well. Any Suggestions?
^^ Please refer: https://www.kapilarya.com/homegroup-alternatives-in-windows-10-v1803.
Mike
How to enable smb2 or smb3? You failed to address that topic.
Kapil Arya
^^ Read step 3 and WAY 2 heading again :) Clearly mentioned that you can create SMB2 registry DWORD and similarly SMB3 registry DWORD just like SMB1 registry DWORD to enable corresponding protocols.
That method you only specifically mention DISABLING SMB1,2, and 3. Although I believe you mean set the key to 0x00000001 (1) to make them enabled.
My SMB2 is true, but where can I find the SMB2 feature software.