
Microsoft Defender (earlier Windows Defender) comes pre-installed with Windows 10. Due to its presence, you don’t need third-party antivirus to safeguard your system. Microsoft has enhanced this security suite in successive Windows 10 versions. When you regularly need to access a network shared folder (located on other system) from your Windows, you usually map it and call it as mapped drive. Microsoft Defender will not scan mapped drives by default. So in this post, we will learn how you can scan mapped drives with Microsoft Defender.
See, there are two common methods you can use to enable scanning mapped drives using Microsoft Defender. The first method is using Group Policy which you can use it to deploy the setting on the client’s system. If you want to configure this for your personal system, its better use registry manipulation. Both the methods are mentioned below, try them as per your convenience.
Page Contents
Scan Mapped Drives With Microsoft Defender
Method 1 – Using Group Policy
1. Open GPO Editor by running gpedit.msc in Windows client edition and by using gpmc.msc command in Windows Server.
2. Next, open the GPO Editor window, navigate here:
Computer Configuration > Administrative Templates > Windows Components > Windows Defender Antivirus > Scan
Note: You should have Policies folder after Computer Configuration, if you’re on Windows Server.
3. In the right pane of Scan folder, locate and double click on Run full scan on mapped network drives policy setting. Double click on it to modify its status.

4. Now set the policy status to Enabled and click apply followed by OK. Close the GPO Editor and update GP engine to make changes effective.

Method 2 – Using Registry
1. Open Registry Editor.
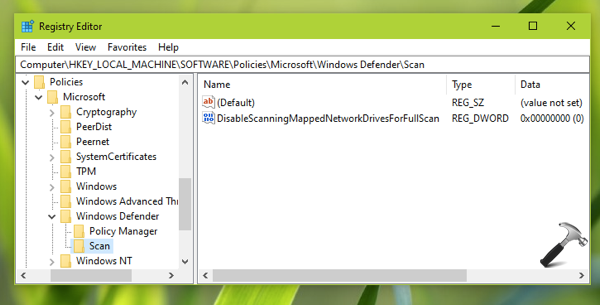
2. Go to HKEY_LOCAL_MACHINE\SOFTWARE\Policies\Microsoft\Windows Defender.
3. Next to Windows Defender, create a new registry sub-key and name it as Scan. In the right pane of this Scan registry sub-key, right click and create new registry DWORD and name it as DisableScanningMappedNetworkDrivesForFullScan. Let its data remain set to 0 so that Microsoft Defender can scan mapped drives. Else, you can set it to 1 to disable mapped drive scanning by Defender.
4. Close Registry Editor and reboot to make changes effective.
Hope this helps!
Related: Allow/Prevent Scan Network Files With Microsoft Defender.


Sir,
You are awesome and matchless,you always using Registry , for each and every problem you solved by Registry,which is very hard to understand to an ordinary person.You try to solve problems in simple way to whome people will understand ,write down your notes and accordingly do the necessary changes to repair PC/computers . I again said you are awesome . Thanks. – Balvant Avasarmal.
^^ Thanks for your feedback!