

Windows Defender is the inbuilt security suite in Windows 8 and its later updates. So basically, you do not need to use any other antivirus program on your system as the Windows Defender is itself capable of protecting your system with best security definitions. Its easy to use and contains almost all the features which competitor security suites are offering to you. I am using Windows Defender on my system since I started using Windows 8, and I never faced virus related issues on my system since then.
Recently, I have came across the issue of Windows Defender not starting. This was the scenario I faced on a system upgraded to Windows 8.1 from Windows 8. In this case, Windows Defender service was throwing error code 577.
Page Contents
Windows could not start the Windows Defender Network Inspection Service service on Local Computer.
Error 577: Windows cannot verify the digital signature for this file. A recent hardware or software change might have installed a file that is signed incorrectly or damaged, or that might be malicious software from an unknown source.
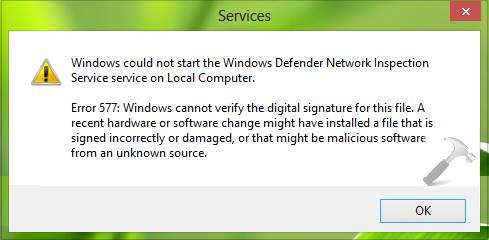
Well, you might face this error as well when you uninstall a third party security software/antivirus and then you try to turn on Windows Defender. Here is what you have to do to turn on Windows Defender back:
FIX : ‘Windows Could Not Start The Windows Defender Network Inspection Service On Local Computer’ In Windows 10/8.1/8/7
FIX 1 – Using Action Center
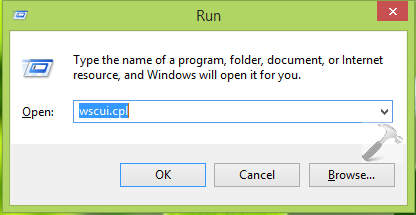
1. Press  + R and type wscui.cpl in the Run dialog box and hit Enter.
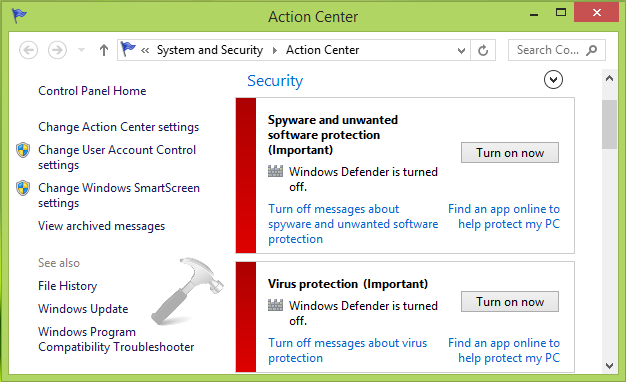
2. Last step will take you to the Action Center, so in the following window, look for the Windows Defender entry and immediately click Turn on now or if you see there the Launch button, click it.
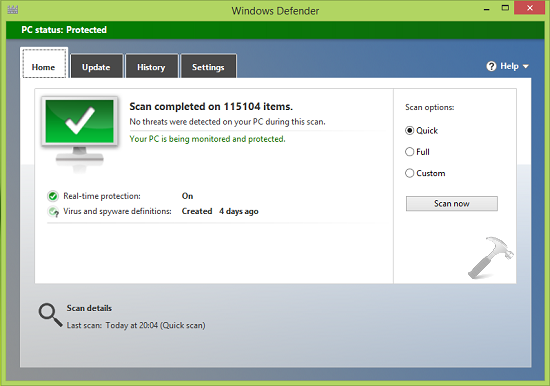
This should launch Windows Defender normally and thus your system is now being protected by the same.
FIX 2 – Using Registry Editor
Registry Disclaimer: The further steps will involve registry manipulation. Making mistakes while manipulating registry could affect your system adversely. So be careful while editing registry entries and create a System Restore point first.
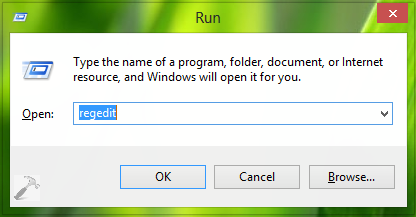
1. Press + R and put regedit in Run dialog box to open Registry Editor (if you’re not familiar with Registry Editor, then click here). Click OK.
2. Navigate here:
HKEY_LOCAL_MACHINE\SOFTWARE\Microsoft\Windows Defender
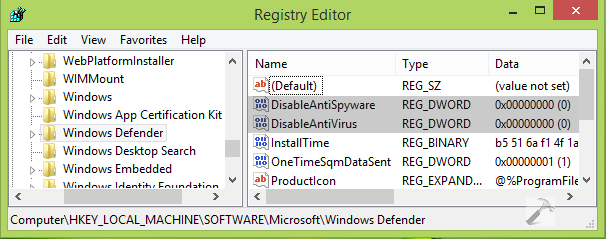
3. Take the ownership of Windows Defender key first using RegOwnerShipEx. In the right pane look for DisableAntiSpyware and DisableAntiVirus named registry DWORDs. Double click on them to get this:
4. Make sure that Value data is 0 for both the DWORDs. Click OK, close the Registry Editor. Now open file MSASCui.exe at following location.
C:\Program Files\Windows Defender
In this way, Windows Defender should start working fine on your system now. Go here if you can’t start Security Center in Windows 8 or later.
Note: Post edited on 13 Feb, 2019 for updated information.






Second method helped me. Thanks man!!
it didn’t worked any more ideas pls..
Yay it worked!!!
thanks if the “Using Registry Editor” doesn’t work.
right click on the windows defender node in registry -> permission -> advanced -> owner (change) -> type your windows profile name (what shows in user profile in windows) -> apply /ok -> add click on ADD and do the same thing done in previous step -> ok/apply -> click on the name ->tick on full control and read -> then follow the rest of the steps -> click on start service. it will run the service, if you try to manually run the service, it won’t work.
^^ I appreciate your inputs, well here if you take ownership of the registry key using RegOwnershipEx, your job gets simplified, I have linked it in article :)
Thanks @Kapil and @Logan both of your suggestions worked like charm. My Windows Defender works fine now. so thanks again :-)
Oh my…I have been trying to fix this for days and I finally figured it out, thanks to Kapil and Logan….I cant thank you enough..YOU ARE THE BEST!!
^^ Glad we could help :)
I tried the registry steps as you said and this worked for first time. After a reboot I have same problem, please help me…..
great solutions, thanks.. have been tryng to find solutions for a month, but this is the right way to activate windows defender again… thank you
It worked thanx man :-)
I cant take ownership of this registry key. Pls help me sir
^^ Checkout this: https://www.kapilarya.com/manually-take-ownership-windows-8
excellent fix! worked for me too :)
Great fix!! I ran across an issue after getting rid of malware using Malwarebytes and uninstalling Norton. The second option fixing the registry did it for me. Many thanks!
Thank you so much! The second option worked!!!!!
^^ Thanks for feedback :)
THANK YOU! THANK YOU! THANK YOU!! You have just saved me $140 using Microsoft support
^^ Cool :)
What if these values are already 1.
i.imgur.com/qSNSTbm.png
i.imgur.com/mwUIBlC.png
i try to change value to 1 but it says cannot edit
^^ You need to take ownership of registry key first!
when it changed it successfully..it rechange it 0 value for keyvalue.
^^ Try first method and see if it helps in your case.
no not working first method also…. :(
Yay!! The registry fix worked. Thank you so much!
^^ Glad it helped! :)
You’re the man, this got my Defender working after 3+ hours of searching. 5 minute fix and it’s back. Thanks so much!
^^ Awesome :D
The values are already 1. what can I do?
The 2nd method worked. The values were already 1. After I tried to run “MSASCui.exe” it asked me to check status (from Security and maintenance in control panel) of currently installed anti-virus software. I use Advance System Care Ultimate so, I had to turn that off and then “MSASCui.exe” ran just fine. Thanks!
^^ Glad we could help :) I appericiate your feedback!
Hello, I am stuck on Method 2 step 3. How do I take ownership after downloading the tool? What do I put in the space below the words “Select Registry Key”? Thanks!
^^ Yes, put the registry key location in the tool and hit Take Ownership button.
Worked perfect by changing registry values from 1 to 0 after I had spent a whole day trying everything else. Thanks you so much.
^^ Happy to help :D
Hello,
My Windows Defender cannot be avtivated. The error 577 stays even after I tried witj regedit, mscommand and the things that you suggested. For example when I press in the Action Centre on “Turn on now” for spyware protection and virus protection, it leads me to C/Windows/system32.
Any suggestionss why it does that?
Happy if you cold help.
^^ Please try the System File Checker scan and see if it helps:
https://www.kapilarya.com/how-to-use-system-file-checker-to-repair-windows
Kapil, it didn’t work for me. After removing Avast, it won’t allow me to open the Masascui.exe.
^^ You must try FIX 2.
Fix2 worked for me. Much Thanks :))
^^ Great to see it worked! :)
Thank you sir it works amazing site
^^ :)
Worked with Windows x64 Thx from Turkey.
^^ Perfect! :)
it works for windows 10……………
thanks alot
Problem yet..
Tried both fix but didnt worked for me..
Cannot edit DisableAntiVirus: Error writing the value’s new contents.
^^ Take the ownership of registry key first, retry step 3.
fix1 worked for me. Thanks
^^ Glad it helped 😀
i dont even have disableantispyware or disableantivirus, please help me :( im on windows 10
all step taken but its not working , as window defender start but disable within few second.
^^ If you’ve installed any other security suite, completely uninstall it first :)
@phil, You can create those values and set them as directed in article.
A perfect solution boss…
^^ Glad we could help 😊
Tried both the Methods, including taking ownership, I even tried the system file checker and still Defender is not working. Its showing Error 577 in Services. For the record there is no AV software installed. Can you tell me a solution for my Windows 10 laptop?
it cannot work boss
can u help me
I’m on Windows 10 and I tried doing method 2, and I can’t find DisableAntiSpyware or DisableAntivirus! Help!
^^ Create those values manually!
thank you soo much you i solved my problem with FIX1
^^ You’re most welcome, alladi 😊
Dude in the registry editor itself windows defender is not there what should i do now plzz reply me fast as soon as possible thank you
Value data to 1 from 0 for both the DWORDs. it’s not changing. It is showing- cannot edit DisableAntiSpyware; Error writing the value’s new contents.please help
^^ Please take ownership of Windows Defender registry key first: https://www.kapilarya.com/how-to-manually-take-ownership-of-registry-key-in-windows-10
I don’t have a Windows Defender key at all. It’s gone. Do I need to create it first and then take ownership?
^^ Yes, you can create it and configure it as mentioned in the article.
It works! I have been trying to fix this for few hours. Thanks so much!!!
^^ Glad to help Darek!
I have changed values of both the fields to 0 but I am not able to find the file MSASCui.exe in windows defender folder.
^^ It should be there, please recheck.
I can’t thank you enough man, i worked it out following your steps, thanks for taking the time to help people!
^^ Glad to help!