
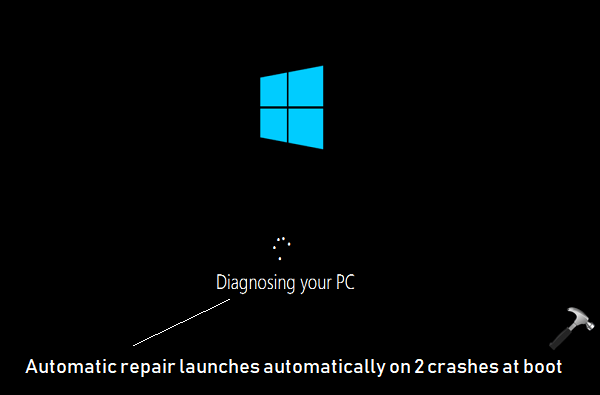
If your Windows 10 fails to reach boot screen due to crash or shut down, this might damage your operating system. Two consecutive failures of such type will trigger Windows 10 to perform automatic or startup repair on the next boot. See this fix, you receive ‘Startup Repair couldn’t repair your PC‘ message then.
Well, this automatic repair done by Windows 10 will sometime take user’s a lot of time. It is time consuming process and rarely fixes the machine. If boot records are corrupted, you still need to repair them manually as mentioned in this fix. So if you like, you can prevent Windows 10 from performing automatic repair, even after two or more crashes while booting.
Here’s how to do this:
How To Disable Automatic Repair In Windows 10
1. Plug in your system recovery disc or Windows 10 bootable USB and start your system and press any key to continue.
2. Then click on Next in Windows Setup screen.
3. Moving on, click on Repair your computer link in next screen of same window.
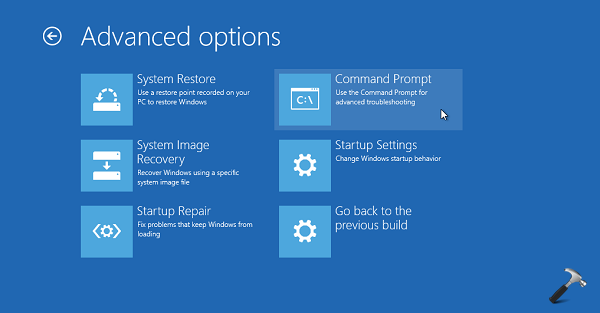
4. Now click Troubleshoot > Advanced options and select Command Prompt. Provide your account credentials, if asked.
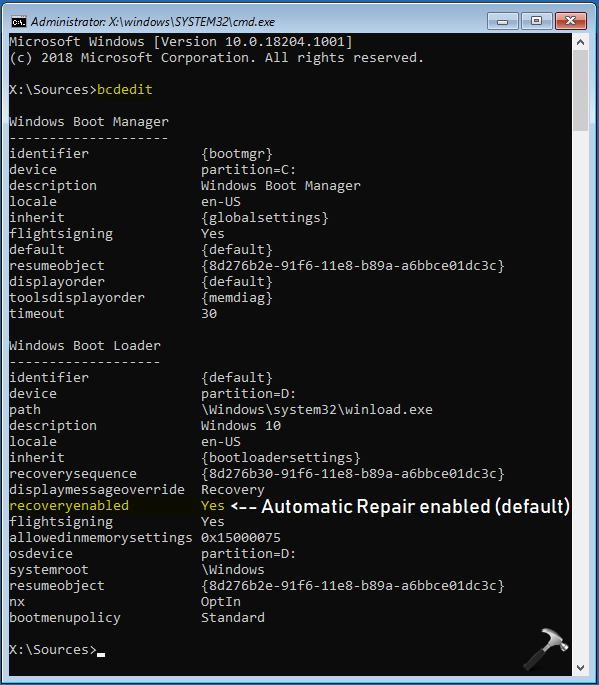
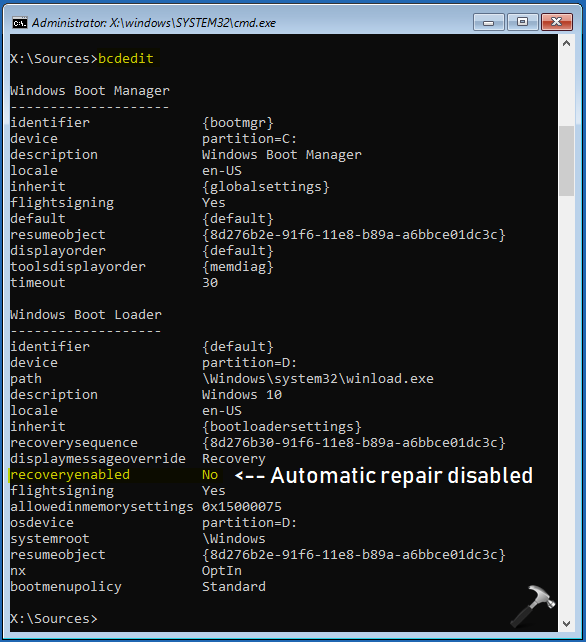
5. In Command Prompt window, type bcdedit command and press Enter key. Now from the boot loader information, look for description set to your Windows 10 installation. Note the identifier value set in this information. It is usually set to {default} or {current}.
Also notice recoveryenabled section value, which is set to Yes by default and it implies that automatic repair on multiple crashes is enabled.
6. Then type bcdedit /set {identifier} recoveryenabled No and press Enter key to disable automatic repair on multiple crashes at boot. Make sure you substitute the correct {identifier} value, you obtained in previous step.
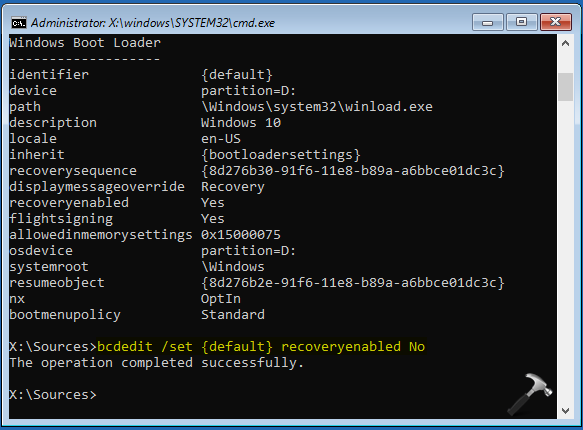
Now if you execute bcdedit command, you’ll see that recoveryenabled is set to No, which means automatic repair at multiple crashes is disabled.
That’s it!


I don’t have a Windows recovery disk and everything seems to not work. I’ve tried this but it comes up with ” the specified command line is not valid” . It won’t enable me to put it into safe mode or anytime like that either.
^^ You must download the Windows 10 ISO and make bootable USB to follow the steps.
Good morning Kapil,
I am using a lenovo X200 and had to reset my PC 3 times in last 5 months. I am always getting into automatic repair mode. Did a chdsk and sfc scannow and the CBS log shows a error as follows :-
000049ad Error: Overlap: Duplicate ownership for directory \??\C:\Windows\Servicing in component Microsoft-Windows-ServicingStack
I am trying to find the problem that caused previous OS failures. Any insights would be really helpful
^^ Clean install may help in your case. Good luck!
I am nagendra in my pc name is hp ,Windows then morning I am switch on my system it shows diagnosing your pc ,and not start what we do now ,how to disable this issue,can you answer me please
^^ Try repairing boot records: https://www.kapilarya.com/fix-windows-10-master-boot-record-corrupted.