In Windows, you can enable disk write caching to improve system performance. When Windows caches data, it usually retrieve it from some area of the Random Access Memory (RAM) instead of physical disk. Utilizing this concept, the disk works rapidly and because it has to often access data from RAM and thus it makes applications to work even faster.
But there are some drawbacks of this concept as well. As the data read operations are performed from RAM and not from the physical disk, there may be chances of data loss on power or equipment failure. However, this doesn’t happen regularly with modern computing devices. But you should take care about these things in advance. Either of the power/equipment failure may also lead to data corruption. Hence a backup of data is always recommended.
You can try below mentioned steps to enable disk write caching in Windows.
Page Contents
How To Enable Disk Write Caching Policy In Windows 10
1. Press  + R to open Run and type
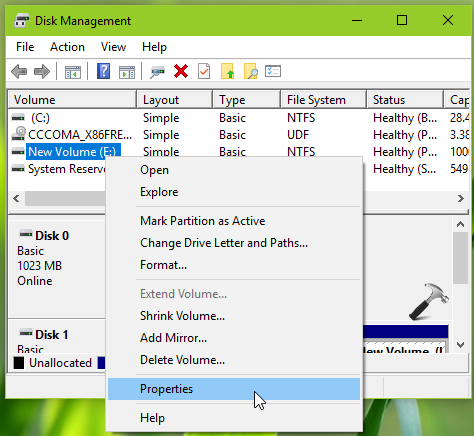
 diskmgmt.msc in it to open Disk Management. Click OK or press Enter.

2. In Disk Management window, right click on the disk volume on which you want to enable write caching and select Properties.
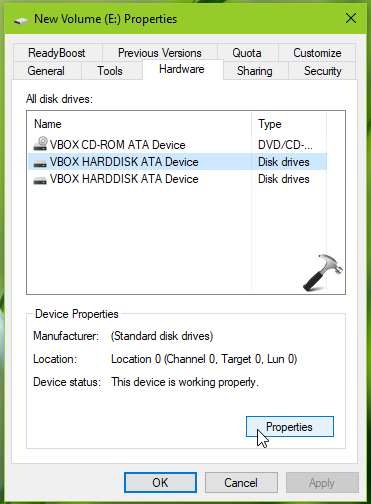
3. Next, on the property sheet, switch to Hardware tab. Under All disk drives, select the disk for which you want to enable write caching and click Properties.
4. Finally, on disk property sheet, check Enable write caching on the device option. Click OK.
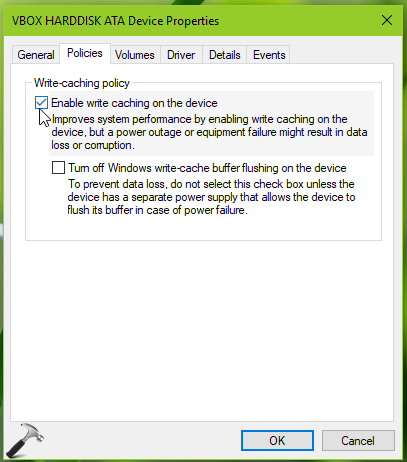
You must reboot your system to make these changes effective. So the write caching should be enabled on the disk immediately after restart.
That’s it!
You may also like:
1. How To Create Extended Partition In Windows 10
2. How To Extend C: Drive In Windows 10 Without Software
3. How To Convert Dynamic Disk Into Basic Disk In Windows 10/8/7