To manage a setting in Windows, you can modify its registry value. Sometimes, in Windows you can only manage a specific setting with registry, if its GUI option is not available. While at some cases, you may need to use registry manipulation to fix a problem. A registry entry can be easily modified using Registry Editor. However, if your work involves a lot of scripting and you ever need to modify registry using Windows PowerShell, this guide should help you.
In this article, we’ll see how to modify registry using two well known PowerShell cmdlets. The first cmdlet is New-Item while the second is Set-ItemProperty. You can use either of these cmdlets to modify an existing registry key or add a new registry value. I’ll show
So without wasting the time anymore, let us see how you can do this.
Page Contents
How to modify registry using Windows PowerShell
Method 1 – Modify registry using New-Item PowerShell cmdlet
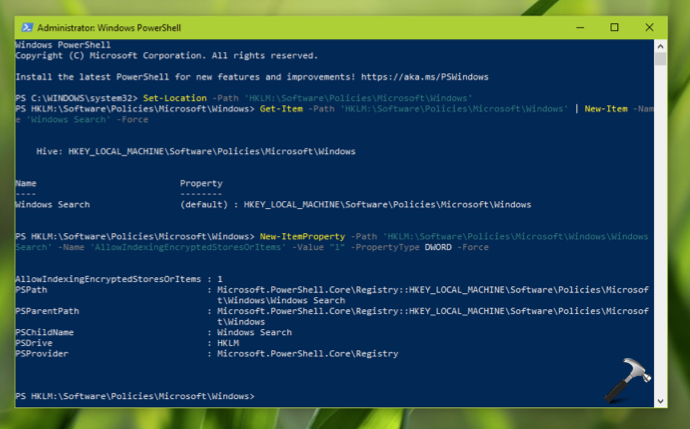
In this example, I’ll be creating AllowIndexingEncryptedStoresOrItems registry DWORD at HKEY_LOCAL_MACHINE\Software\Policies\Microsoft\Windows\Windows Search and set it to 1. Usually, this registry DWORD is created to allow Windows 10 to index encrypted files. The Windows Search registry key doesn’t exists by default. So I’ll be creating that first, and then I’ll create the registry DWORD and set it to 1. You can replace the registry key location and values in your case. Here are the steps involved.
1. Open Windows PowerShell (Admin).
2. Type following and press Enter key to go to registry location:
Set-Location -Path 'HKLM:\Software\Policies\Microsoft\Windows'
3. Then execute following cmdlet to create the new registry sub-key named Windows Search. I’m using -Force parameter here to override, if the registry items exists already.
Get-Item -Path 'HKLM:\Software\Policies\Microsoft\Windows' | New-Item -Name 'Windows Search' -Force
4. Now as the registry sub-key is created, I’ll now create registry DWORD and execute following code for this:
New-ItemProperty -Path 'HKLM:\Software\Policies\Microsoft\Windows\Windows Search' -Name 'AllowIndexingEncryptedStoresOrItems' -Value "1" -PropertyType DWORD -Force
Note: If you’re creating string, you have to use the -PropertyType as string.
5. You can execute pop-location to go back to normal PowerShell where you can execute other cmdlets.
Method 2 – Modify registry using Set-ItemProperty PowerShell cmdlet
For this example, I’ll be setting HideSCAVolume registry DWORD at HKEY_CURRENT_USER\Software\Microsoft\Windows\CurrentVersion\Policies to 0. Setting this DWORD to 0 restores Volume icon, if it is missing from taskbar. Here are the steps for this:
1. Open Windows PowerShell (Admin).
2. Then simply copy-paste this cmdlet to perform registry manipulation. Of course, you need to modify the registry location and value with your own, in below mentioned code.
Set-ItemProperty -Path HKCU:\Software\Microsoft\Windows\CurrentVersion\Policies\Explorer -Name HideSCAVolume -Value 0 -Force

With this method, you don’t need to execute pop-location to go back to normal PowerShell as the registry change is directly made here.
That’s it!
Read next: Deploy A Registry Key Using Group Policy