].")

If you do not want a disk partition or volume to appear in File Explorer or other places, you can remove drive letter for that. Also, if you’re getting low disk warning for a drive, you can remove its drive letter to suppress such warnings, if you don’t want to suppress same warnings for other drives. Removing the drive letter won’t delete the data on drive. Later, you can re-assign the drive letter, if you want to use that data. Once the drive letter is removed, the programs or apps will no longer able to recognise that volume. In this article, we will see step-by-step process to remove drive letter in Windows 10/Server/8.1/7 operating systems.
Before removing the drive letter from a volume, you must ensure that you have removed all the data available on that. In case you are explicitly hiding the volume due to privacy, you may let your data remain on that volume.
Here’s how to remove drive letter in Windows.
Page Contents
How to remove drive letter in Windows 10
Method 1 – Remove drive letter using Command Prompt
1. Open administrative Command Prompt.
2. In the Command Prompt window, type following commands one-by-one and press Enter key after each:
diskpart
list volume
select volume #
Replace # with volume/partition number, drive letter for which you want to remove.
remove letter=*
Replace * with drive letter you want to remove.
sel vol #, where # is the drive letter, directly after diskpart. Thanks to @tweet_alqamar for this tip.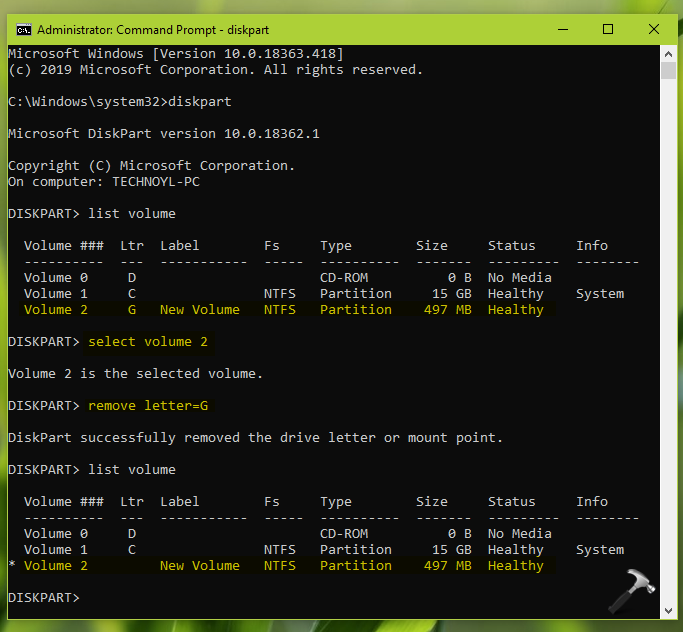
You can again confirm the removal of drive letter by running list volume command. After confirmation, you can close Command Prompt and return to your work.
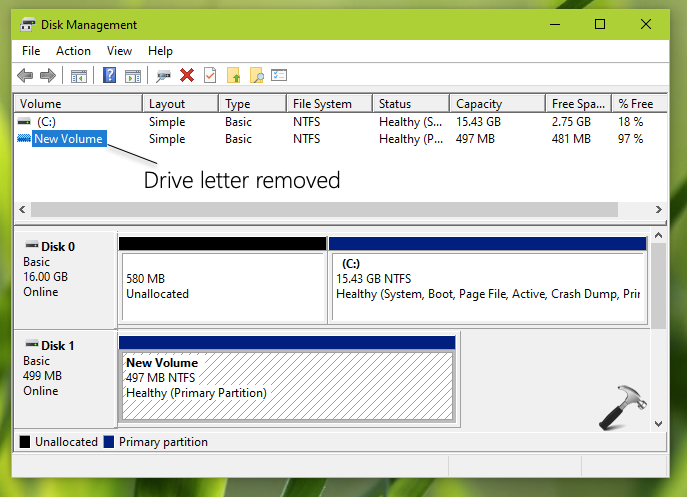
Method 2 – Remove drive letter via Disk Management snap-in
1. Press  + R to open Run and type
 diskmgmt.msc in it to open Disk Management. Click OK or press Enter.
2. In the Disk Management window, right click on the volume/partition for which you want to remove the drive letter and select Change Drive Letter and Paths.

3. Moving on, in Change Drive Letter and Paths, select the drive letter and click Remove.

4. In the confirmation prompt, select Yes.

In few moments, you’ll see the drive letter is now successfully removed.
That’s it!
Read next: How To Create Extended Partition In Windows 10.


![[Latest Windows 11 Update] What’s new in KB5036980?](https://www.kapilarya.com/assets/Windows11-Update.png "[Latest Windows 11 Update] What’s new in KB5036980?")
![[Latest Windows 10 Update] What’s new in KB5036979?](https://www.kapilarya.com/assets/Windows10-Update.png "[Latest Windows 10 Update] What’s new in KB5036979?")
")

Leave a Reply