
The mapped network drive could not be created is a familiar but infuriating issue that Windows users face when attempting to access network drives, Network Attached Storage (NAS) devices, or corporate servers. This error in Windows 11/10 can pop up whether you’re accessing shared files from home, connecting to a corporate network, or even just sharing folders between devices on your local network.
The error can present itself in various ways, including Access Denied, The system cannot find the path specified, or The share requires the obsolete SMB1 protocol.
So, this article explains all you need to know about this error, its variations and how to resolve it in 15 ways.
Page Contents
Fix The mapped network drive could not be created Errors
When you encounter the error The mapped network drive could not be created, it may not signify major system issues; just one aspect of the network connection has failed. By following a few troubleshooting tips and knowing what other variations of the error might happen, you’ll be able to fix this problem in under a minute and keep it from happening again. Now, let’s repair the issue.
Way 1: Ensure the Target Device Is Online and Accessible
Start with the basics. If the computer, network-attached storage (NAS) device, or server that is hosting the shared folder is not power on or connected to the network, Windows won’t be able to map it as a drive.
1. Firstly, make sure to turn on the host computer, NAS or server.
2. Ensure that the devices are connected to the same network.
3. Then, launch Command Prompt as Administrator.

4. Finally, run this command in it.
ping <PC Name>
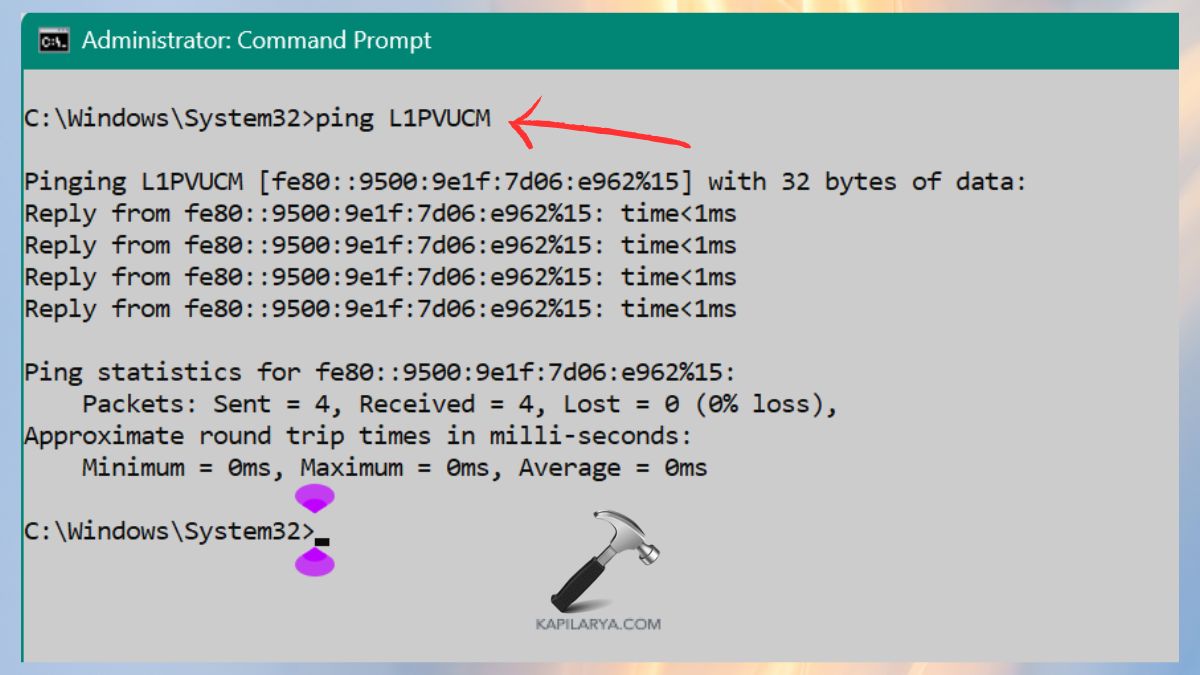
If it seems that the internet is not reliable, reboot the router. Or, if the PC is offline, nothing can be done to fix the problem until it’s back online.
Way 2: Verify Domain or Work Account Connection
On many corporate networks, mapped drives are connected using a domain/work account.
1. Click Settings > Accounts > Access work or school.

2. Ensure you are logged on to the right domain. Re-connect your account if necessary.
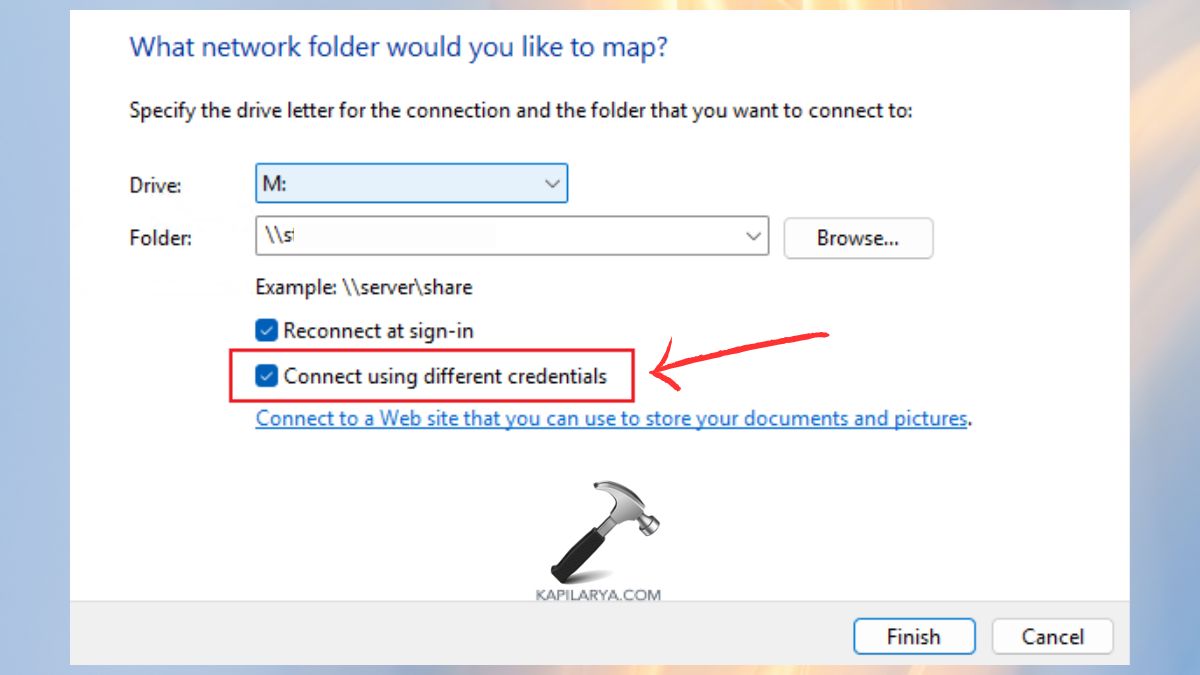
Way 3: Use Different Credentials While Mapping the Drive
Windows may automatically use stored password, which may be modified.
1. Open File Explorer, click on “This PC”.
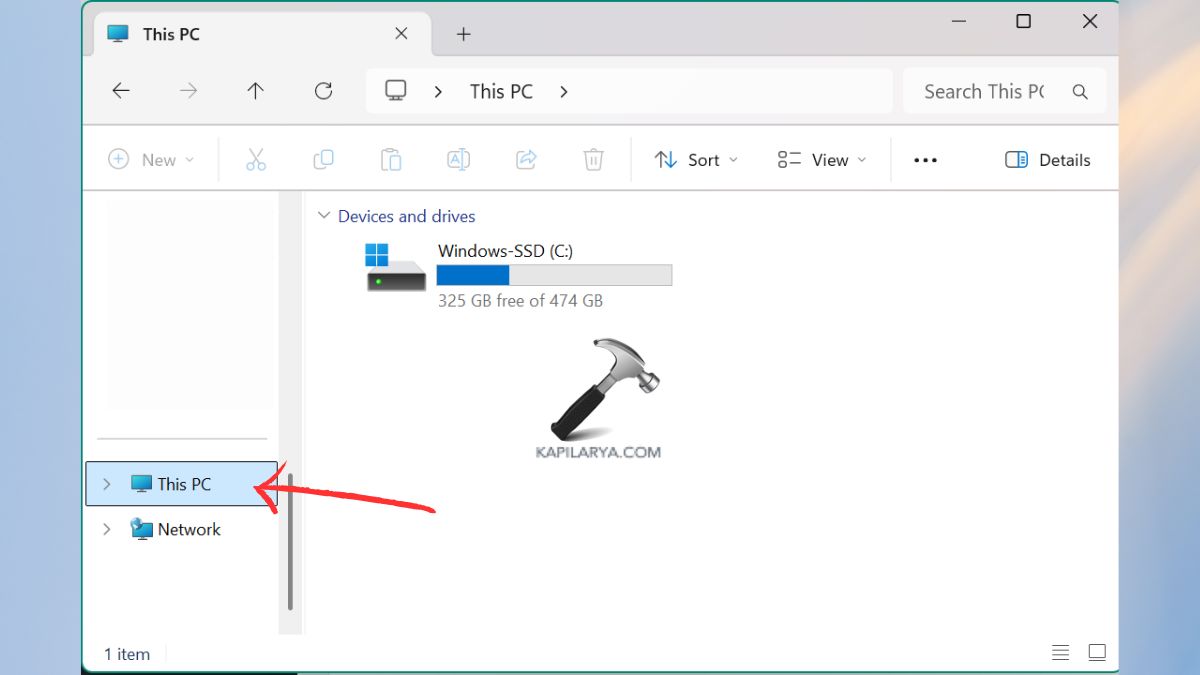
2. Click Map Network Drive.
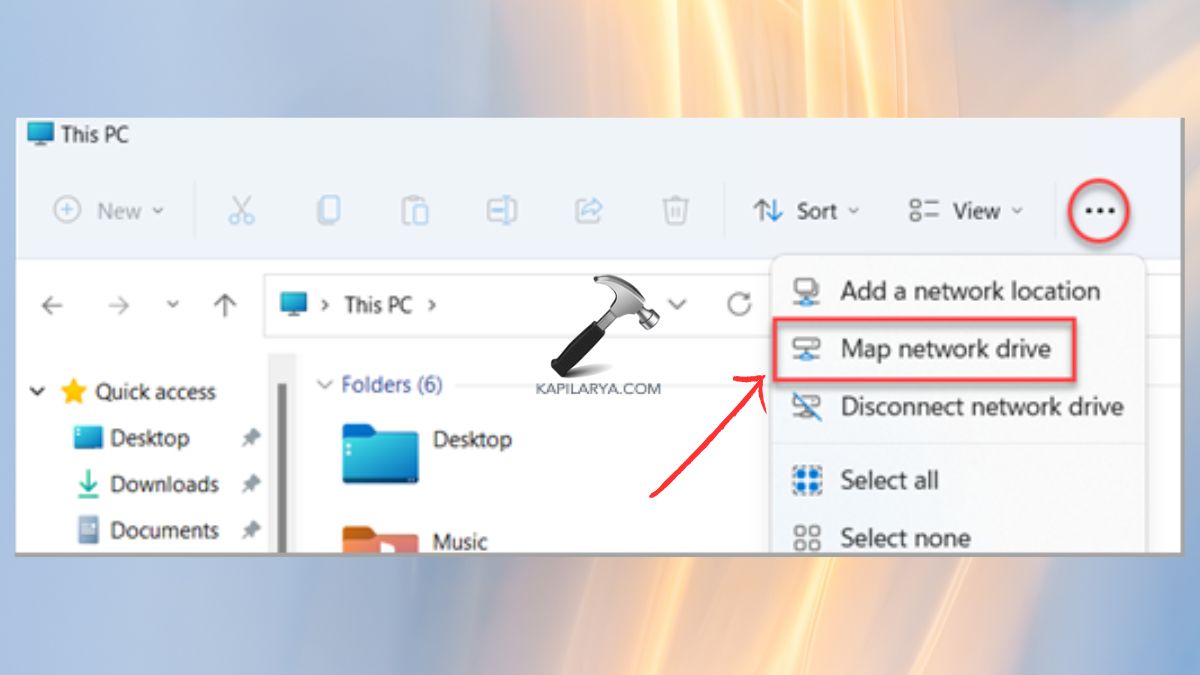
3. Enter the folder path. Select the option to connect using a different user name and password. Type in the username and password. This will cause Windows to use a new set of credentials.
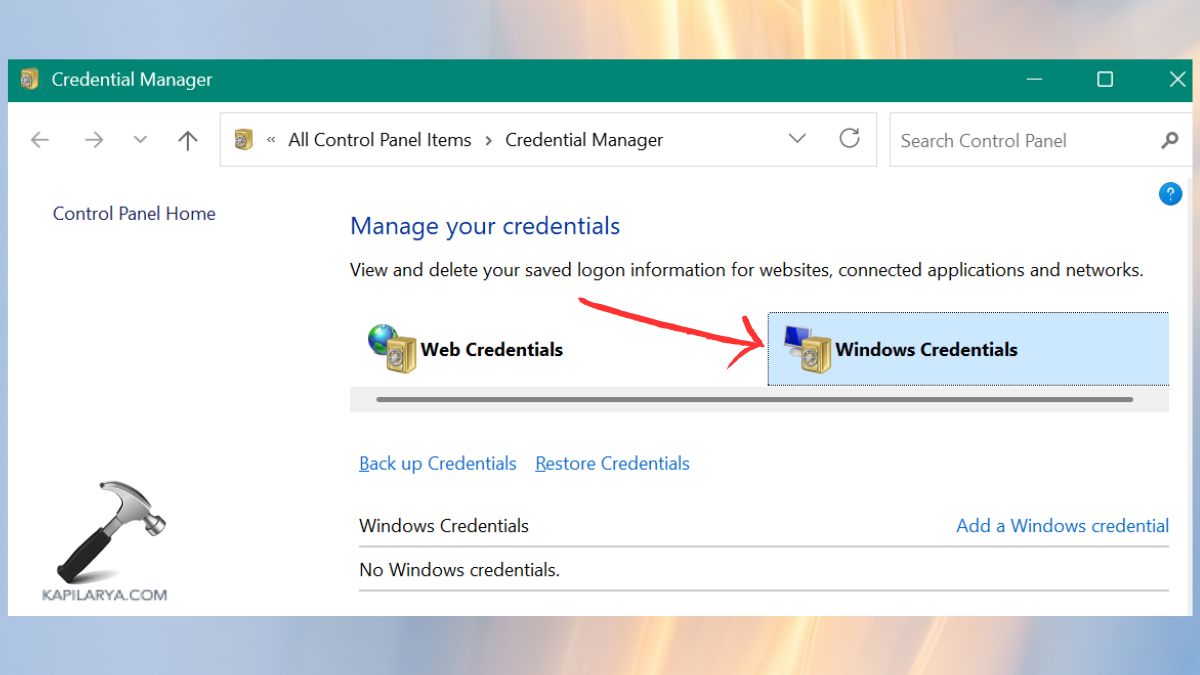
Way 4: Manage Stored Credentials in Credential Manager
Mapping failures are often a result of incorrect credentials.
1. Firstly, remove old credentials. Open Control Panel.
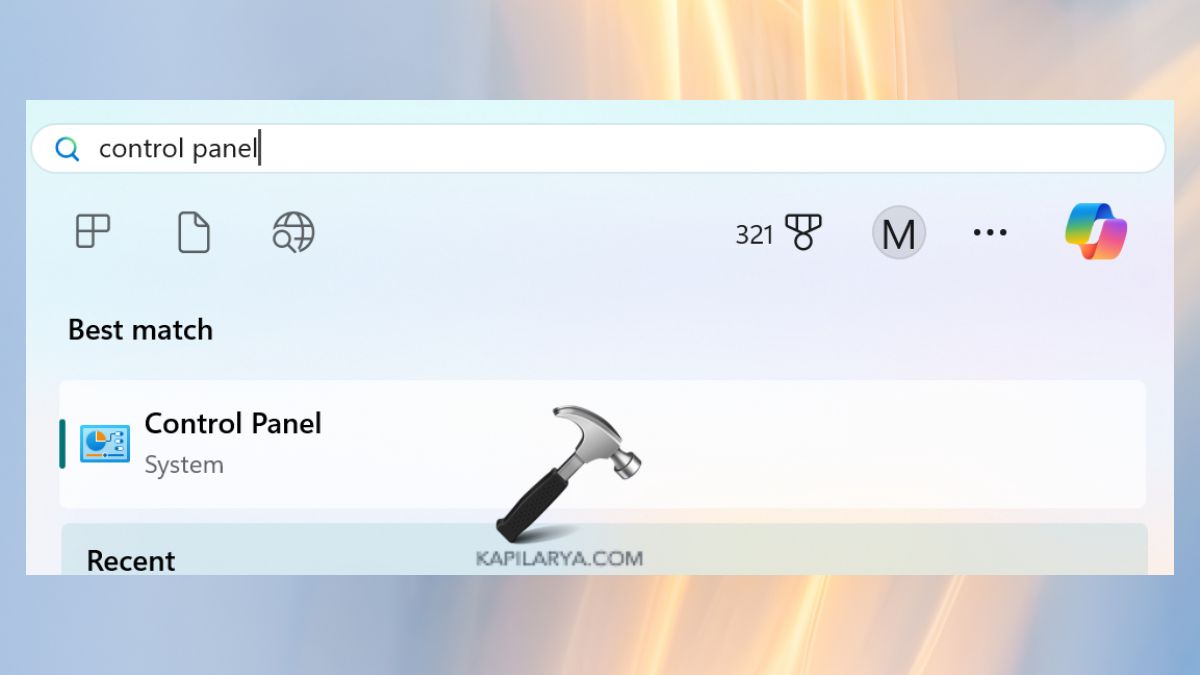
2. Click on Credential Manager.

3. Select Windows Credentials. Delete those associated with the network device.

4. Click “Add” a Windows Credential. Now, type in the server name and credentials.
Reboot your PC.
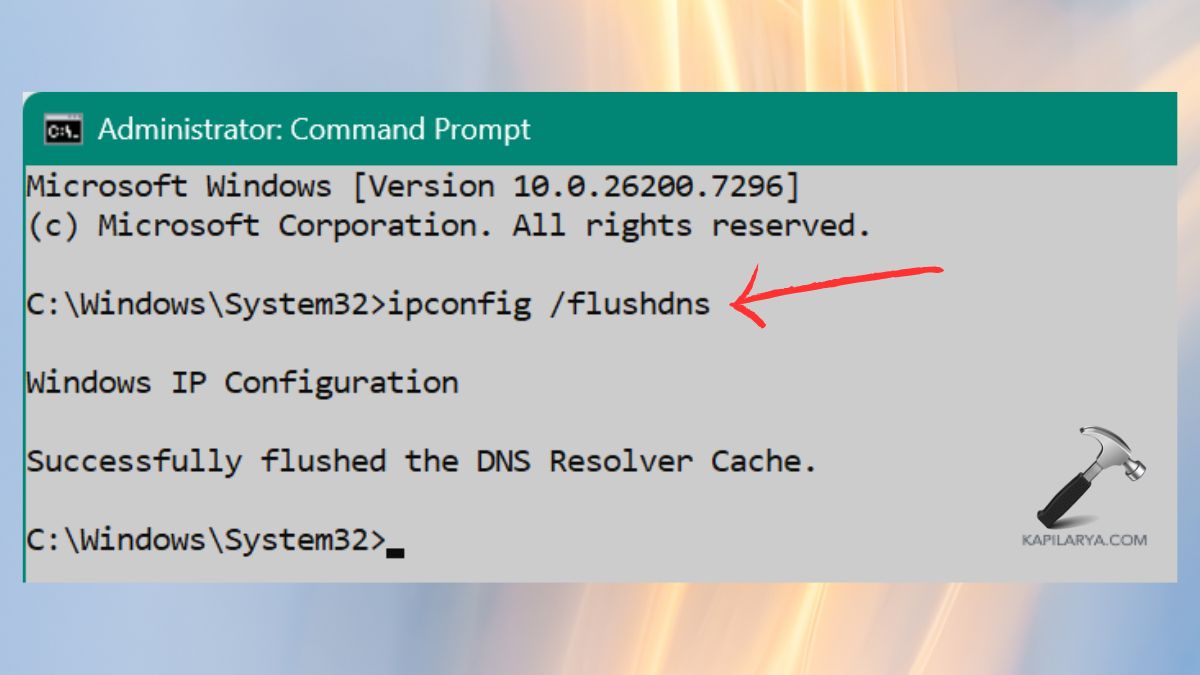
Way 5: Flush DNS Cache and Reset Winsock
Corruption of the network can lead to Windows not finding the share.
1. Open another Command Prompt (Admin) window.
2. Then, enter the following commands step by step.
ipconfig /flushdns
ipconfig /registerdns
netsh winsock reset
netsh int ip reset
Restart your PC afterwards.
Way 6: Check SMB Protocol Compatibility
A common cause for the mapped network drive could not be created error is the version of Server Message Block (SMB).
Here’s how you can check and fix:-
1. Open the settings of your NA/router and check the SMB settings.
2. Make sure to turn on SMBv2 or v3.
3. Ensure your NAS/router firmware is up-to-date. If you are connecting to an older system, check the version of SMB.
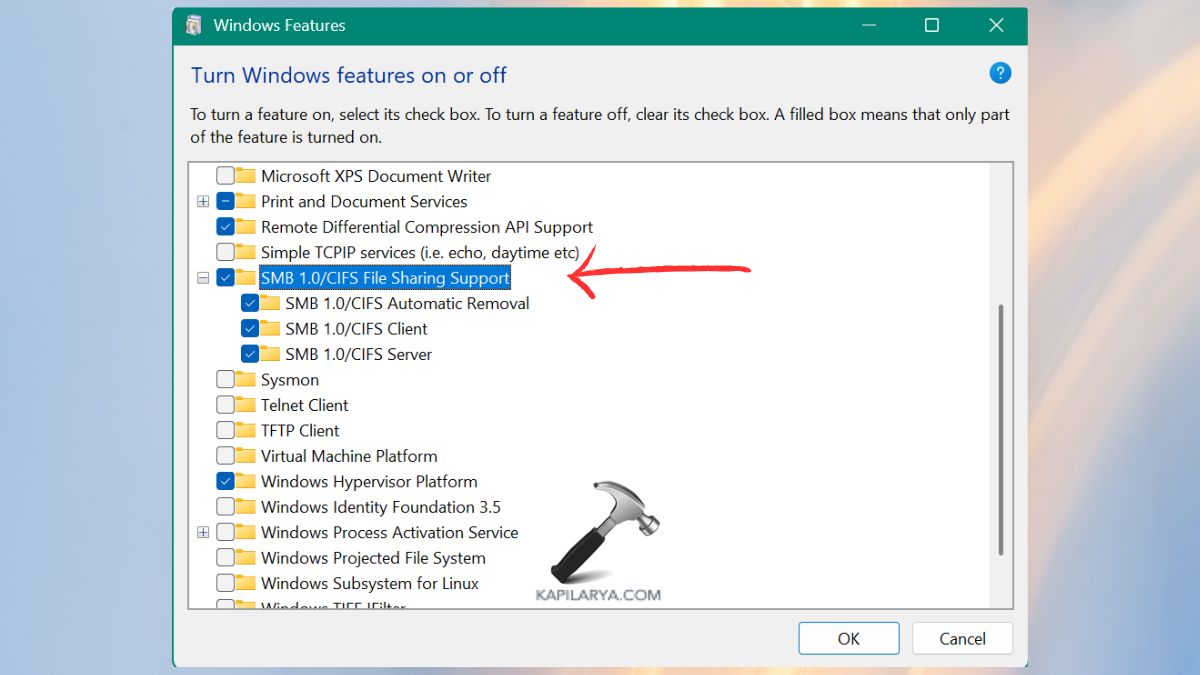
Way 7: Enable SMB 1.0 (Only If Necessary)
If you cannot upgrade the device, and you need to connect to an old system, enabling SMB1 will fix the problem – albeit temporarily.
Be aware: SMB1 is old and susceptible to a variety of attacks. Use it only as a last resort.
1. Hit the Windows key + S and type “Windows Features”. Click and open “Turn Windows features on or off”.

2. Scroll down to check SMB 1.0/CIFS File Sharing Support. Click OK and restart your computer. Now remap the drive and see if it works.
Way 8: Resolve Duplicate Computer Name Conflicts
If two computers on a network are with the same name, Windows might not determine the right host, and display: “A duplicate name exists on the network”.
1. Open Settings > System > About.

2. Click Rename this PC. Just put a very simple name (don’t use PC, PC2 etc).
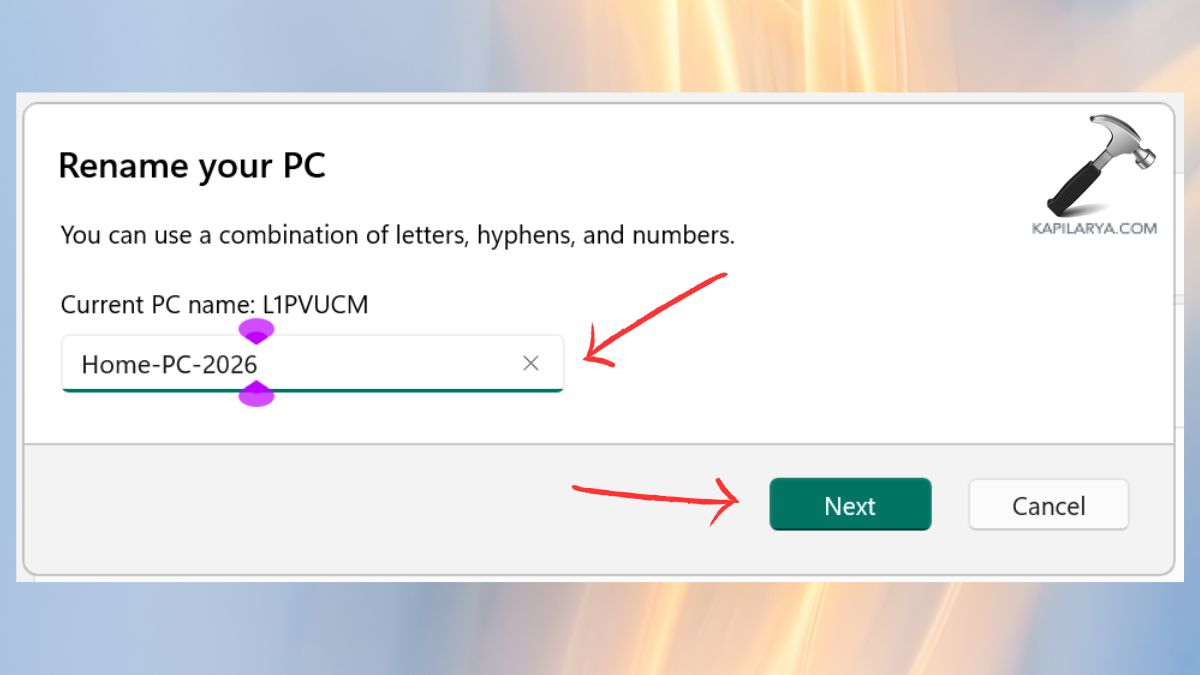
Restart your system.
Note: Be sure to check other computers in the network for naming conflicts.
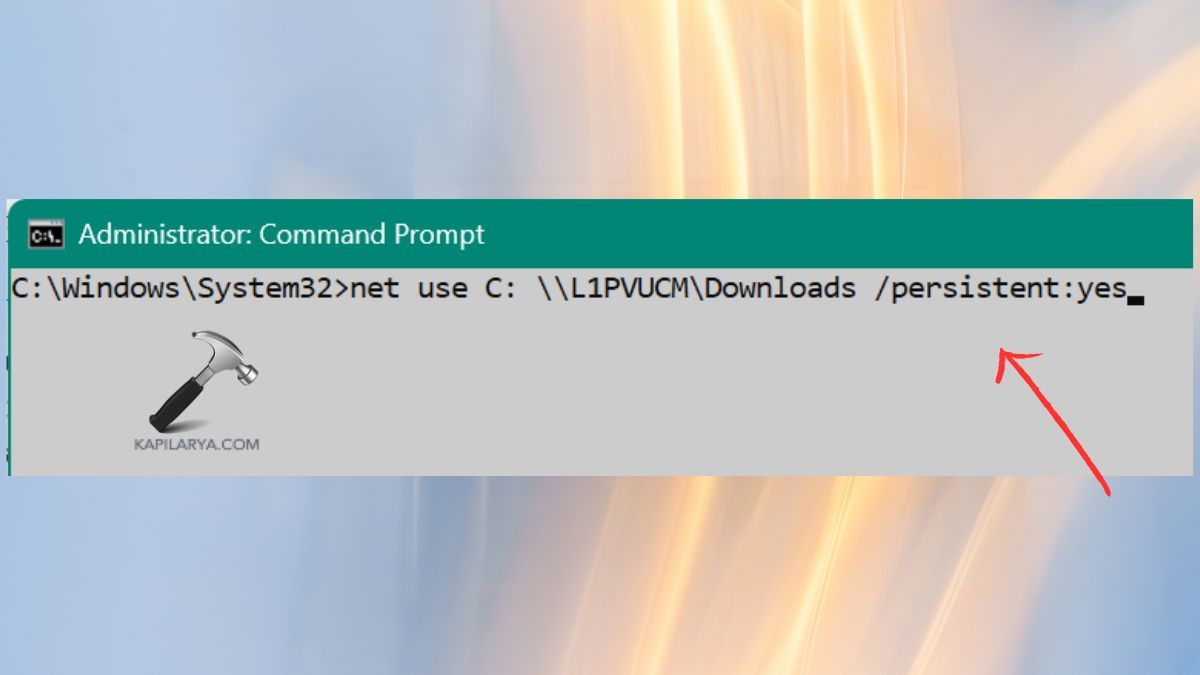
Way 9: Remap the Network Drive Using Command Prompt
On occasion, you can’t connect a drive using the Windows interface, but you can map the drive using the command prompt.
1. Launch Command Prompt (run as admin).
2. Run the command.
net use Z: \\servername\sharename /persistent:yes
Replace these:-
- “Z:” with your desired drive letter.
- “servername” with the device name or IP.
- “sharename” with the name of the folder you are sharing.
This way allows you to create a network drive directly without any UI error.
Way 10: Modify Registry Settings to Fix Authentication Errors
Some errors of network drive are due to the tight security of Windows. In this case, modify the registry.
1. Press Win, open Registry Editor.

2. Navigate to this path-
HKEY_LOCAL_MACHINE\SYSTEM\CurrentControlSet\Services\LanmanWorkstation\Parameters
New > DWORD (32-bit) Value.
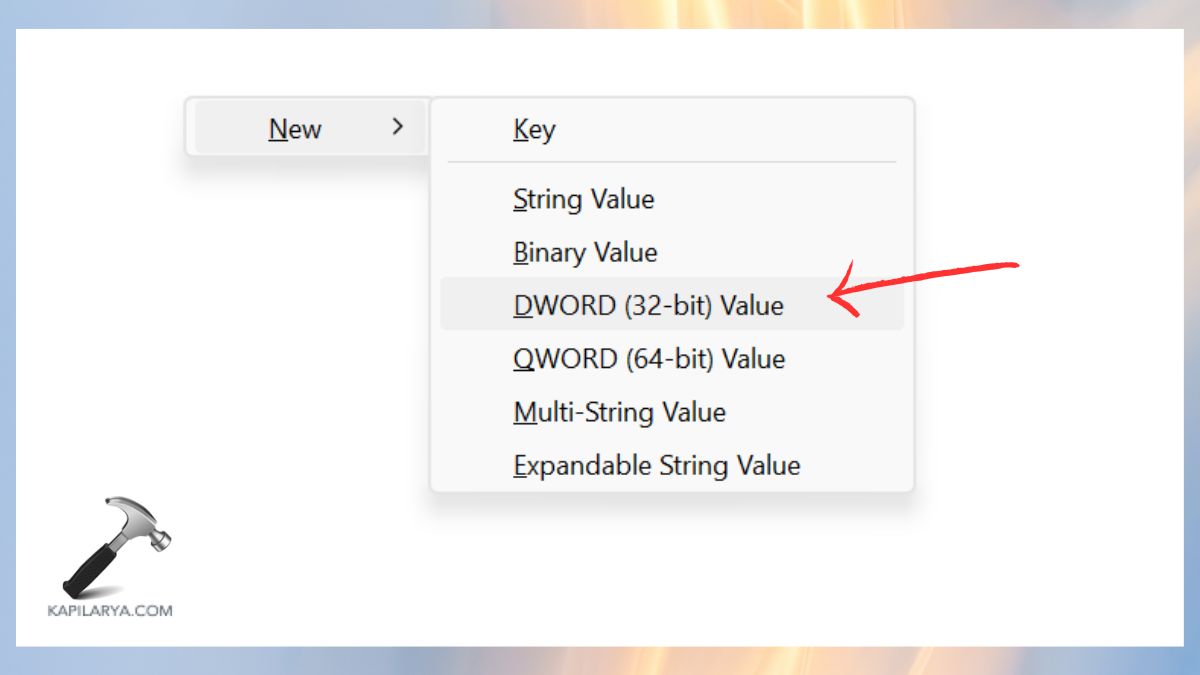
3. Name it “AllowInsecureGuestAuth”. Double-click and change the value to 1.
Restart the computer.
Note: This only works on trusted networks and will allow guest access.
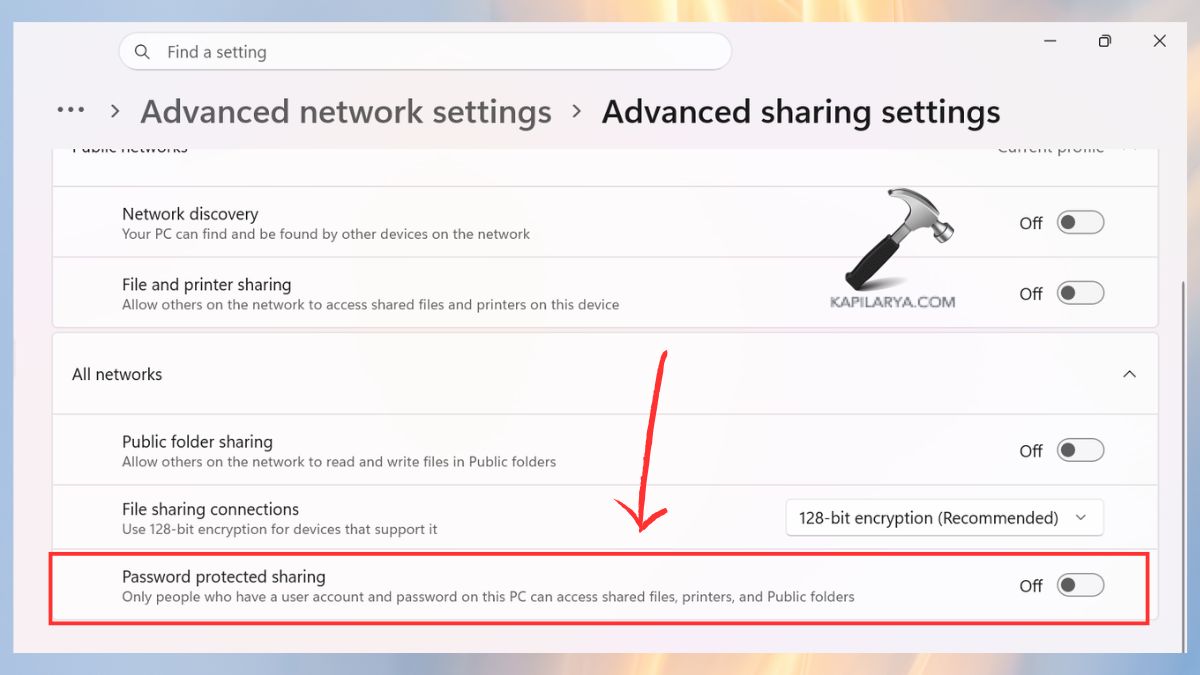
Way 11: Turn Off Password-Protected Sharing
If you have password-protected sharing enabled and have entered the wrong credentials, you can’t access the share. Here’s how you can turn it off.
1. Open Control Panel. Then, click on Network and Sharing Center.

2. Click on Change advanced sharing settings.
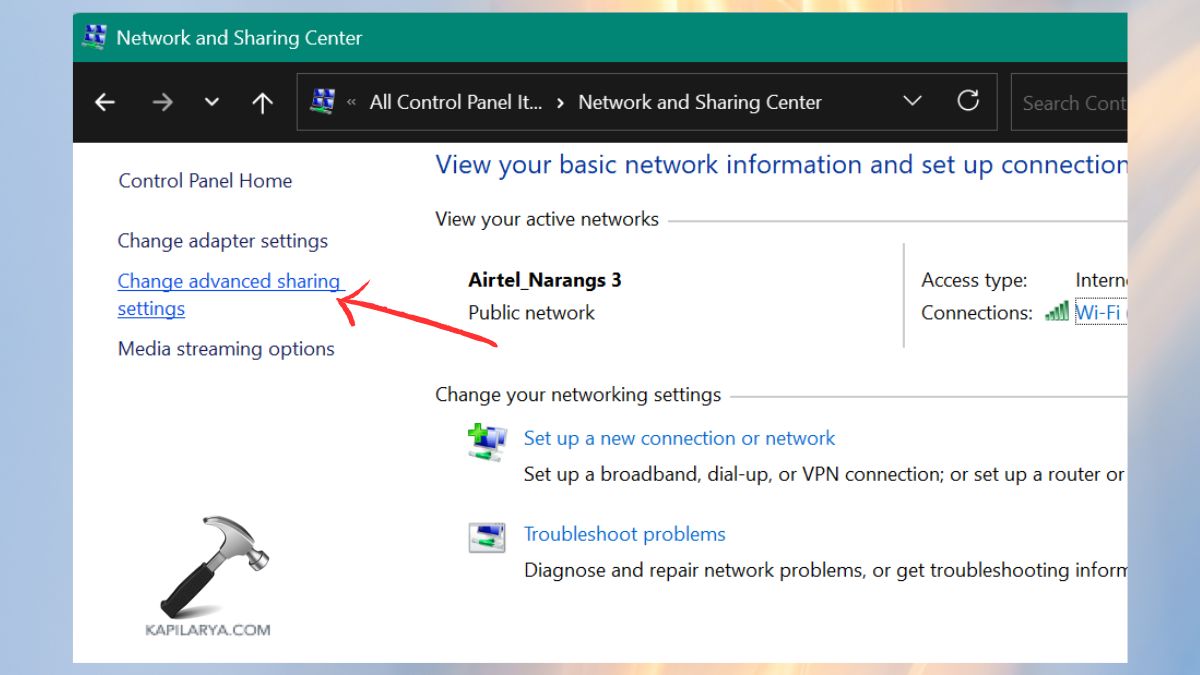
3. Expand All Networks. Now, clear Password protected sharing. Click Save changes.
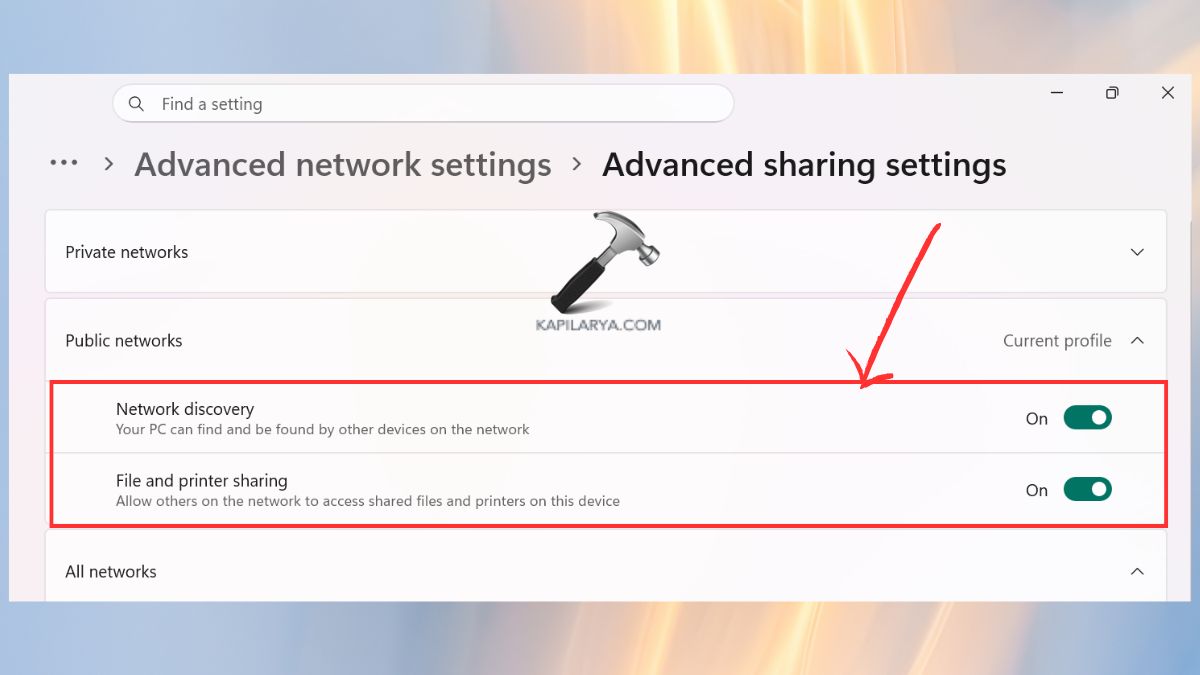
Way 12: Configure Network Discovery and File Sharing Settings
If your computer doesn’t see other computers on the network, you can’t map a network drive. You need to turn on some features.
1. Go to Network and Sharing Center in Control Panel.
2. Tap on Change advanced sharing settings.
3. Click on these and Save changes. Notably, these settings enable your computer to find and connect to these resources.
- Network Discovery
- File and Printer Sharing
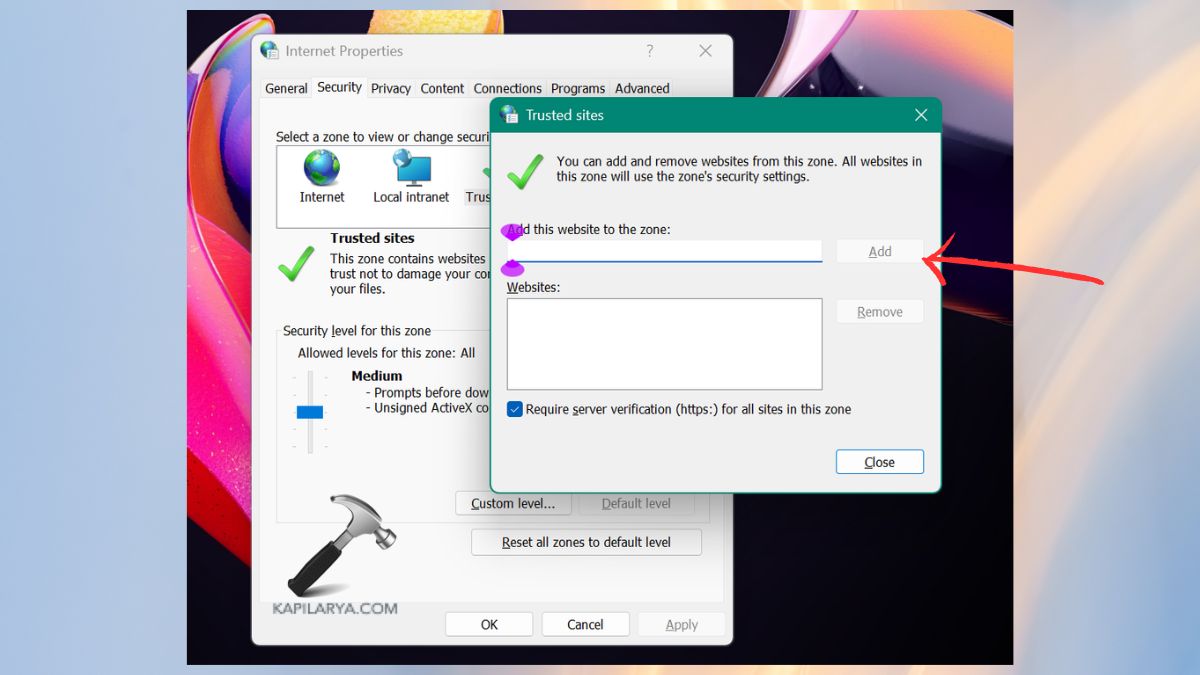
Way 13: Add Network Location or SharePoint URL to Trusted Sites
Windows may not allow you to connect to SharePoint or web drives.
1. Open Internet Options.
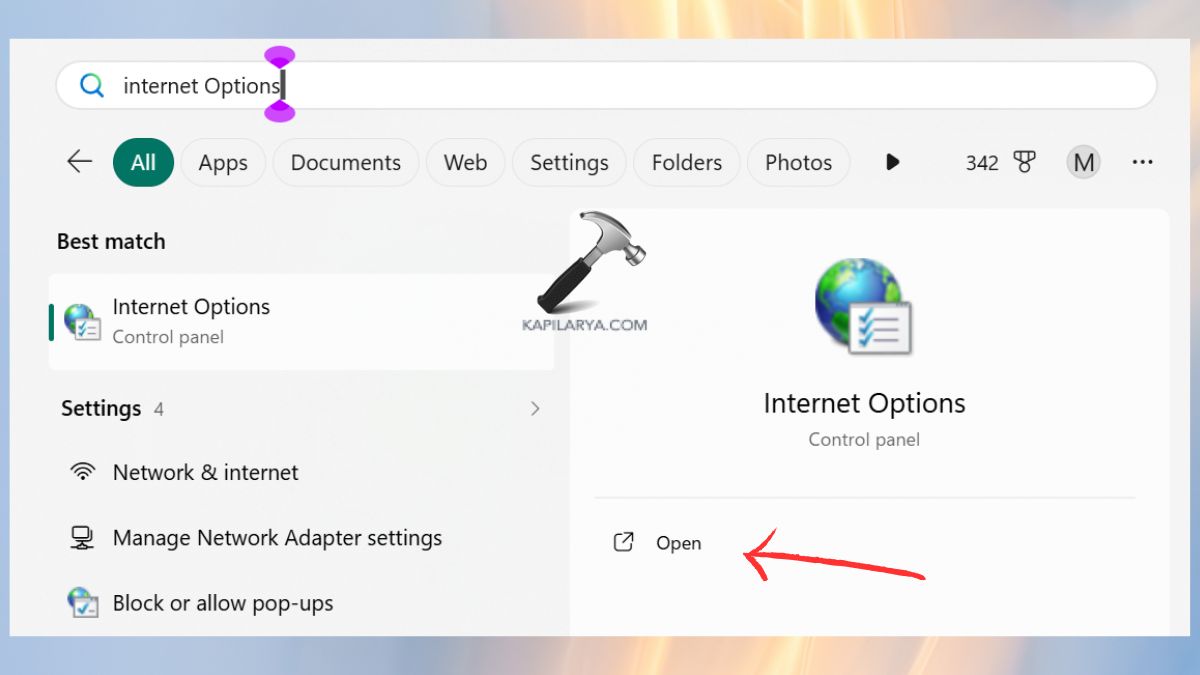
2. Here, select the Security tab > Trusted Sites. Click Sites.
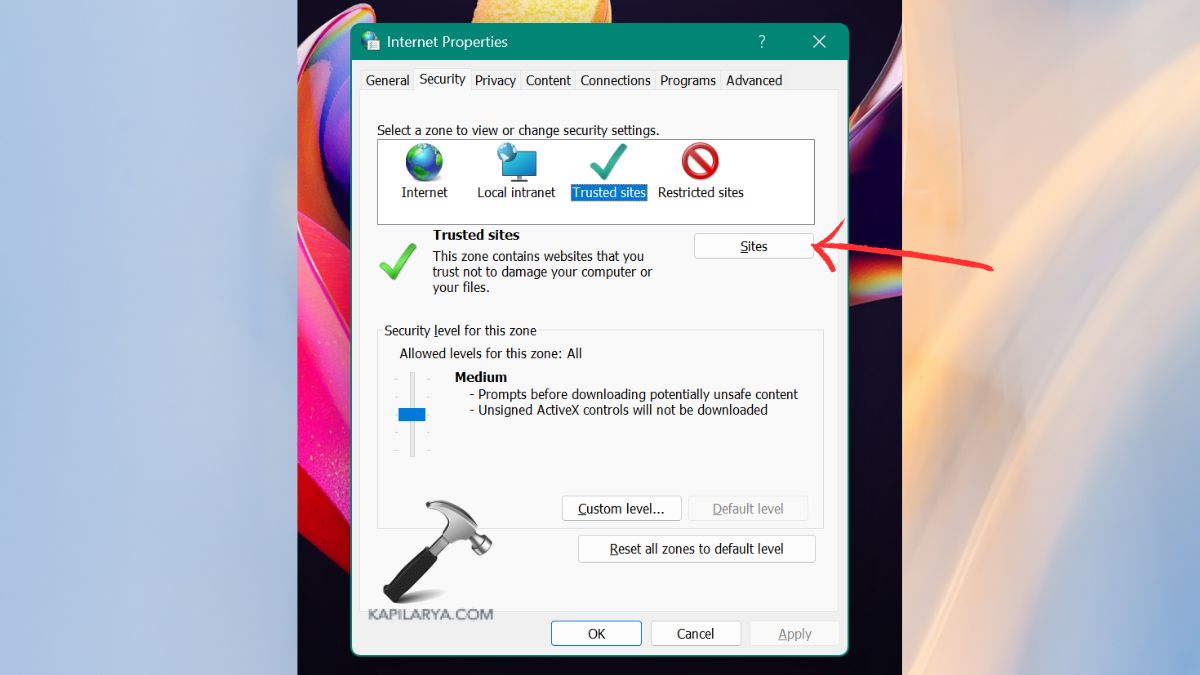
3. Type in the network URL or SharePoint link. Click Close > Apply > OK. This eliminates authentication and permission problems accessing web storage.
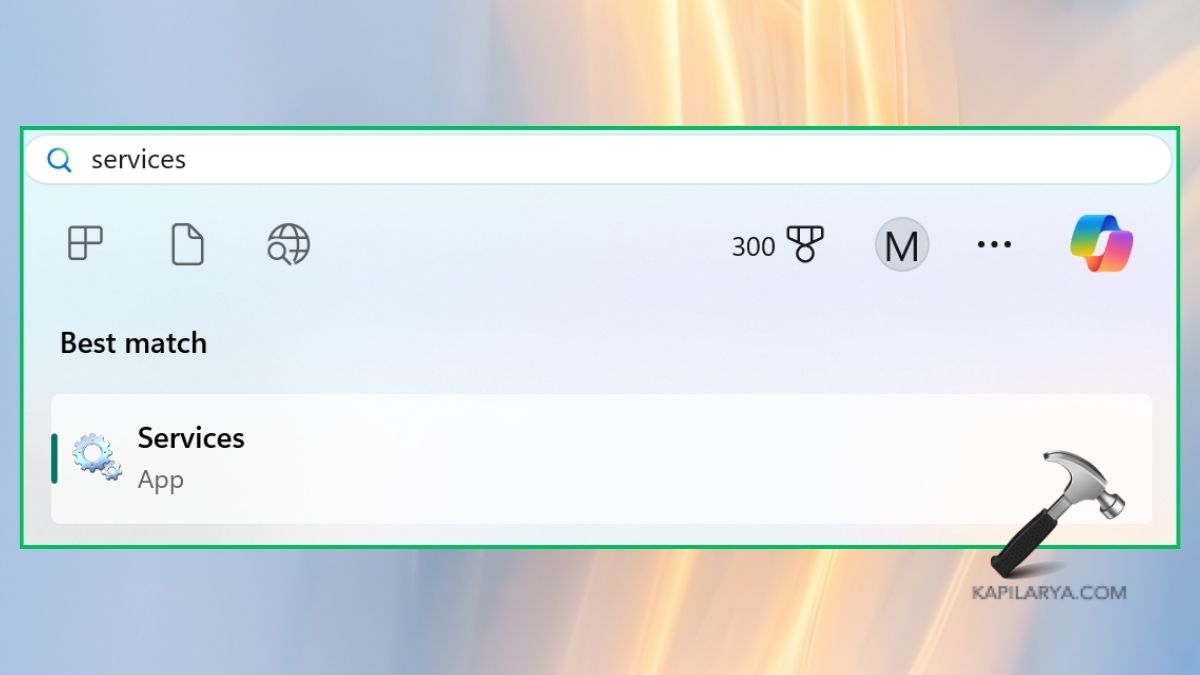
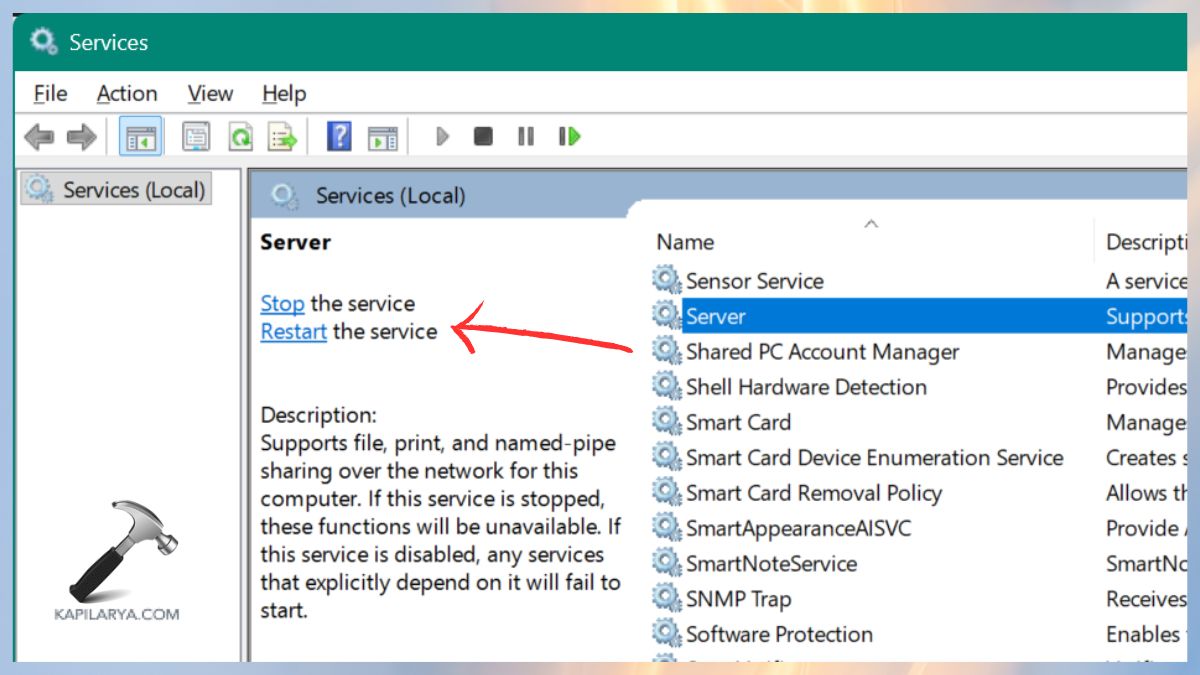
Way 14: Restart the Server Service
Windows has a Server service that enables sharing. Mapping may not work if it’s not running properly.
1. Click the Windows key, type and open the Services app.
2. Locate Server. Right-click > Restart. Also, you can restart your PC to restart all services.
Way 15: Enable Insecure Guest Logons
Older network-attached storage (NAS) devices might not support authentication, and present errors such as: “Your organization’s security policies block unauthenticated guest access”. You need to enable via Group Policy.
1. Press Win + R, and enter this to open the Group Policy Editor.
gpedit.msc

2. Browse to this location:-
Computer Configuration > Administrative Templates > Network > Lanman Workstation
Click “Enable insecure guest logons”. Set it to Enabled. Click Apply > OK.
Restart your system.
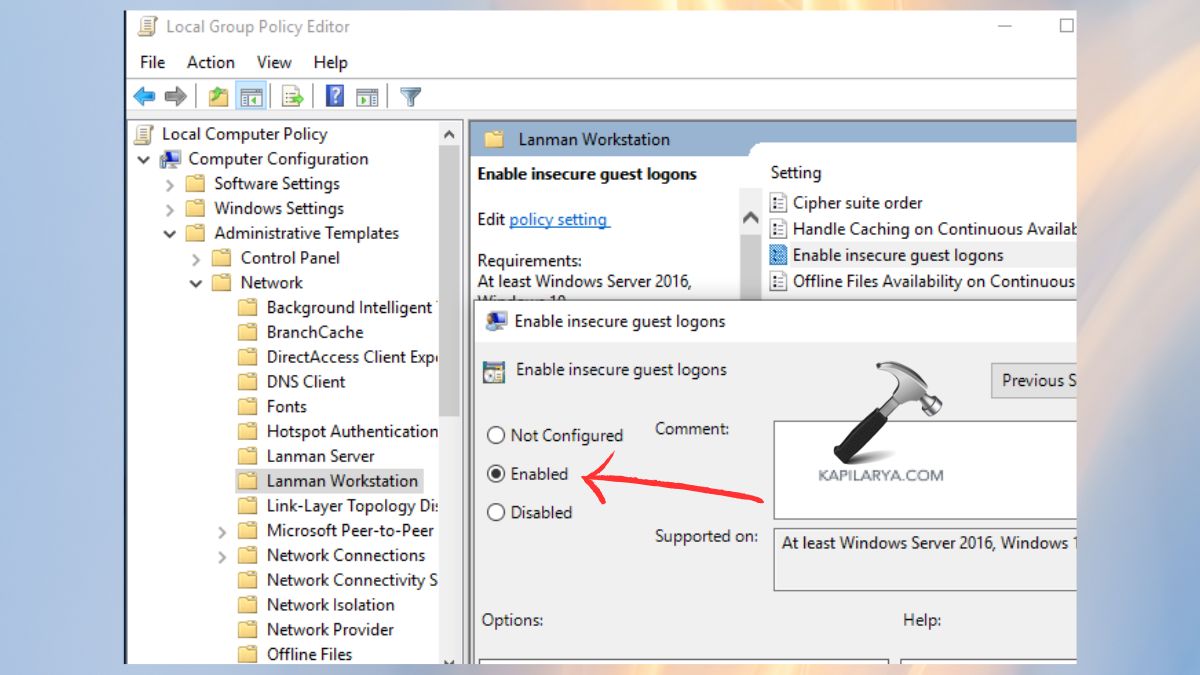
Security Note: This should only be used on secure networks as it may make the system less secure.
Common Variations of The Mapped Network Drive Could Not Be Created Error
Every time Windows displays the error message “The mapped network drive could not be created”, there’s typically a sub-error message that can be used to narrow down the problem. Here’s a comprehensive explanation of all the variations of the error and what they really mean:-
A device attached to the system is not functioning (Hardware/Connectivity Issue)
This error occurs when the operating system cannot access the computer or device that has the shared drive. This may be a network-attached storage device, another computer, a shared drive or a server. Hence, when this error message displays, it means that the operating system thinks the hardware has failed.
The share requires the obsolete SMB1 protocol
This message means that the network share is using the old SMBv1 protocol (SMBv1 is off by default in newer operating systems).
A duplicate name exists on the network
This network error occurs when two computers or devices on the network share a computer name. SMB and the Windows network discovery protocol, rely heavily on NetBIOS names, so when two or more devices on the same network have the same name, the system can’t figure out which device to map the drive from.
Access Denied (Permission/Authentication Problem)
This is probably the most common and vexing variation. This means your user account doesn’t have access to the shared folder.
An extended error has occurred
This message is not very specific but usually represents a network or Winsock issue. It means that Windows tried to map the drive, but there was a problem.
The specified network resource or device is no longer available
You might connect to the network resource, but the connection can’t be sustained. This usually means the resource is at the right location, but there are stability problems in the connection.
The specified server cannot perform the requested operation
This indicates the server is accessible, but does not have the necessary service or resources to respond. Mapping to the server won’t succeed if it cannot establish new SMB sessions.
We can’t sign you in with this credential
Network shares can be saved in Windows with credentials, but if they’re wrong, this message occurs. This variation happens when it attempts authentication but fails.
The system cannot find the path specified
This indicates Windows can’t access or resolve the network path. This variation is usually due to path problems, which are the easiest to solve.
A specified logon session does not exist
This occurs when Windows cannot authenticate. This variation can occur after installing upgrades.
Your organization’s security policies block unauthenticated guest access
Guest access is not recommended in Windows and domains. This error may occur if a shared resource is set for guest access.
The different variations in the error message The mapped network drive could not be created, give a clue to fix the problem. It could be any cause, but you can quickly narrow down the issue and skip the guesswork by reading the error message.
Frequently Asked Questions(FAQs)
Why is my mapped network drive not connecting?
Network drive mapping may be unsuccessful because of connection problems, incorrect user name and password, incorrect security permissions, a firewall blocking, or the network drive is not set to reconnect at login.
How to fix error 0x80070035: “The network path was not found”?
Make sure the computer is connected, enable network discovery, check sharing permissions, etc. For a detailed guide, follow this article on [FIX] The Network Path Was Not Found (0x80070035) In Windows 10.
How to create a mapped network drive?
If you want to map a network drive, read this article on how to map a network drive in Windows 11. Here’s how with a step-by-step guide and video tutorial.
Why won’t it let me map a network drive?
Mapping fails if sharing is disabled, permissions are not set, the path is incorrect, group policies are at play, there are conflicting credentials, or there are problems with the SMB protocol. Here, turning on sharing and checking permissions can solve the problem.
How to restore mapped drives?
Enable “Reconnect at sign-in” option, remove conflicting credentials, restart critical network services and update Windows. Thus, to prevent drives from disconnecting, add a startup script to reconnect them.
If you still face an issue with the error mapped network drive could not be created, do comment or reach out, and we will help you fix it.
That’s it!


![Stop sharing a folder in Windows 11 [Guide]](https://www.kapilarya.com/assets/Network-768x522.png)