

Usually, when you type a website name you want to visit in your browser, the DNS servers in background are responsible for translating that domain name into numeric IP addresses and finally leading you to the correct website. Without DNS server, it is not possible to surf web like we do everyday. In Windows 11/10, DNS servers are automatically set by the OS depending upon the network you connect to. Although, if you ever need change DNS server in Windows, this article is for you!

There are different possible methods to change DNS server in your Windows operating system. However, the most common methods are mentioned below in this article. You can try them as per your convenience.
Page Contents
How to change DNS server in Windows 11/10
Method 1: Using Network Adapter Properties
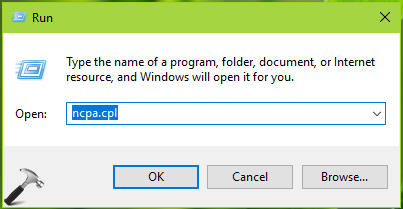
1. Press Windows + R to open Run, type ncpa.cpl and click OK.
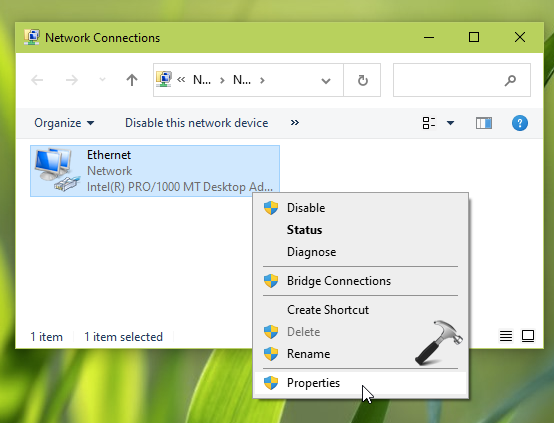
2. In the Network Connections window, select your currently active network adapter and right click on it, choose Properties.
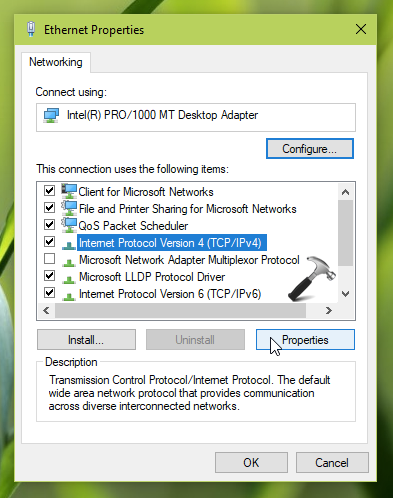
3. Next, on the property sheet, select Internet Protocol Version 4 (TCP/IPv4) option and then click Properties.
4. Finally, on the Internet Protocol Version 4 (TCP/IPv4) property sheet, choose Use the following DNS server address and type the DNS server address you want to change to in Preferred DNS server and Alternate DNS server sections. Three most common DNS server used worldwide are:
- Google Public DNS: 8.8.8.8 and 8.8.4.4
- Cloudflare: 1.1.1.1 and 1.0.0.1
- Cisco OpenDNS: 208.67.222.222 and 208.67.220.220
In this example, we’ve used Google DNS values. You’ve to check Validate settings on exit option and then click OK.
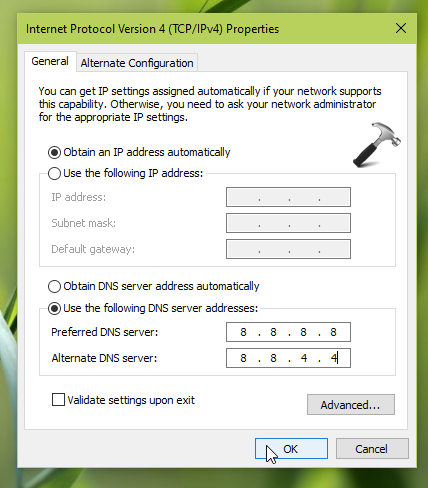
Your new DNS server address should now be used.
Method 2: Using Command Prompt
1. Open Command Prompt as administrator.
2. Now in the Command Prompt window, type following commands one-by-one and press Enter key after each:
netsh
interface show interface
interface ip set dns name="Ethernet" source="static" address="8.8.8.8"
* Make sure you replace Ethernet with your actual network adapter name in above command. When you run second command above, you’ll get network adapter name under Interface Name.
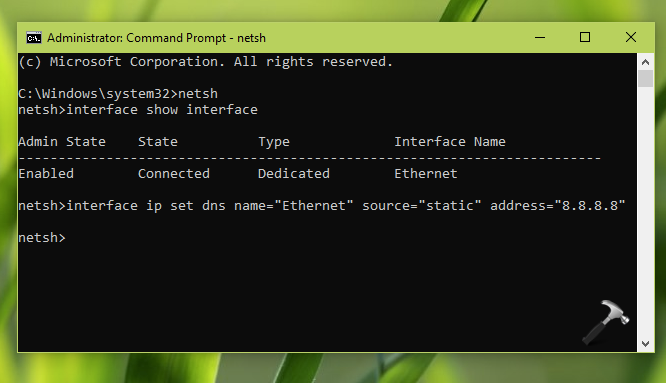
Once all commands executed successfully, your system DNS server should be changed and active now.
Method 3: Using Windows PowerShell
Try these steps to change DNS server using Windows PowerShell.
1. Open Windows PowerShell as administrator.
2. Type following cmdlet and press Enter:
Set-DnsClientServerAddress -InterfaceAlias Ethernet -ServerAddresses 8.8.8.8
In above command, you can change -InterfaceAlias with your primary network adapter name.
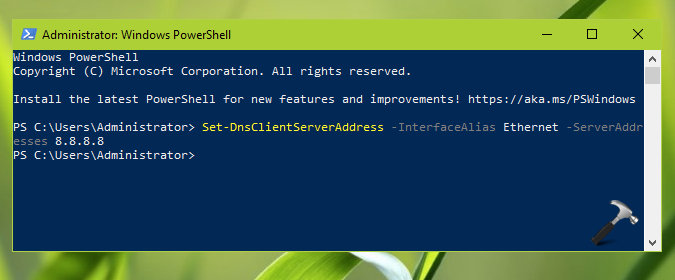
3. Once cmdlet execution is successfully, you new DNS server should be in effect now.
That’s it!
Read next: Configure secure DNS in Google Chrome.




![The mapped network drive could not be created [Detailed fix]](https://www.kapilarya.com/assets/Network-Drive-768x511.jpg)
