
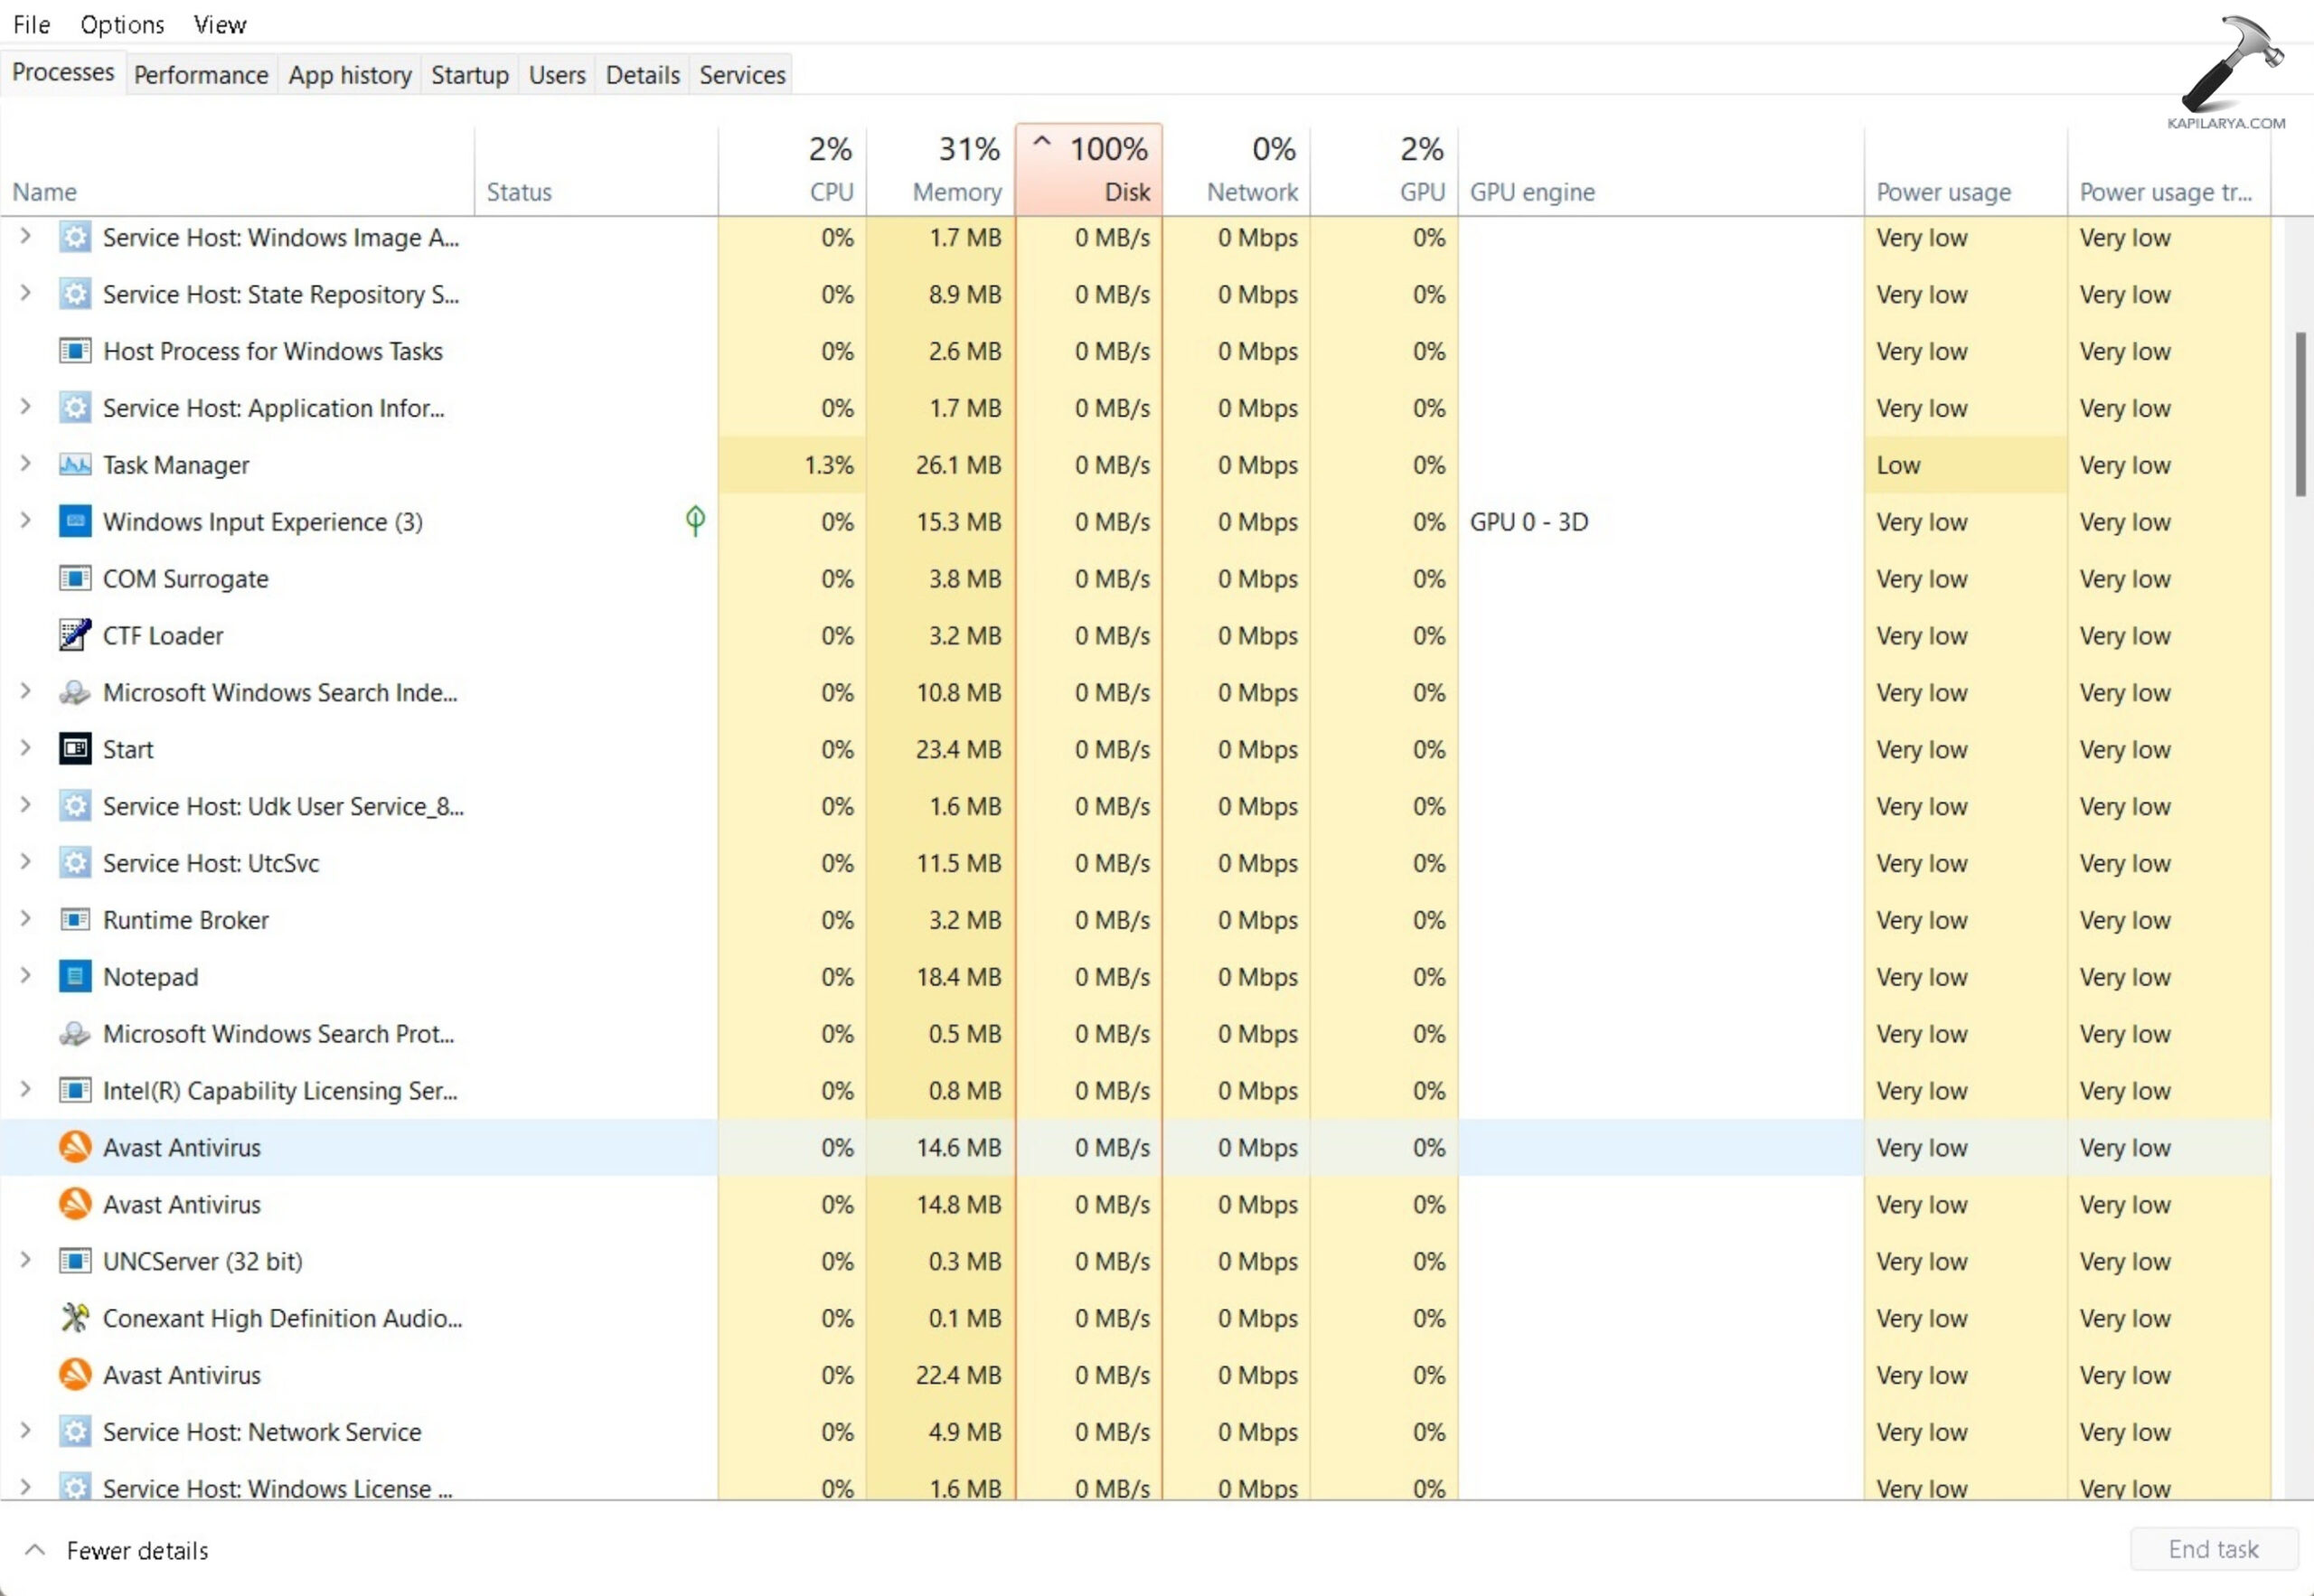
Sometimes, we get reports from users facing random spikes in Disk usage in Windows with 100% disk usage even when the PC is idle. If your drive has a high load like that, it doesn’t have spare cycles to perform routine operating system tasks. If you are experiencing this issue, then this tutorial will guide you to fix 100% disk usage in Windows 11.
Page Contents
Fix: 100% Disk Usage in Windows 11
Method 1: Disable Windows Search
Disabling the Windows Search may also affect files and folders search on your PC. If you don’t want to disable then go to the next solution. Follow the below steps to disable Windows Search:
1. Press the Windows Key + R. Type services.msc and click OK.
2. Find and double click on “Windows Search”. A prompt box will appear.

3. Under the startup type, select “Disabled”.
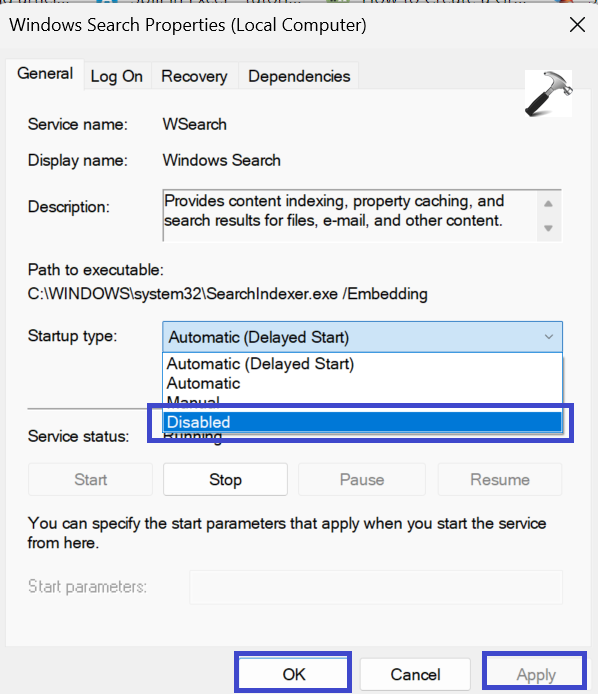
4. Click OK followed by Apply.
5. Close the Window and restart the PC to apply the settings.
Method 2: Disable MSI Mode
Microsoft reported that high disk usage actually stems from Advanced Host Controller Interface PCI-Express (AHCI PCIe) controllers that have firmware incompatibility.
If your PC is using the “StorAHCI.sys” driver, you are most likely affected by this issue. Microsoft further states that if Message Signaled Interrupt (MSI) mode is disabled, disk usage can be reduced drastically. Follow the below steps:
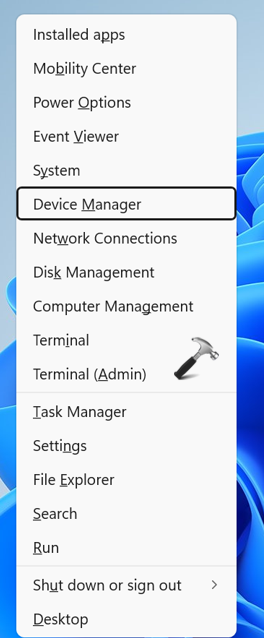
1. Press the Windows Key + X and select “Device manager”.
2. Now, expand “IDE ATA/ATAPI controllers” and select Properties.
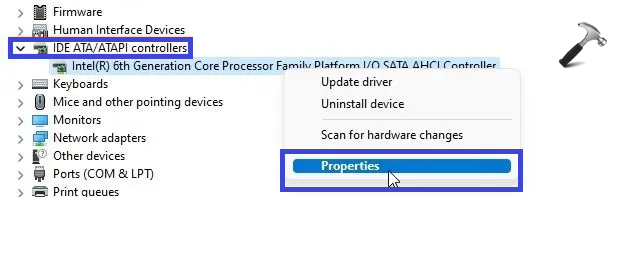
3. In Driver tab, click on “Driver Details”.
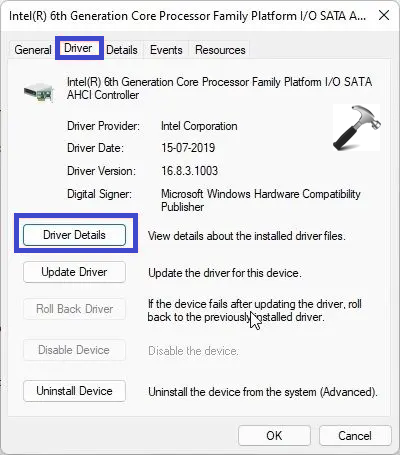
4. If you find “storAHCI.sys” path then only proceed to the next step.
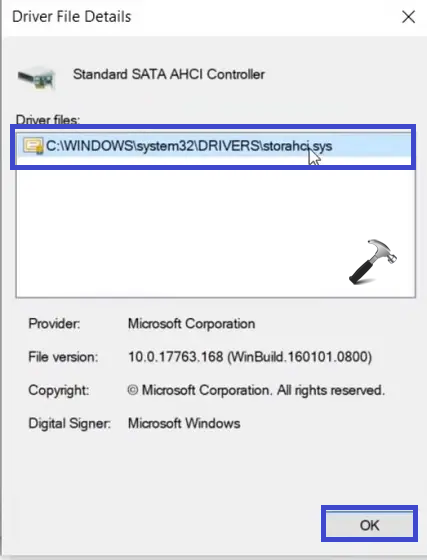
If different driver name appear, then don’t proceed to the next step. Follow the below steps:
1. Go to the Details tab and change the property to “Device instance path”.
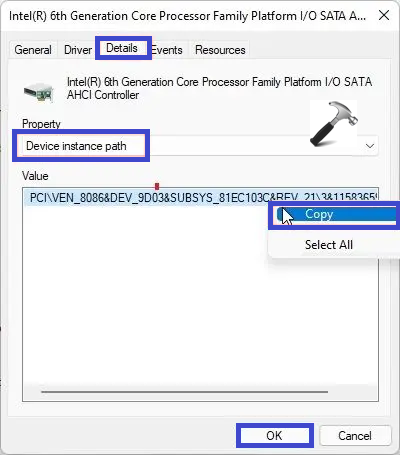
2. Copy the path and paste it in notepad as you will need it ahead.
3. Close the Device manager.
Press the Windows Key + R. Type regedit.exe to open the Registry Editor. Click OK.
4. Navigate the following path:
Computer\HKEY_LOCAL_MACHINE\SYSTEM\CurrentControlSet\Enum\PCI
5. Now, match the entry which you have in notepad. Afterwards, expand it.
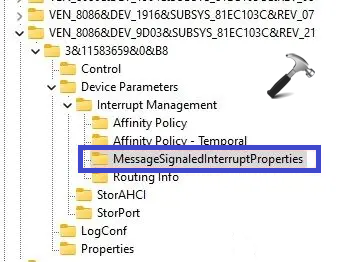
6. Move to Device parameters => Interrupt Management => MessageSignaledInterruptProperties.
7. In the right panel, double click on “MSISupported”.
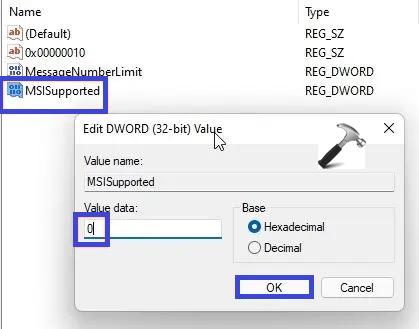
8. Set the value to 0.
9. Close the Registry Editor Window and restart your PC to apply the settings.
Method 3: Run Disk Check
Due to bad sectors or logical errors, the disk is unable to complete a given operation, and it continues to use the disk abnormally in an attempt to execute the action.
1. Open Command Prompt and select “Run as administrator”.
2. To perform a disk check, copy and paste the below command:
chkdsk /r c:
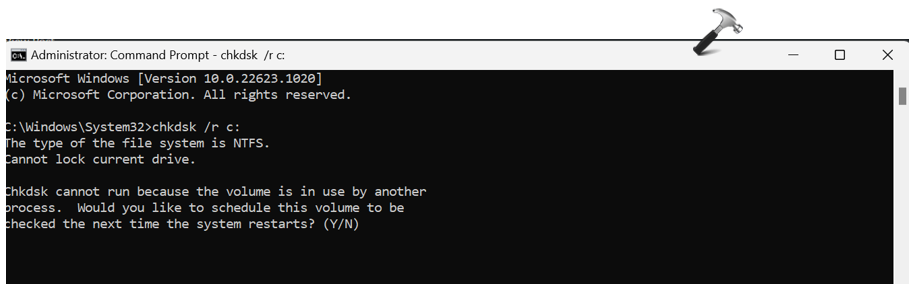
This will check all the bad sectors and logical error and will fix them along the way.
3. Type “Y” for yes. Hit Enter.
4. Close the Command Prompt Window and restart your PC.
Method 4: Disable Connected User Experience and Telemetry
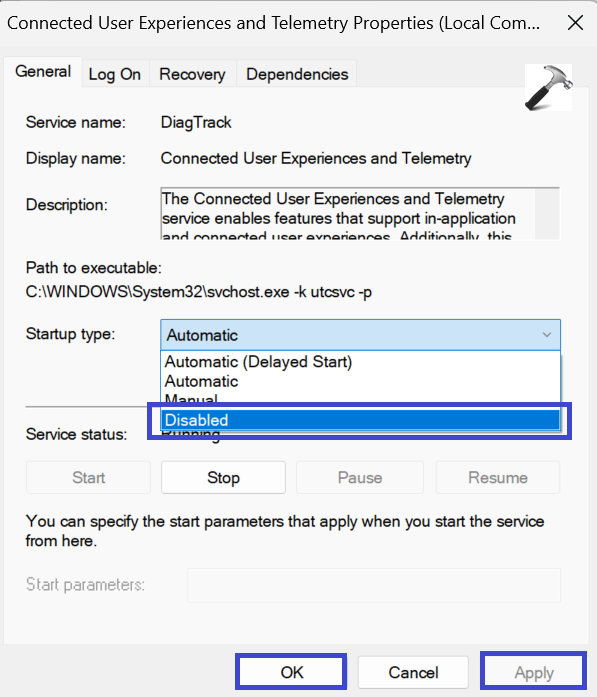
Connected User Experience and Telemetry is a service that runs under svchost.exe which is responsible for high disk usage in Windows 11.
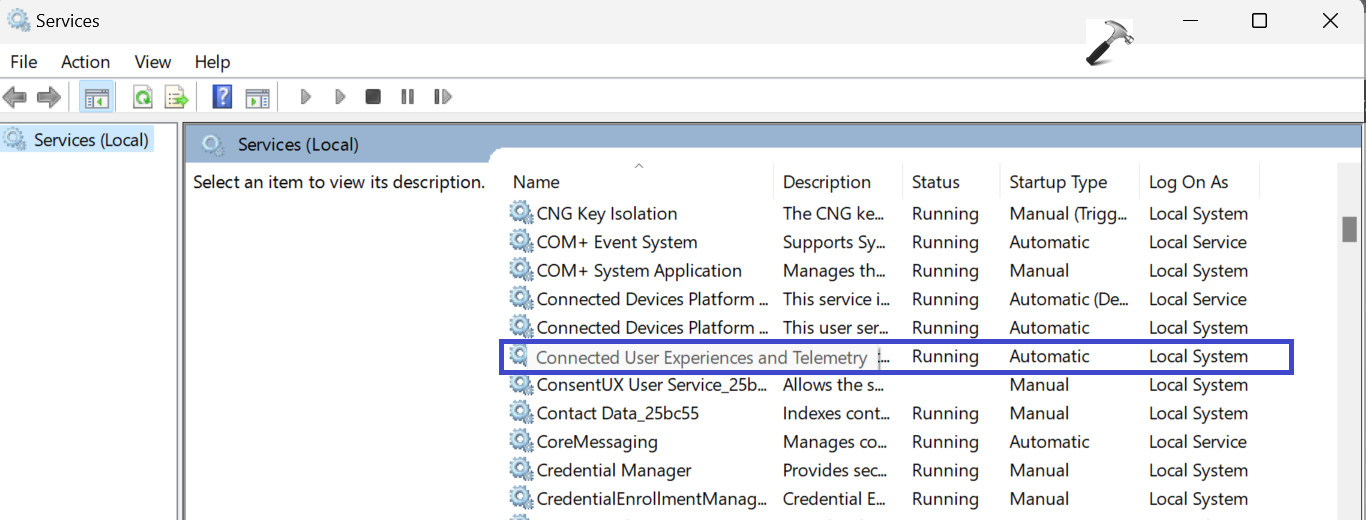
1. Press the Windows Key + R. Type services.msc and click OK.
2. Double click on “Connected User Experiences and Telemetry” and click on Properties.
3. Under Startup type, choose “Disabled” and click on “Stop”.
4. Also, double click on “Connected Devices Platform Service” and choose “Disabled”.
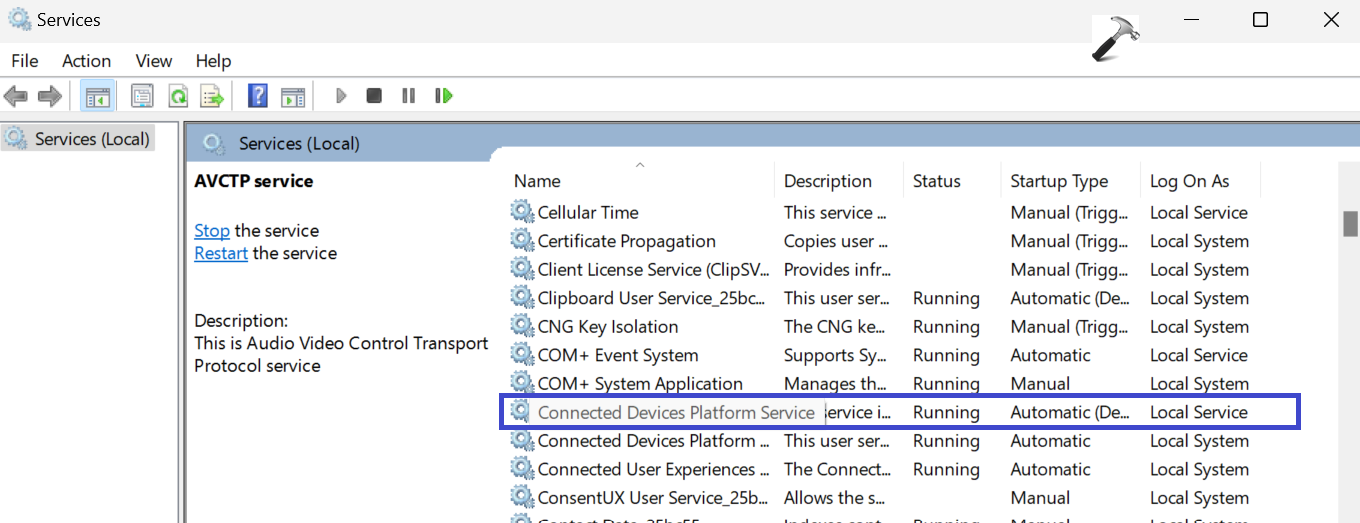
5. Click OK followed by Apply.
Method 5: Disable SysMain (Superfetch) Service
Sysmain is a service used by Windows 11/10 to preload apps into memory before you launch. It is used to launch program as quickly as possible. Due to this, disk usage gets high. So fix the issue by disabling SysMain Service.
1. Press the Windows Key + R. Type services.msc and click OK.
2. Double click on SysMain and select Properties.
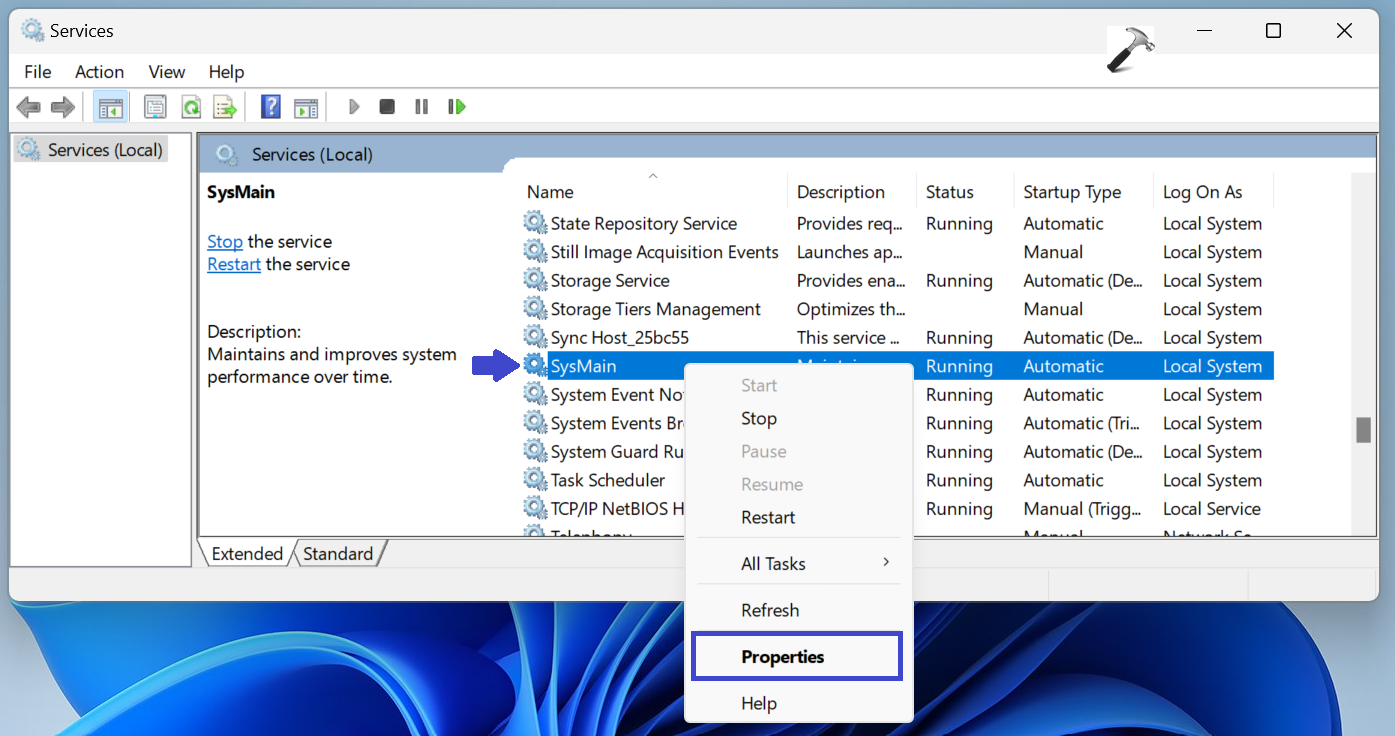
3. Under Startup type, choose “Disabled” and click on “Stop”.
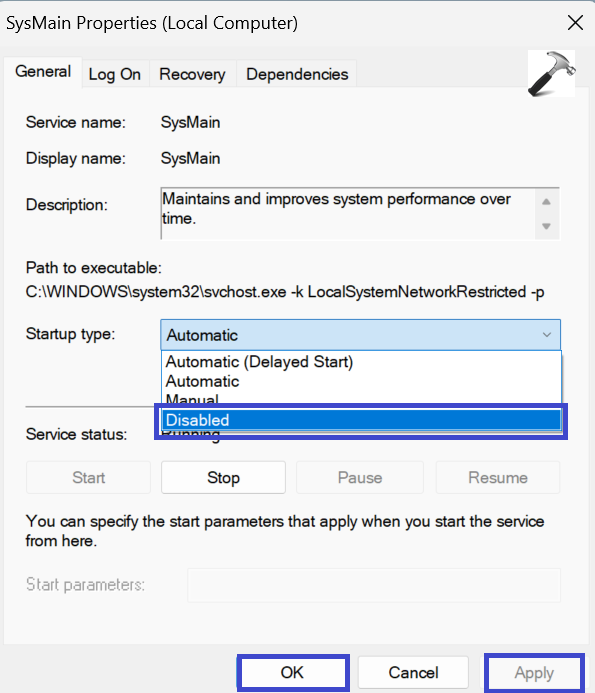
4. Click OK followed by Apply.
5. Now, open Task Manager. You will see that the Disk usage is reduced to 10-15%.
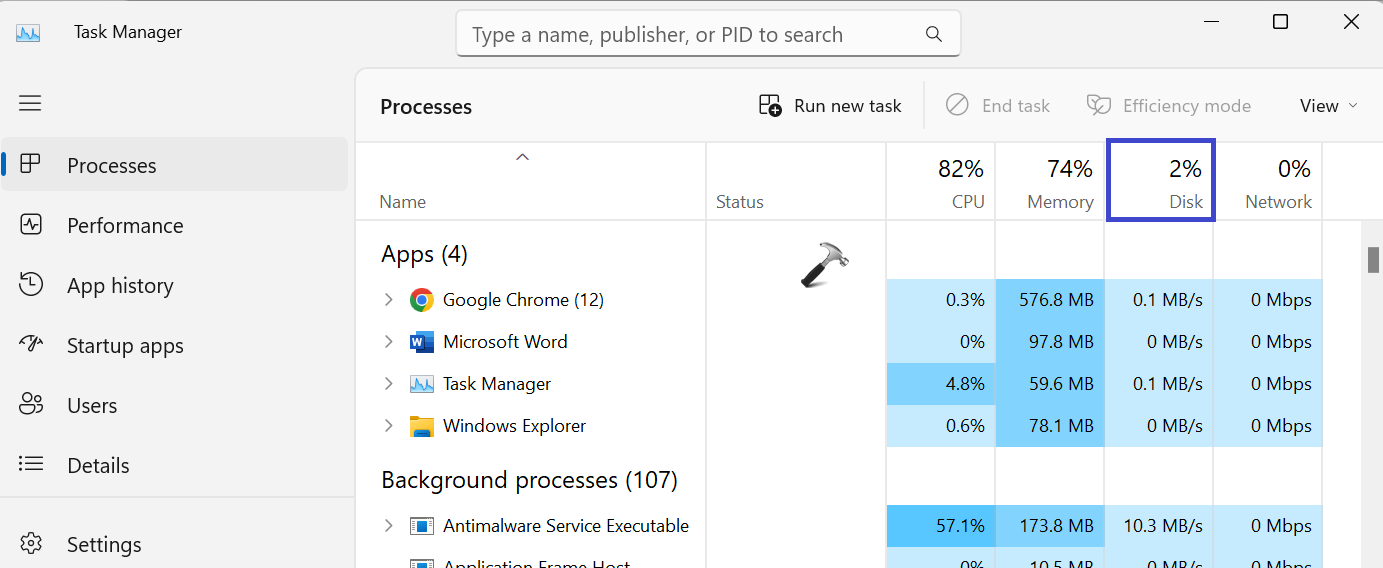
6. Close the Window and restart your PC and check whether the Disk usage is still spiking or not.
Method 6: Disable Startup Apps
1. Press the Windows Key + X and select “Task manager”.
2. Go to “Startup apps”. Check all the apps.
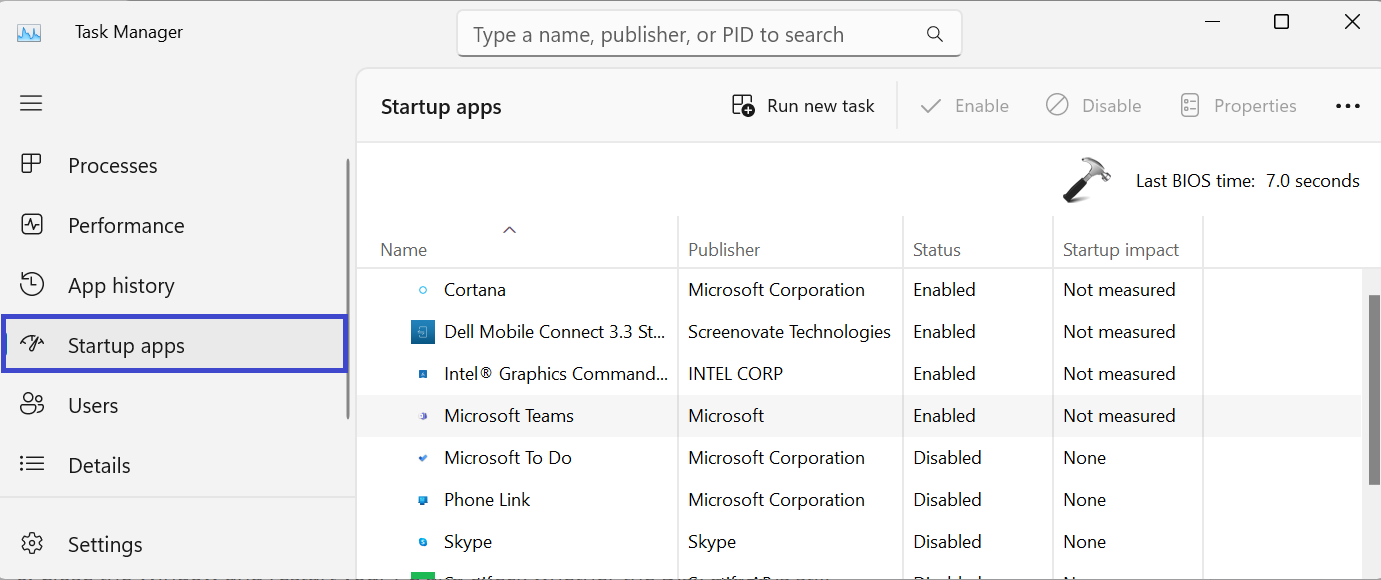
If you see apps that you don’t use during startup and has been enabled.
3. Right-click on that app and select “Disable”.
Method 7: Reset Virtual Memory
When your PC is short of RAM, it sometimes utilizes the hard disk memory as a swap to hold programs and files in memory. However, in some instances, the PC takes up major disk space, which could increase the disk usage considerably. We can reset virtual memory or increase it, so that the OS does not keep the hard disk engaged all the time. Here are the steps:
1. Press the Windows Key + R. Type sysdm.cpl and click OK.
2. Go to “Advanced” tab and click Settings.
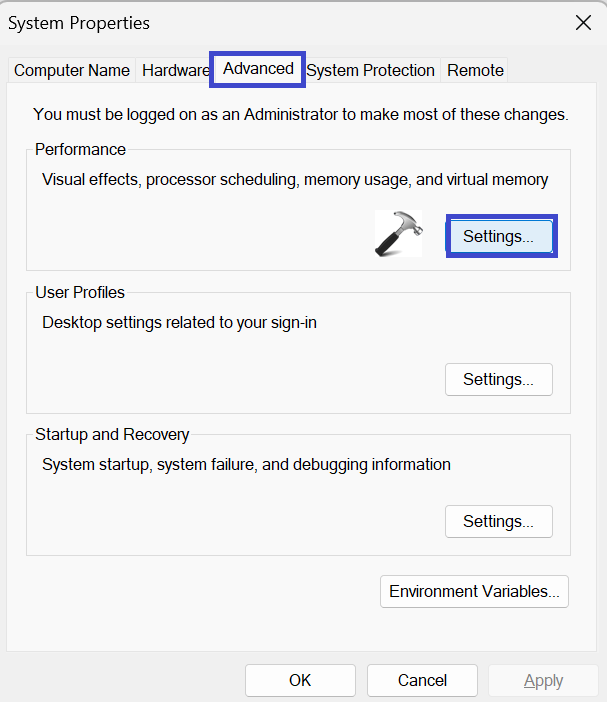
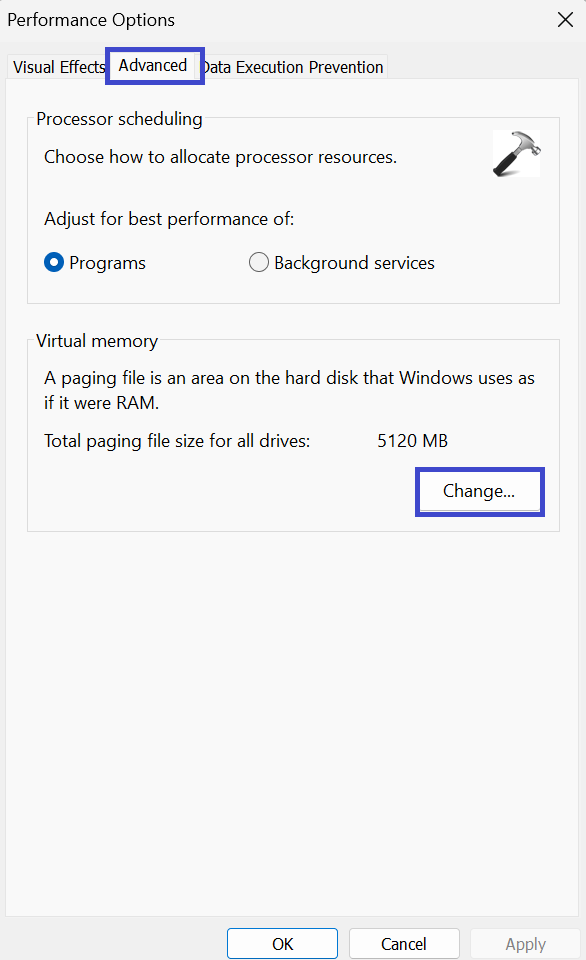
3. Now, under Performance Options go to “Advanced” tab.
4. Click on “Change..”
5. Here, uncheck “Automatically manage paging file size for all drives” and select “Custom size”.
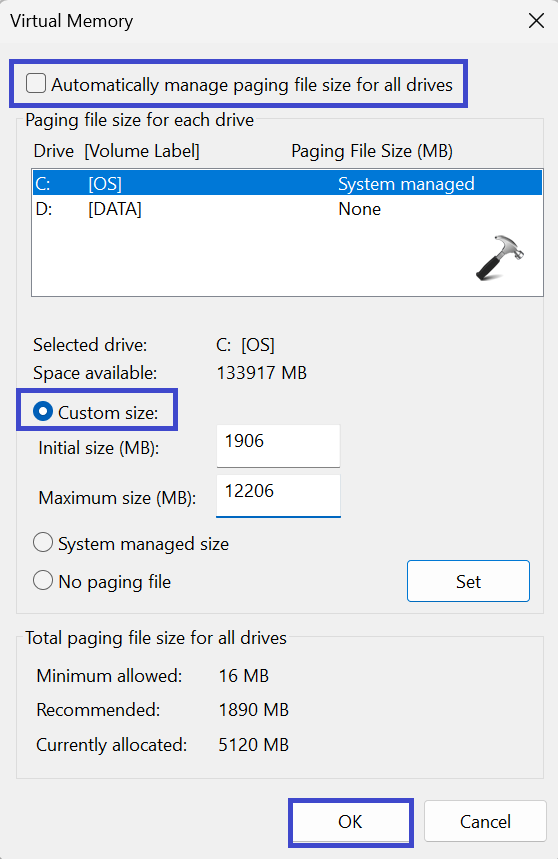
6. Now, enter 1906 into the initial size field.
And enter the amount (in MB) 1.5x times your RAM size in Maximum size.
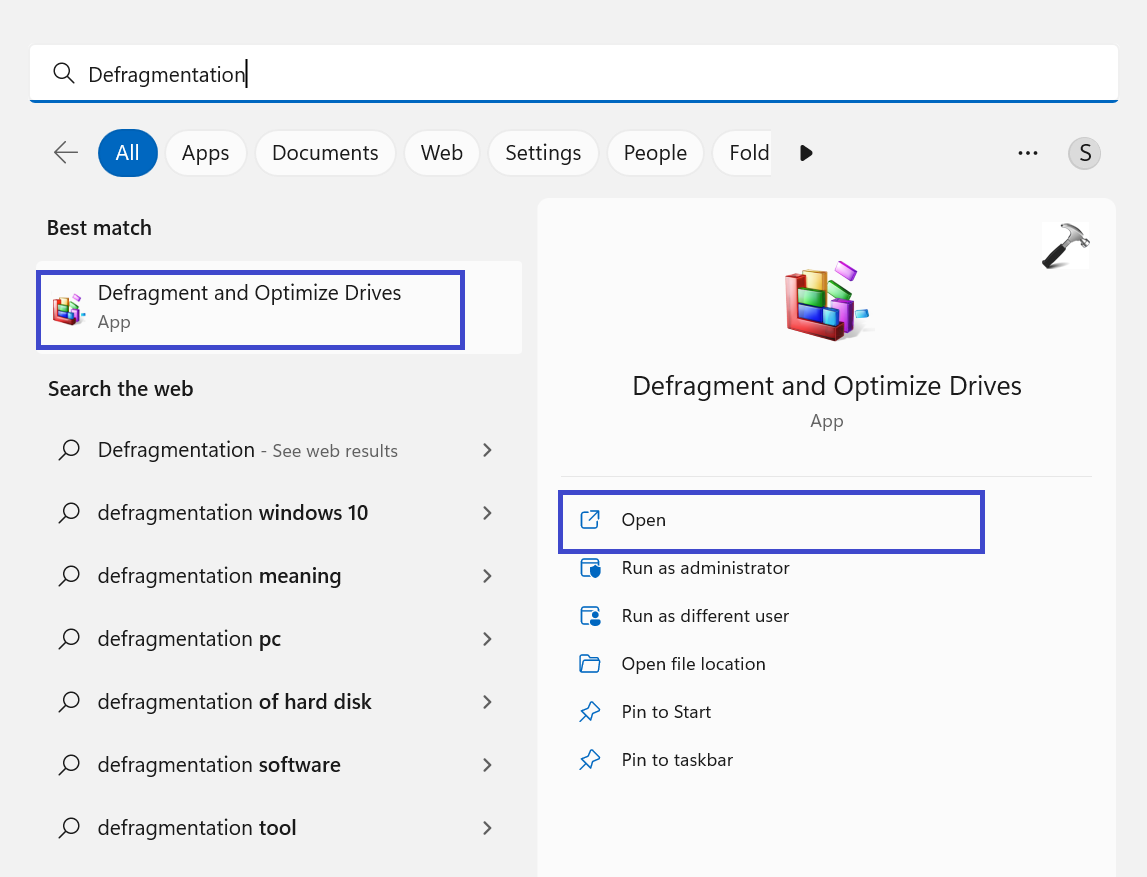
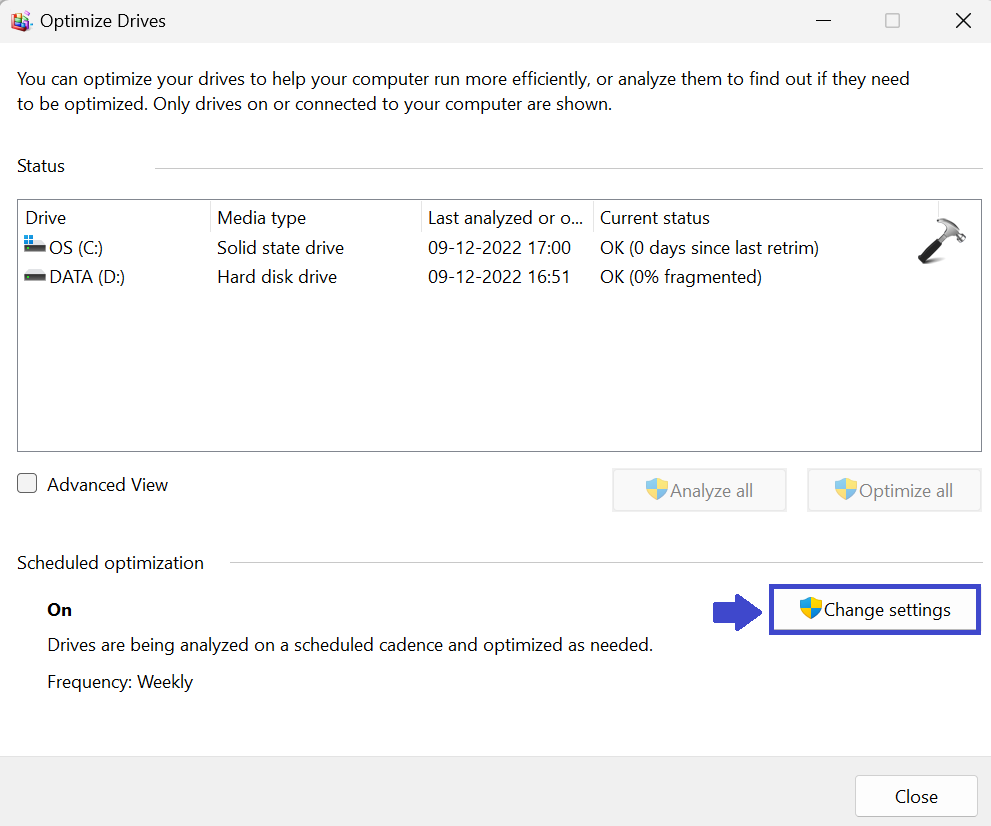
Method 8: Disable Scheduled Defragmentation
1. Press the Windows key and search for “Defragmentation”. Open it.
2. Next, click on “Change settings”.
3. Now, uncheck the “Run on a schedule (recommended)” and click OK.
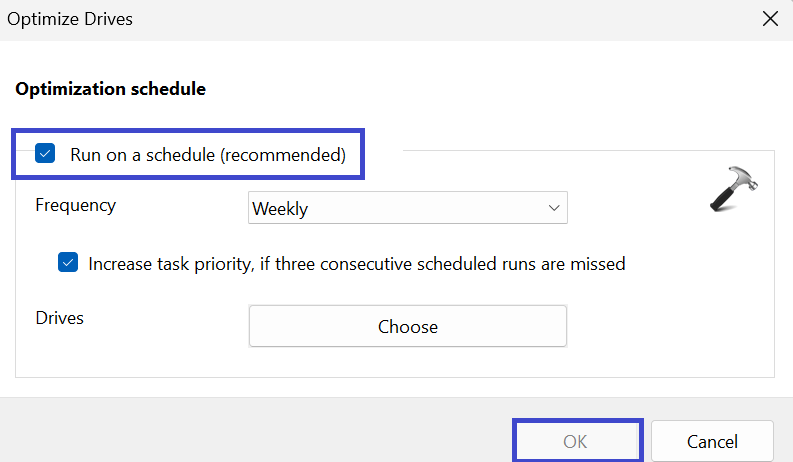
4. Close the Window and restart the PC to apply the settings.
Method 9: Perform a System Scan
Perform system scan for malware or hidden rootkits. Sometimes, malware hides behind the system folders and perform all sorts of actions including crypto mining and malicious encryption.
You can manually scan by using the following steps:
1. Open Windows Security.
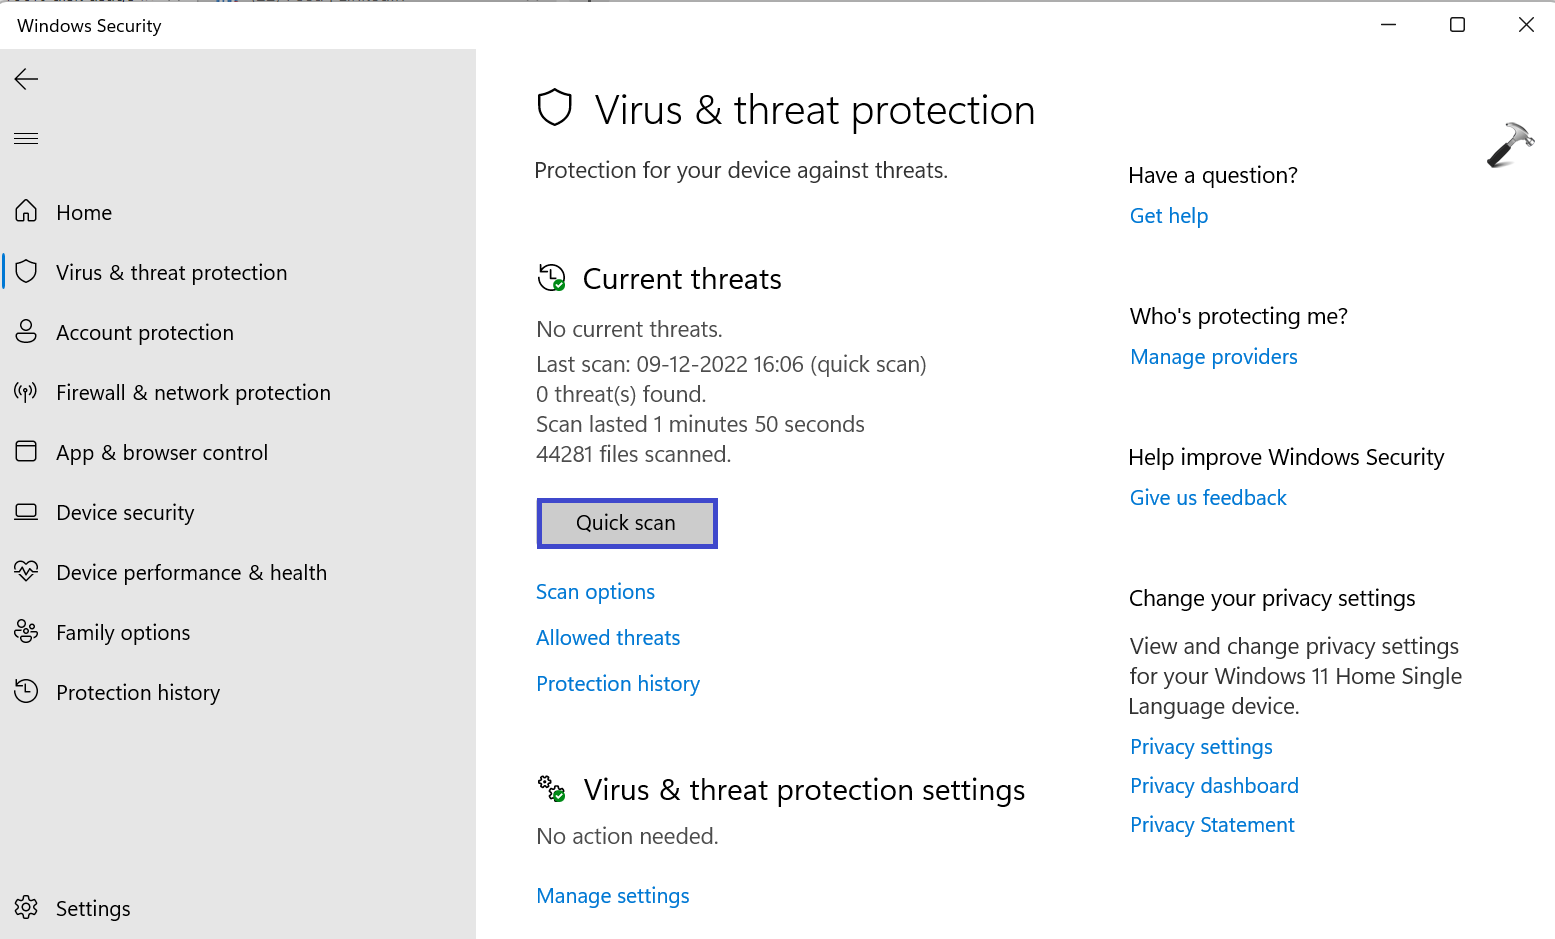
2. Click on “Virus & threat protection” and click on “Quick Scan”.
3. After scanning, you notice still there is 100% disk usage.
Then, go to Virus & threat protection => Scan options => Full Scan.
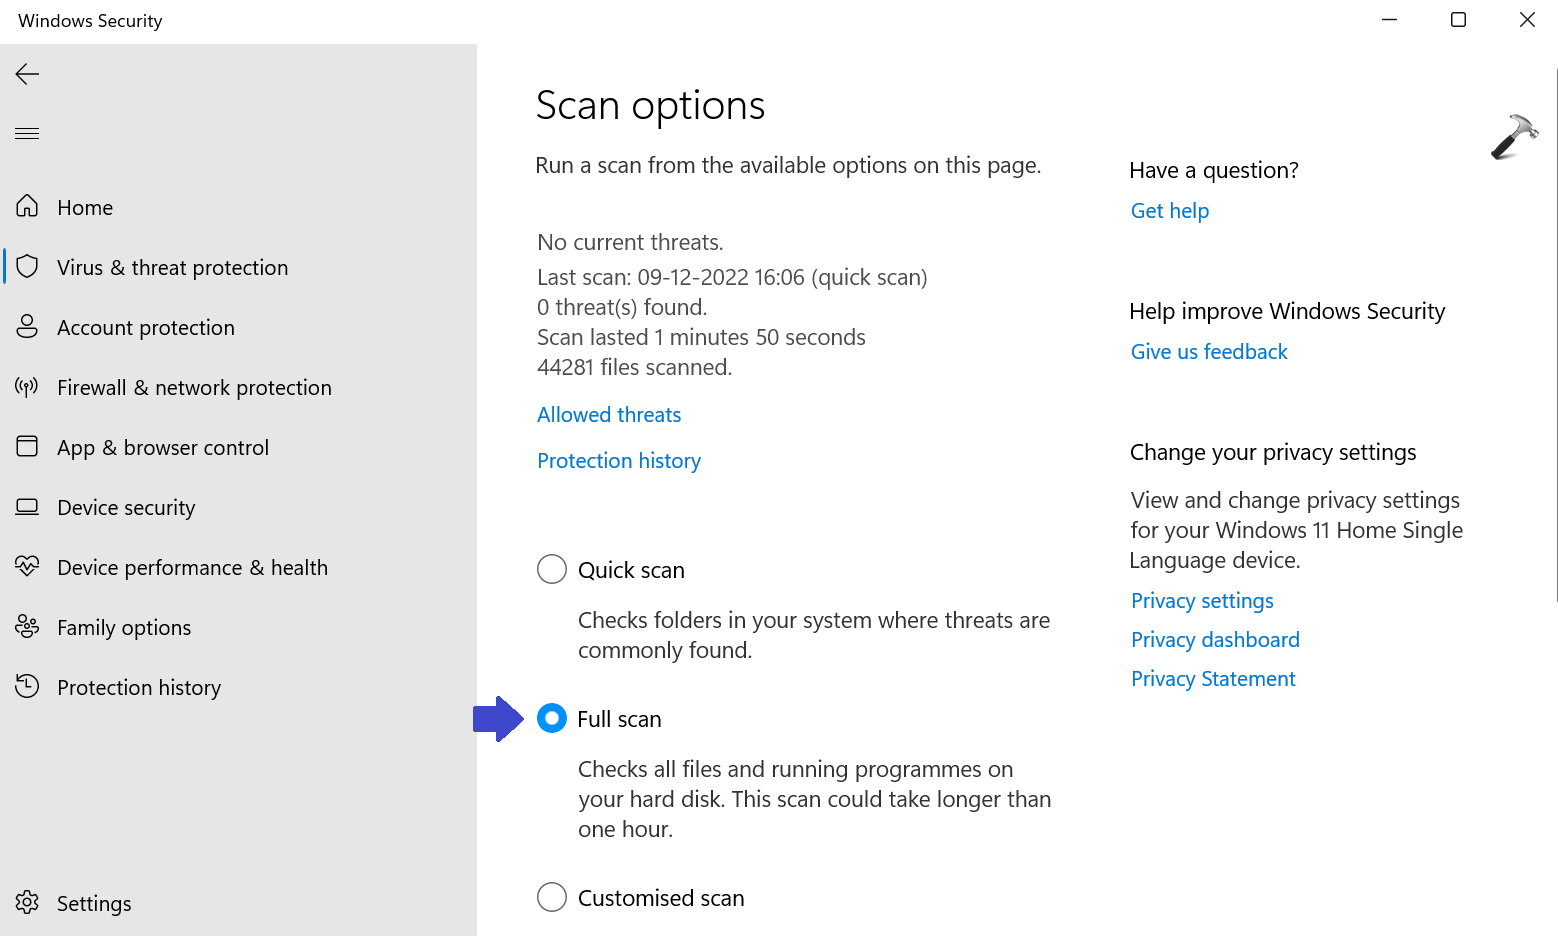
This will take sometime.
4. Restart your PC and check whether the issue is resolved or not.
Method 10: Disable Backgrounds Apps
You should disable the background apps to keep your PC good and responsive. Follow the steps to disable the background apps:
1. Open Settings App and go to Accounts.
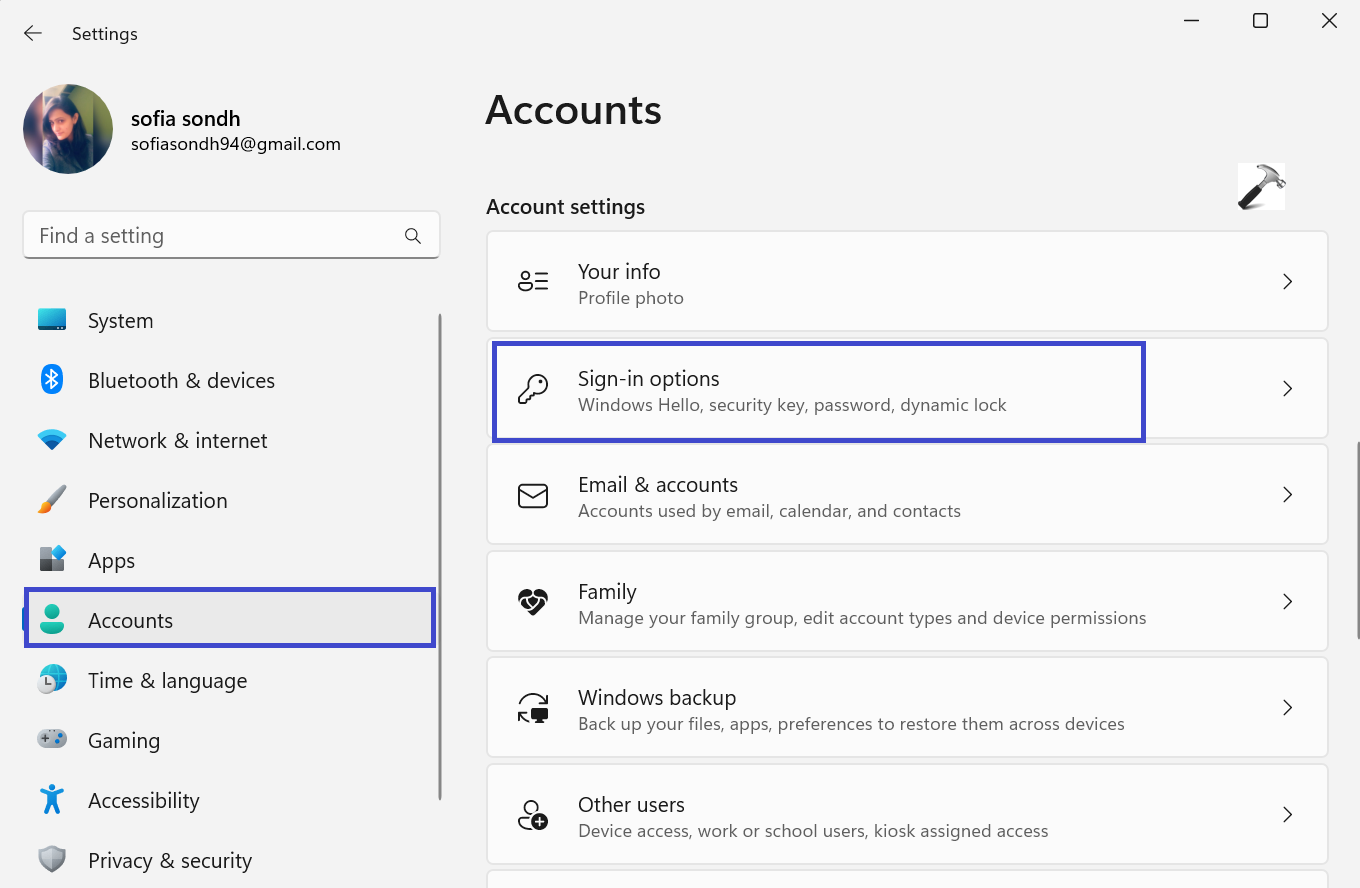
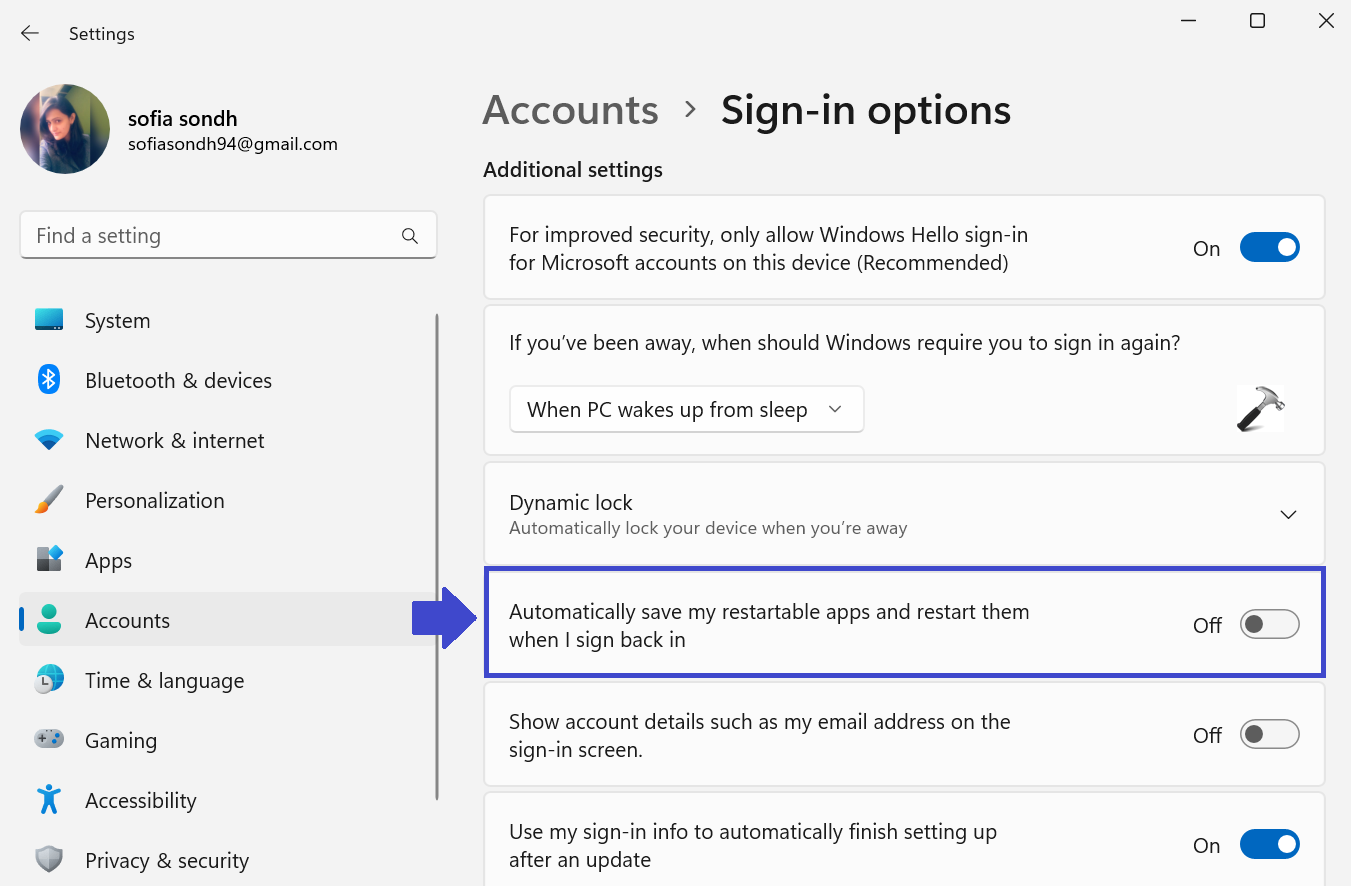
2. Select “Sign-in options”.
3. Now, turn off the “Automatically save my restartable apps and restart then when I sign back in”.
4. Next, go to “Apps” and select “Installed apps”.
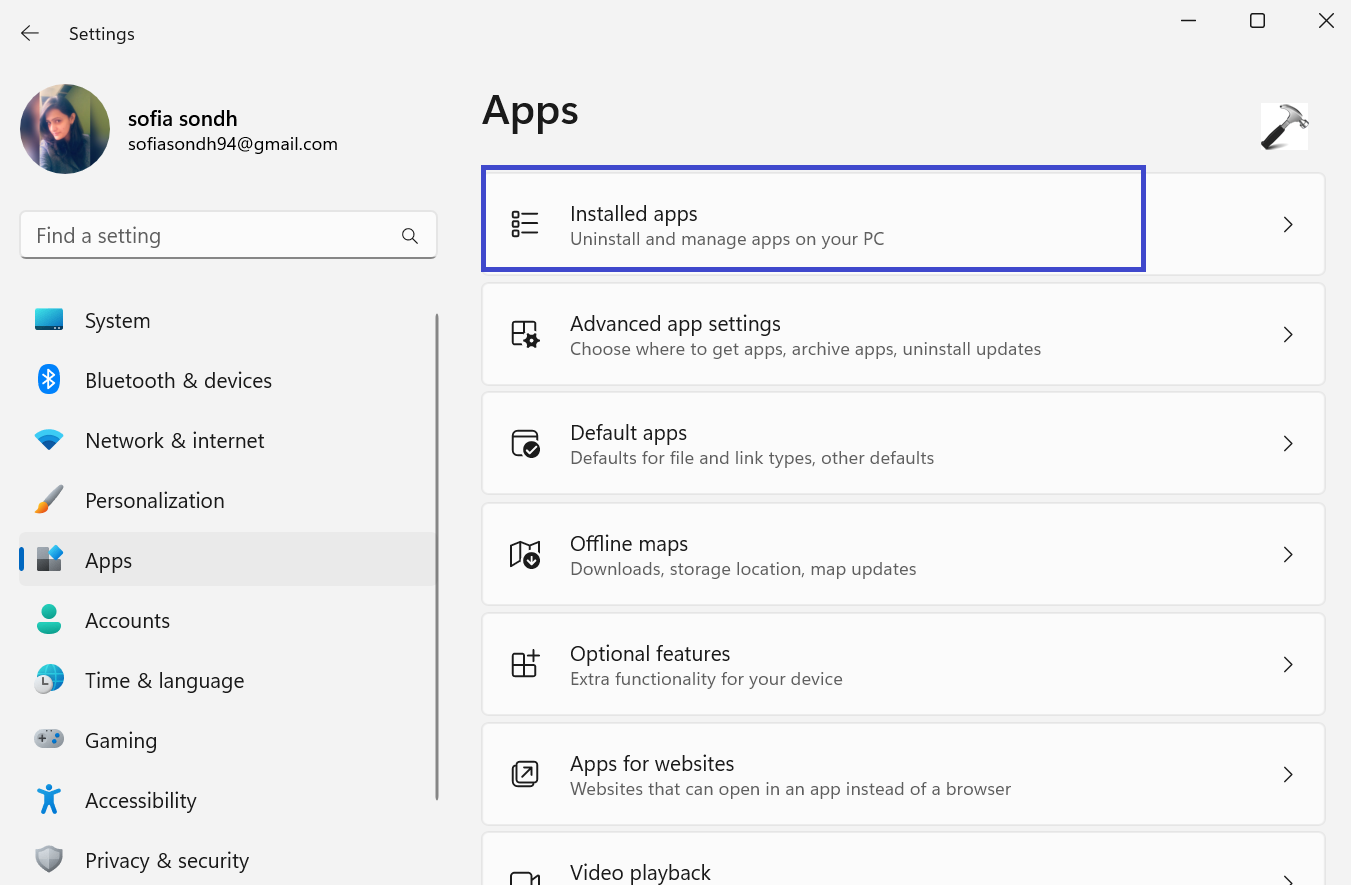
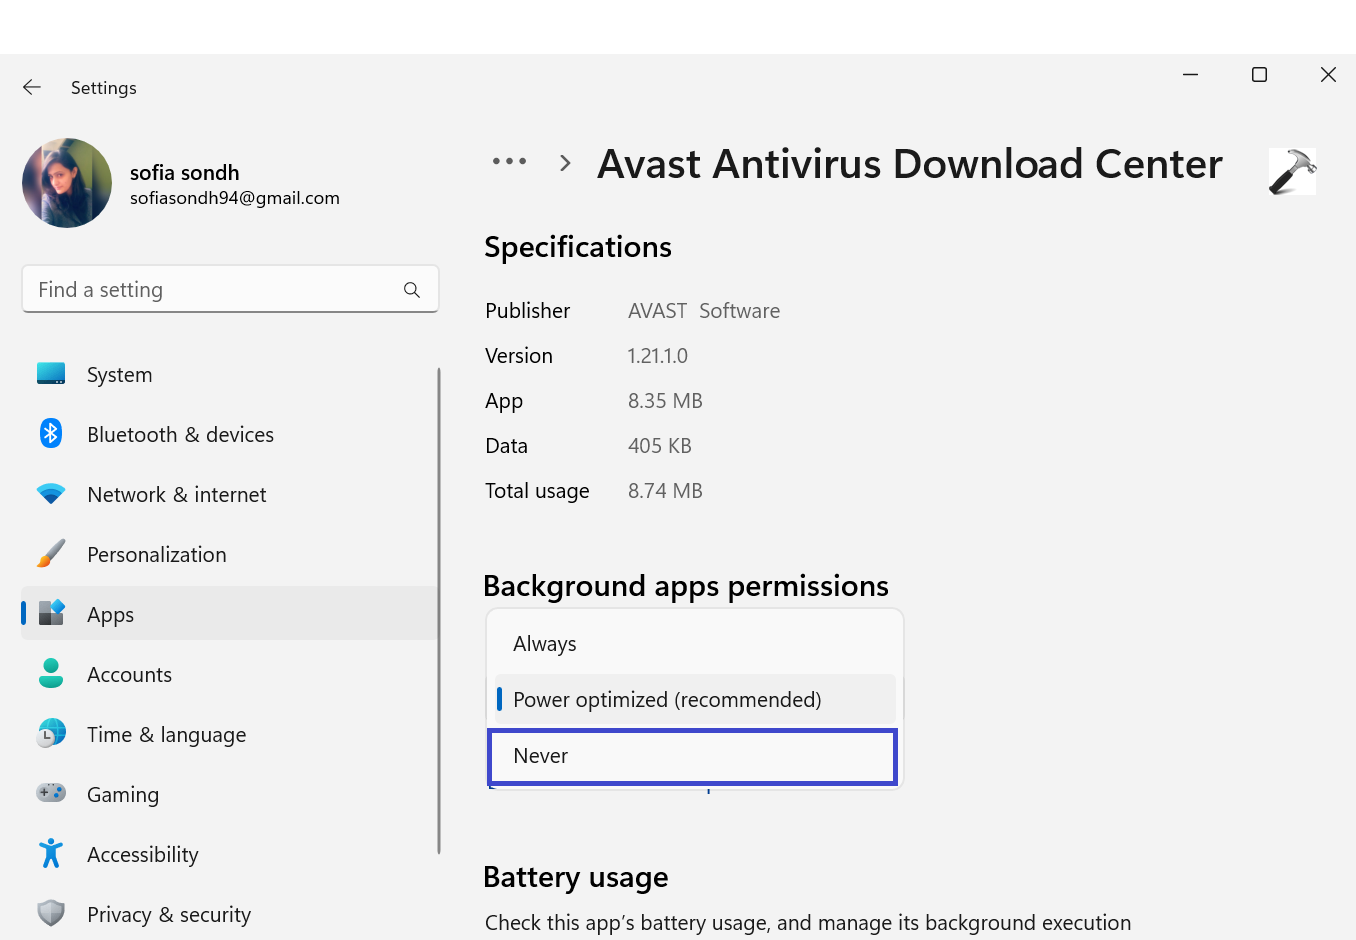
5. Now, click on three dot menu and select “Advanced options”.
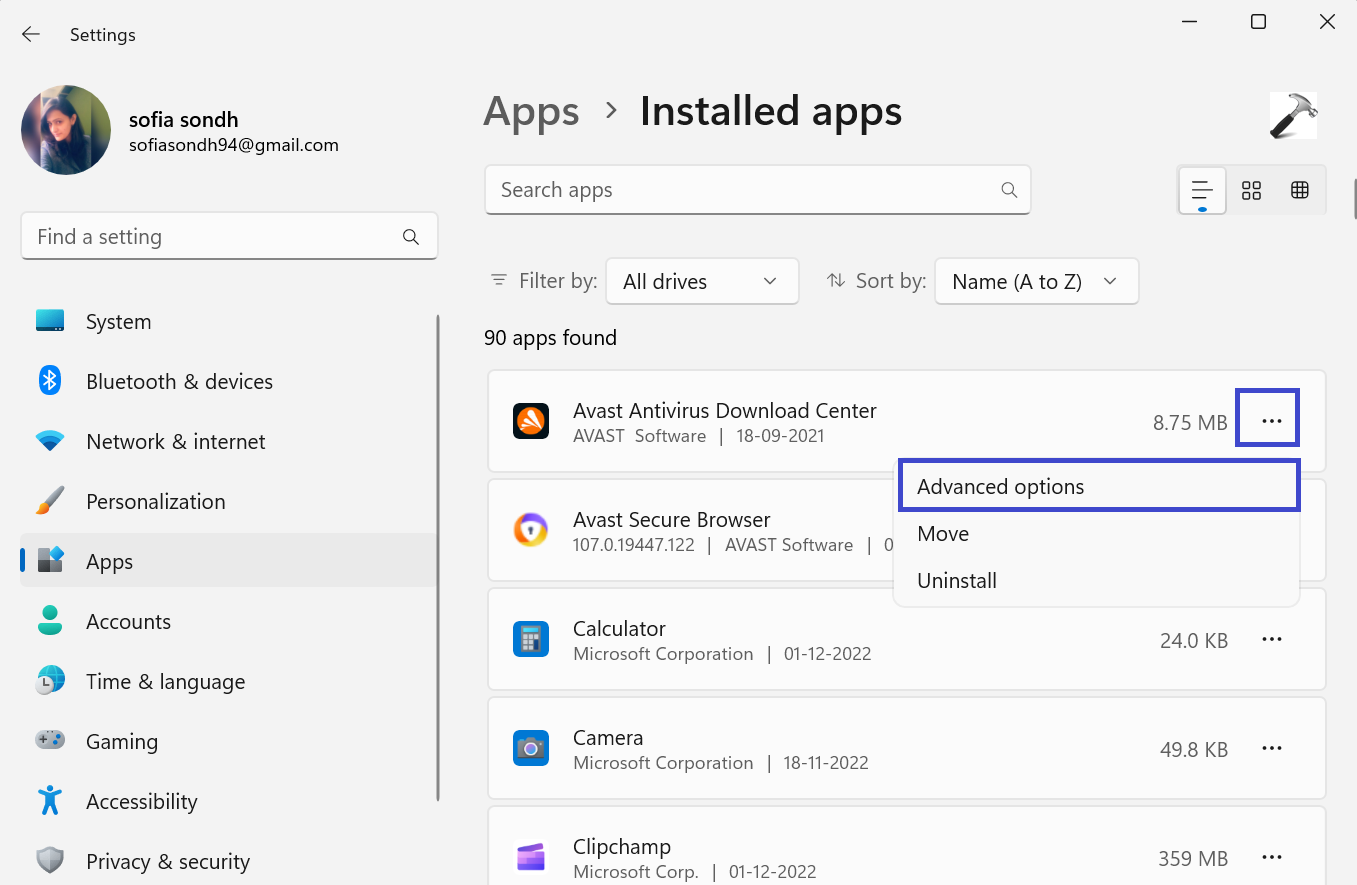
To the apps you want to disable from running in the background.
6. Under the Background apps permissions, select “Never” or as per your choice.
Method 11: Update Storage Drivers
Due to faulty storage drivers, the disk can be stuck in a memory and may perform an action repeatedly. Try updating the storage drivers to the latest version:
1. Press the Windows key + X. Select “Device Manager”.
2. Now, expand “Disk drivers” and select “Update driver”.
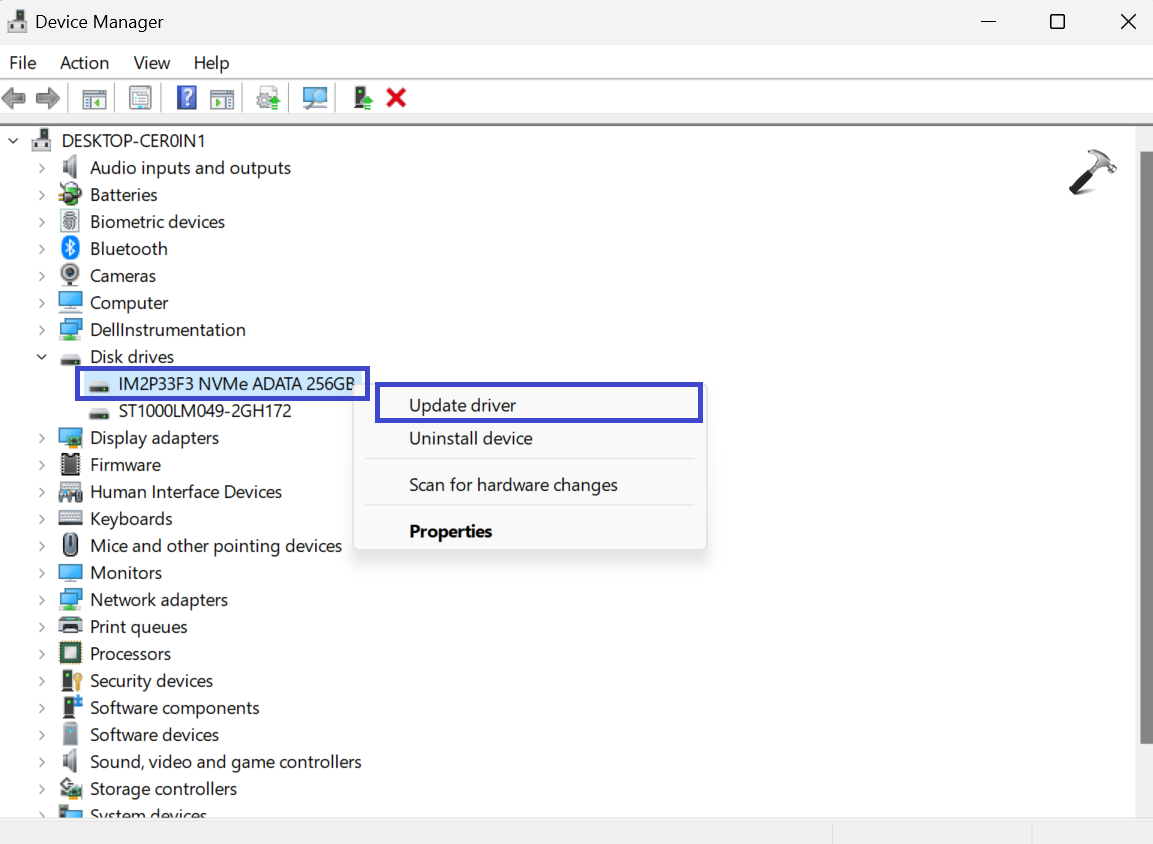
3. A prompt box will appear.
Click on “Search automatically for drivers”.
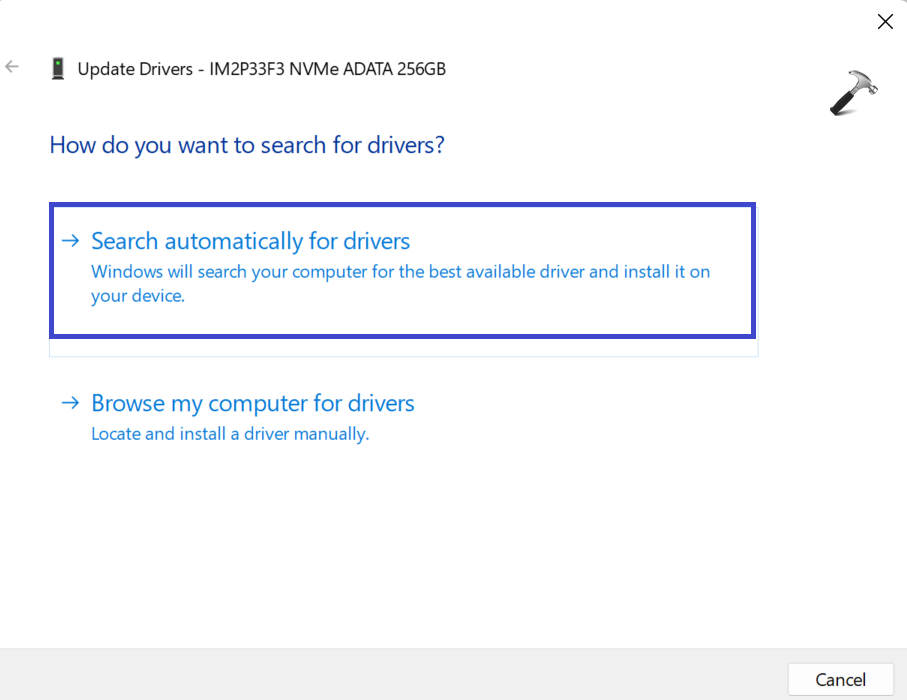
Windows 11 will install it and ask you to restart the PC.
5. Restart your PC and check whether 100% disk usage problem is solved or not.
Method 12: Perform a Clean Install
If none of the above methods worked, then you should try updating Windows 11 to the latest version.
1. Open Settings App and select “Windows Update”.
2. Now, click on “Check for Updates“.
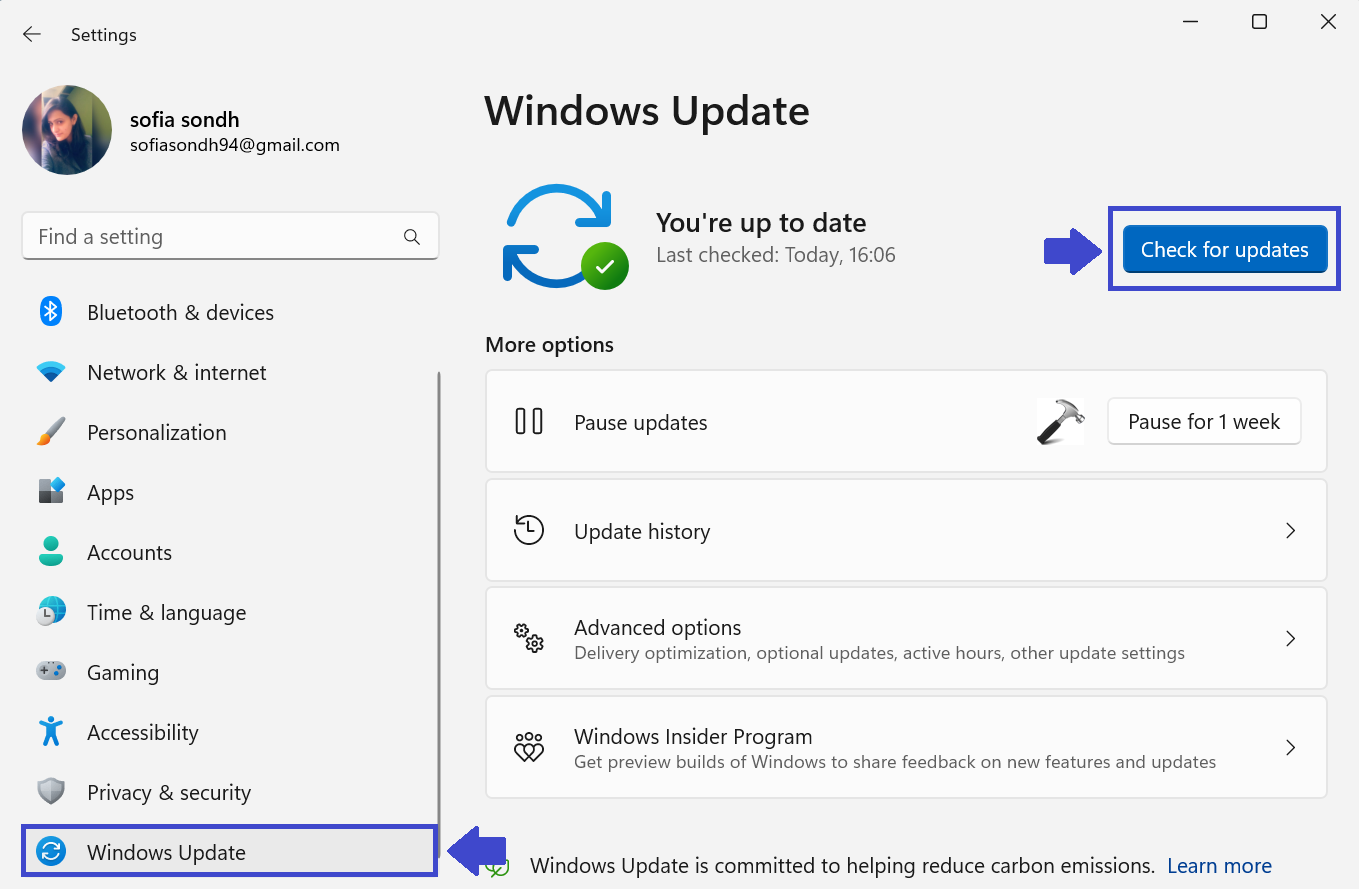
3. If your Windows is not up-to-date then it will download and install all the pending updates.
4. Restart your PC and check whether the 100% disk usage problem has been fixed or not.
Video fix
For live demonstration of above fixes, you can refer this video guide:
That’s It!


Thank you so much! This was really helpful. I followed methods 1-5 and my machine has never been faster!
^^ Glad it helped 😎
Sofia you solved a problem that has been troubling me for years. I had just upgraded the PC and it was still slow… so disappointing! But your article changed everything. Thank you so much. Sofia. means wisdom… very appropriate.
Did steps 1 and 2, step 3 seems to have done the trick
^^ Glad to help!
Perfect solution. After upgrading to Win 11 my desktop PC was almost unusable because of the excess disk usage. Going through and applying as many of these fixes as possible has really done the trick. Bonus is it also got rid of that annoying Microsoft News icon that sits on the task bar and flashes up a window whenever the cursor touches it. Now I will try this same procedure on my laptop. Thank you for your much valued assistance.
^^ Glad it helped!
I don’t see that IDE…. Option in device manager :(
Thanks for your wonderful blog and its resolved my laptop with 100% disk issue, now at least i can use my laptop for minimal things. Keep continuing and sharing the nice trouble shooting resolutions.
^^ Glad it helped 😎
Thanks, Sophia. Very helpful. Hit me up & ill take you and friends on a boat ride (if you’re in the Sound and when it gets warmer)
This just bricked my pc… Blue screen of death when I boot up, after having done the storAHCI.sys thing correctly. Just great.
unfortunately, all the steps have been done and the issue is still there… 100% disk usage….
Thank you very much. have a nice day.
^^ Glad to help!
ty for help keep the good work
4. If you find “storAHCI.sys” path then only proceed to the next step
Which would be what, the next method? Run Disk Check? Or one of the 9 steps you provided should we not find storAHCI.sys? That part was not clear. Please address this as I’m sure I’m not the only one who found that bit confusing.
Method 4 Step 4 will prevent Display Settings from opening.
I had exactly the same problem. I tried out 3 new discs, I tried changing many system settings, I even re-installed Windows and the problem still existed. Surprisingly, what solved the problem for good was replacing SATA CABLE with new one. My computer works like new now.
^^ Glad the issue is resolved 😎