

Are you also stuck in a loop where the Windows 11 installation keeps restarting? Well, it is one of the most annoying problems that users experience at the time of a clean installation or when upgrading the Windows version. The PC fails to boot up and keeps going to the Windows installation screen over and over again, so the installation does not go through.
Luckily, you don’t have to give up on installation. For most instances, a few problem-solving steps will solve the issue. In this guide, we’ll discuss the best ways to troubleshoot the Windows 11 installation restart loop and effectively complete the Windows installation.
Page Contents
Quick Checklist Before You Begin to Fix Windows 11 Installation Keeps Restarting
Take a few minutes to look at these simple requirements before attempting the advanced fixes:
- Make sure your PC is compatible with Windows 11.
- Unplug any extra USB devices, printers, and external storage drives.
- Do not unplug your laptop during the installation.
- Check the stability of the Internet connection in case of an online installation.
- If you want to delete/formatting your drive, back up important files.
These basic tests will prevent common installation issues from becoming complex.
Fix: Windows 11 Installation Keeps Restarting
While the Windows 11 installation keeps restarting error might appear to be a serious hardware failure, the majority of the time, this is actually caused by something else. This includes an incorrect boot setting, corrupt installation media, or troubles with the disk. You can use the solutions in this guide step by step to determine the cause and finish the Windows 11 installation.
Fix 1: Remove the Installation USB After Windows Copies the Files
Another frequent cause of the Windows 11 installation restart loop is the failure to boot from the hard drive. After Windows has finished copying the installation files and asks you to restart, the computer should boot from the hard drive, not the USB.
1. Wait until Windows has finished copying installation files.
2. When the PC automatically restarts, remove the bootable USB drive.
3. Restart the computer if needed.
4. Press Enter to continue Windows Setup from the internal drive.
If Windows still restarts from the installer, then try the next solution.
Fix 2: Set the Internal Drive as the First Boot Device
A computer whose boot sequence is incorrect will require booting of the installer each and every time that the computer is restarted.
1. Change the Boot Order.
2. Restart your computer. Press F2, F10, F12, Delete or Esc at boot time to enter BIOS/UEFI.
3. Then, open the Boot menu. Set the priority for booting your SSD or HDD that has Windows installed.
4. Save the changes to exit BIOS and restart the PC.
The installation should now proceed without re-launching the installer.
Fix 3: Clean the Drive Using DiskPart
Windows Setup may crash and restart repeatedly if the destination drive has corrupted partitions or boot records. Removing the partitions cleanses your drive, and Windows will re-create partitions.
1. Start the Windows install USB. Click on Shift + F10 to get into Command Prompt.
2. Type this command.
diskpart
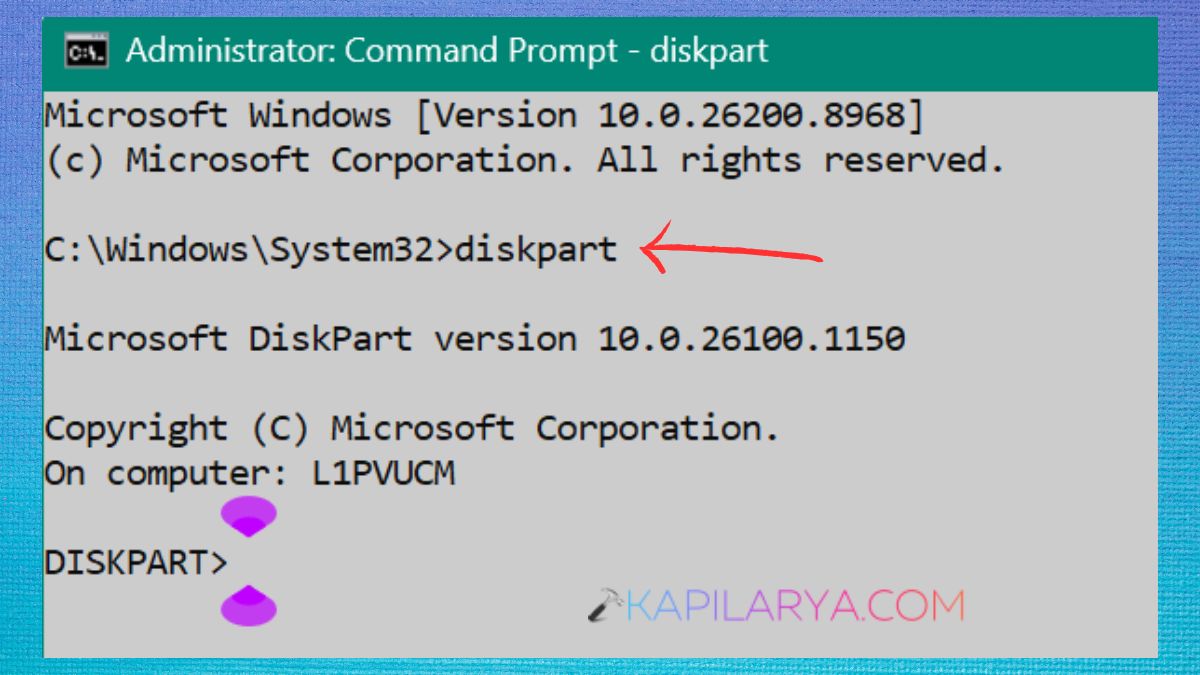
3. Display available disks.
list disk
4. Choose the drive where you want to install it. (Replace 0 with your actual drive number.)
select disk 0
5. Clean the disk.
clean
6. Exit DiskPart.
exit
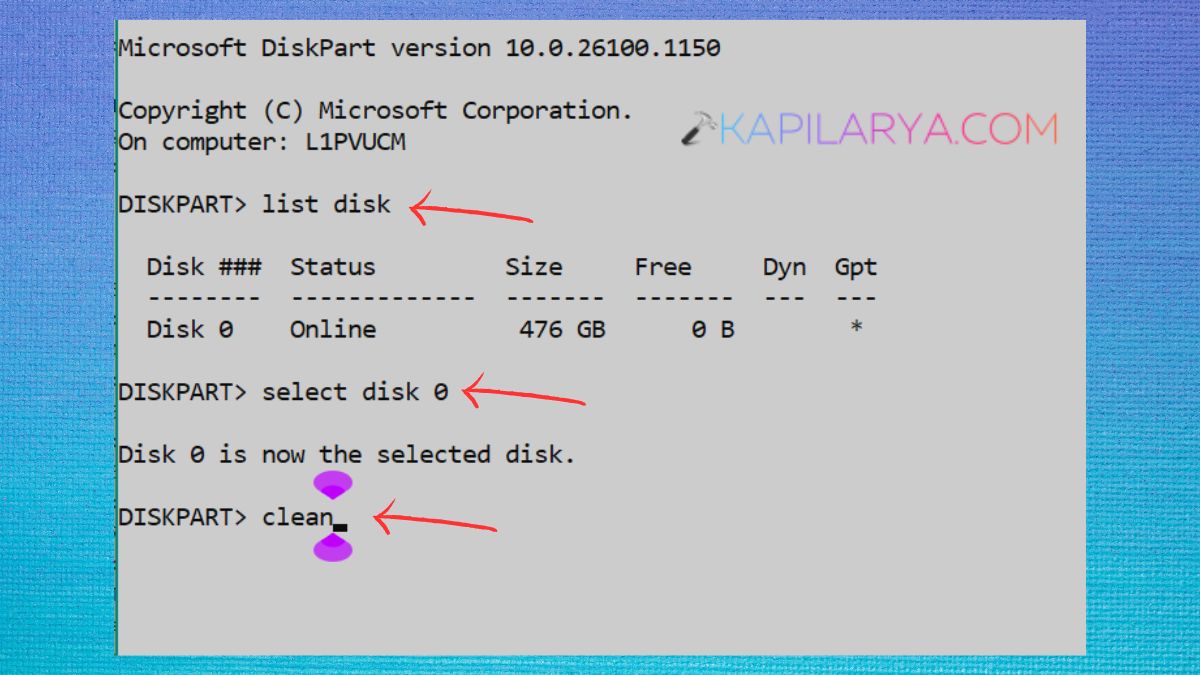
7. Close Command Prompt. Back to the Windows Setup. Choose the unused space and proceed with the installation.
Fix 4: Disable Secure Boot and Verify UEFI Mode
This can be caused by improper firmware settings, which can interfere with Windows Setup, particularly when changing storage devices or motherboard settings.
Modern Windows 11 installations are recommended to be done in UEFI mode with GPT partitioning.
1. Turn on the computer and go into the BIOS.
2. Find Secure Boot Settings. Temporarily disable Secure Boot.
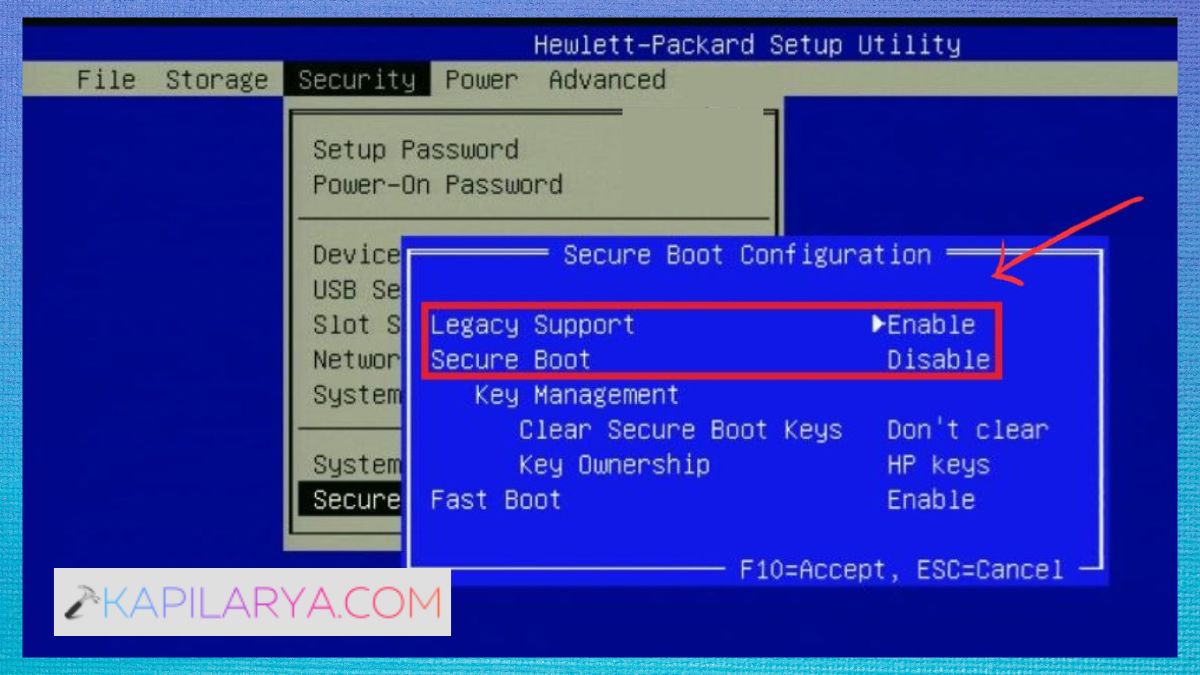
3. Check for UEFI mode instead of Legacy or CSM.
4. Save the changes. Restart Windows Setup.
Once Windows installs successfully, you can re-enable Secure Boot if required.
Fix 5: Delete All Existing Windows Partitions
Occasionally, old recovery, EFI, or system partitions compete with a new Windows install. If you delete all the partitions, Windows Setup can format a new partition structure.
1. Boot off Windows installation media.
2. Choose Custom: Install Windows only.
3. Click on each partition on the target drive.
4. Continue to click Delete until there is only Unallocated Space left. Click on the free space. Choose Next.
The necessary partitions will be created automatically with Windows Setup.
Fix 6: Create Fresh Windows 11 Installation Media
If the USB installer is damaged or the ISO file was not downloaded properly, the installation process can be interrupted many times. If there is a problem during setup, generating a new installer can fix the problem.
1. Go to Microsoft’s official website and download the Windows 11 installation Media Creation Tool – “https://www.microsoft.com/en-us/software-download/windows11“.
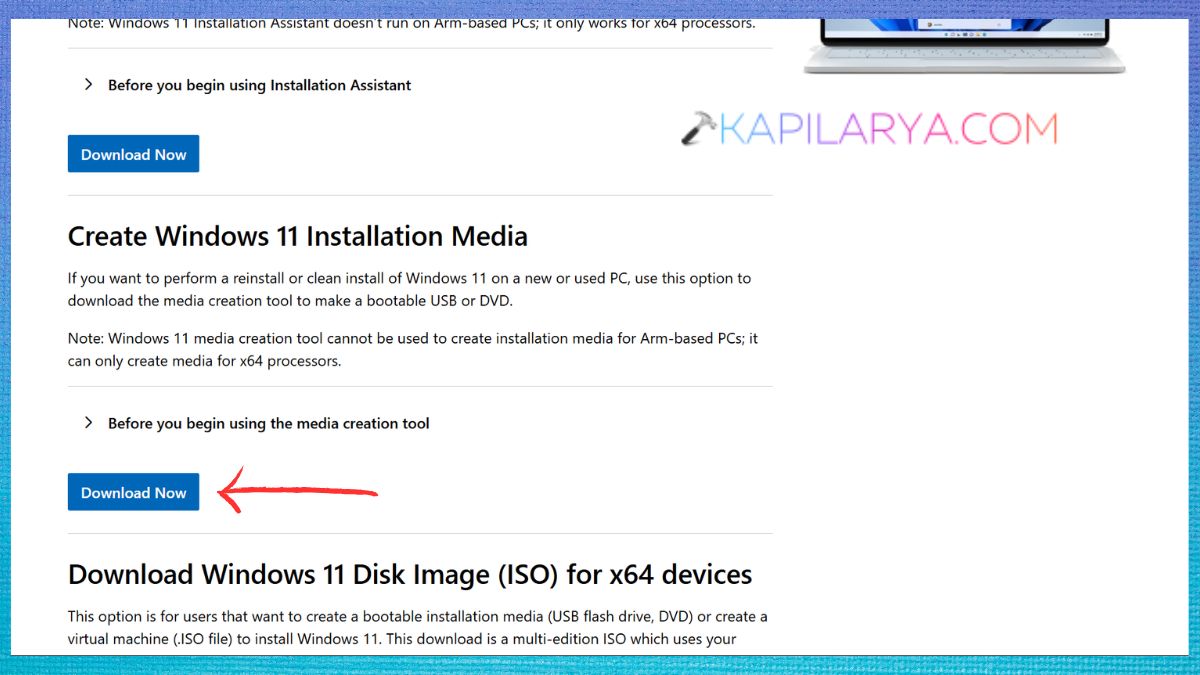
2. Use the Media Creation Tool to create a bootable USB. Install on a USB stick that has a minimum capacity of 8 GB. Use a different USB flash drive, if available.
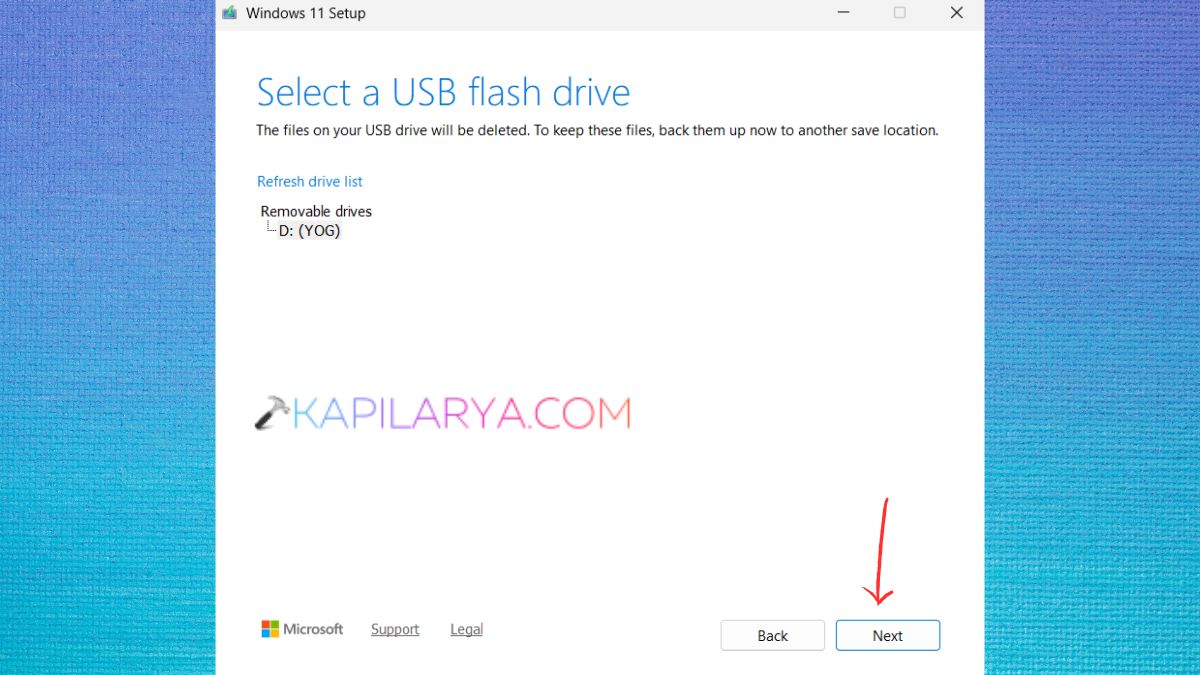
3. Boot with the installation media created just now. A clean installer minimises installation failures.
Fix 7: Run Startup Repair
If Windows has already copied the files and it has an error in the reboot process, Startup Repair might automatically repair corrupted files in the boot process.
1. Boot using the Windows Installation USB.
2. Click on Repair your computer. On the Troubleshoot tab, in the Advanced options section, click Startup Repair.
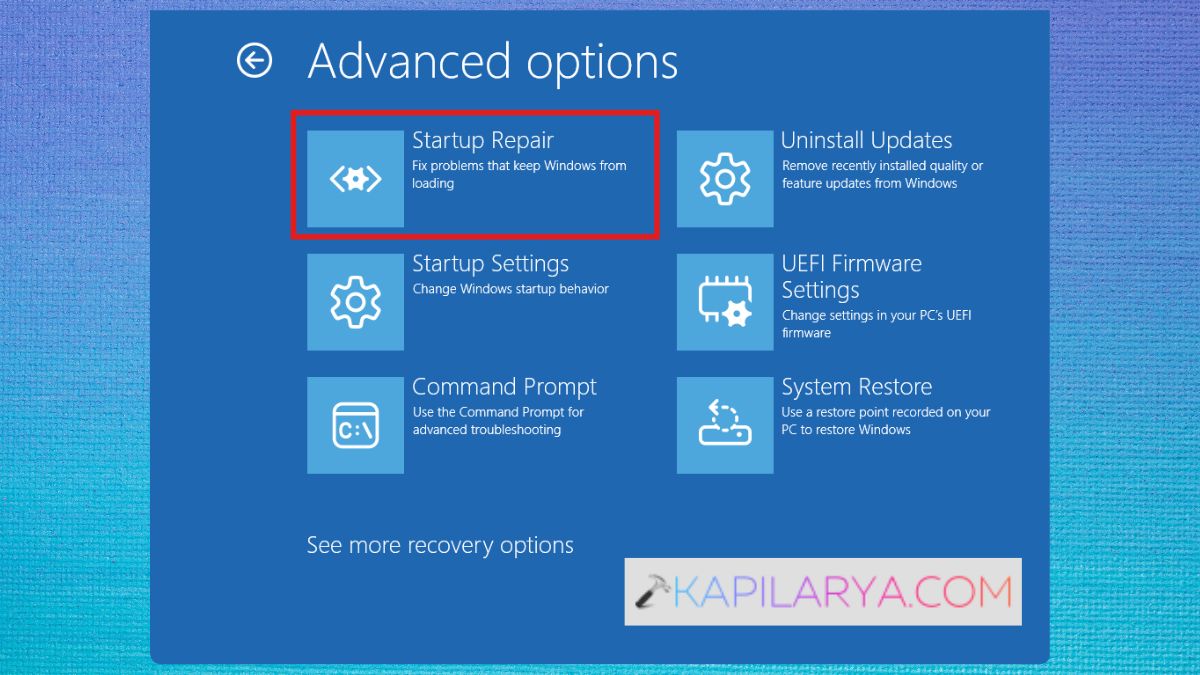
3. Click on the Windows operating system that was installed. Wait and see how Windows self-diagnoses and fixes the problem with starting up.
Frequently Asked Questions (FAQs)
That’s it!


![[FIX] Can’t Select Windows 10 Edition During Clean Installation](https://www.kapilarya.com/assets/windows_10_logo_1751105802-768x418.jpeg)
