

Windows 11 Camera 0xA00F42A0 (SceneSwitchFailed) error can be a confusing surprise, not for me, because I’ve already been down this camera-error rabbit hole. This is true if you just want to use your camera for a video call, a quick snap or to record something. Windows 11 may instead present this error, and you’ll be left wondering what happened.
In most cases, this error is fixable. In this article, we will show you some easy solutions so that you can overcome this issue.
Page Contents
What Is Windows 11 Camera Error 0xA00F42A0 (SceneSwitchFailed)?
The 0xA00F42A0 (SceneSwitchFailed) error is a Windows Camera error that is typically caused by problems switching or setting up a camera scene correctly by the operating system or the Camera app.
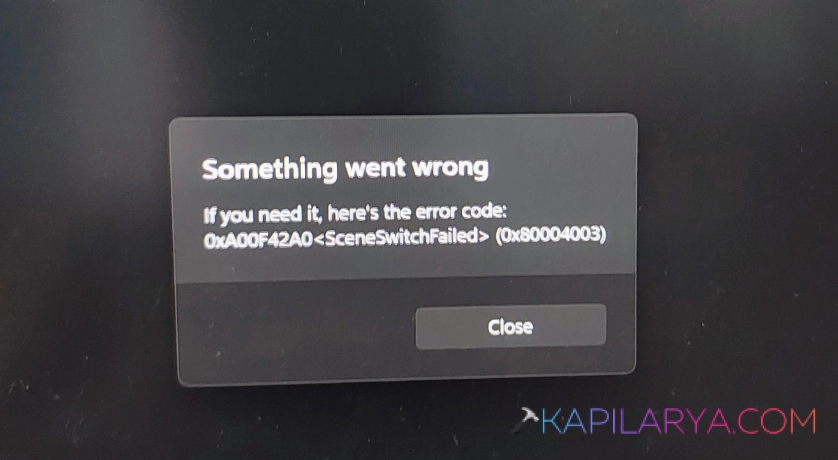
This error message might be displayed during these steps:
- Go to the Windows Camera app.
- Try switching from one camera mode to another.
- Try initiating a video call.
- Try using an external USB webcam.
- Try using several cameras in succession.
- Try using apps that require the camera, like Microsoft Teams or Zoom.
You see, it can be a variety of issues. But the first ones to consider are camera driver issues, privacy concerns, and damaged Camera app elements.
Fix Windows 11 Camera Error 0xA00F42A0 (SceneSwitchFailed)
Although Windows 11 Camera Error 0xA00F42A0 SceneSwitchFailed can be an annoyance, it doesn’t indicate that your webcam is damaged. Try these solutions in steps.
Way 1: Check Windows 11 Camera Privacy Permissions
If camera privacy permissions are denied in Windows 11, the apps can’t use the camera. If the Camera app or another application doesn’t have the required access, you may experience camera-related errors.
Ensuring these permissions are in place is thus one of the simplest fixes for Windows 11 Camera Error 0xA00F42A0.
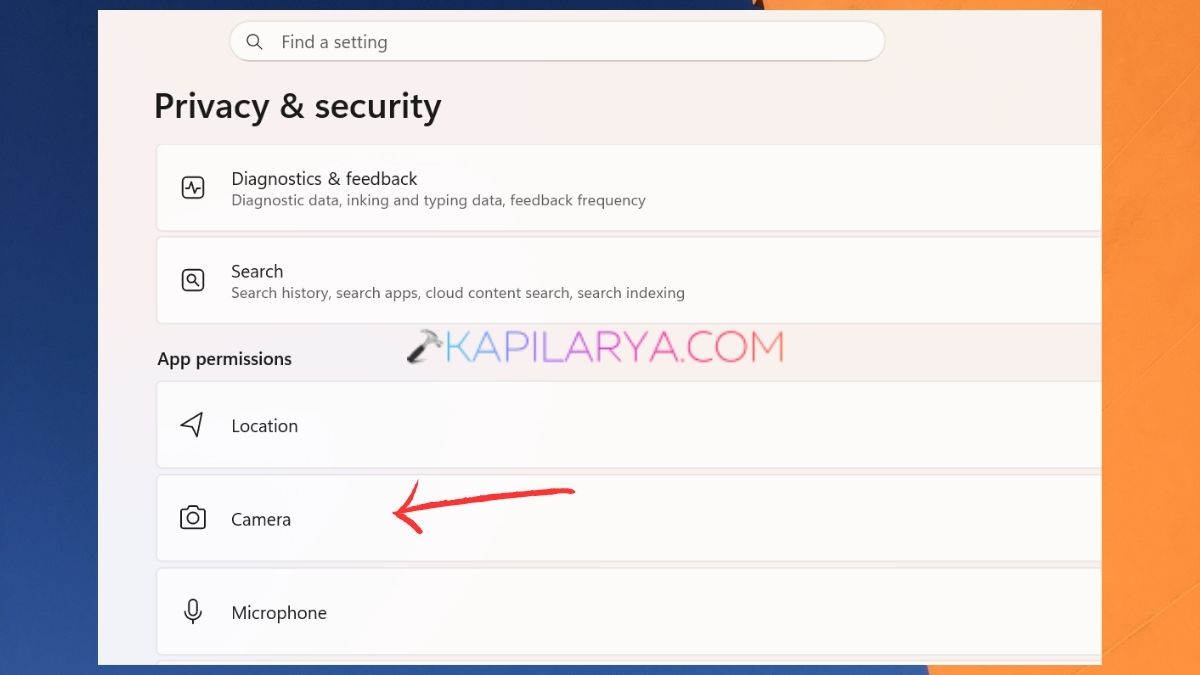
1. Use the Win + I keyboard combination to open Settings. From the left-hand side menu, click on Privacy & security. Tap Camera at the bottom.
2. Be sure to enable Camera access. Allow access to the camera when using Let apps. If it’s an option, ensure that Let desktop apps access your camera is enabled as well.
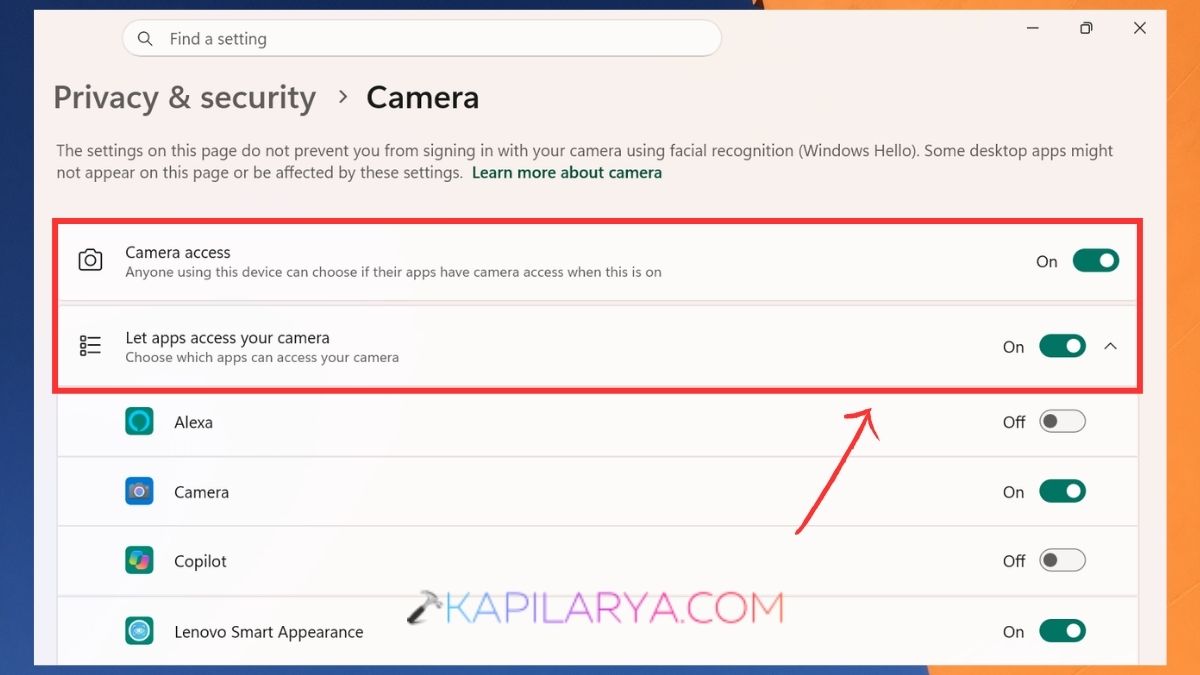
4. Now, you must review the list of applications and verify that those you wish to use have access to the camera.
5. Close Settings and reopen the Camera app. It is possible that Windows has denied access to the camera, and that the applications cannot properly initialize the webcam. The right permissions can enable the camera back in without modifying any of the drivers.
Way 2: Update the Camera Driver in Windows 11
Windows may not communicate properly with your webcam if the driver for your webcam is outdated, incompatible or buggy. Hence, one of the best solutions that can be used to fix Camera Error 0xA00F42A0 (SceneSwitchFailed) is to update the driver for the camera.
1. Click on Win + X to launch Device Manager.
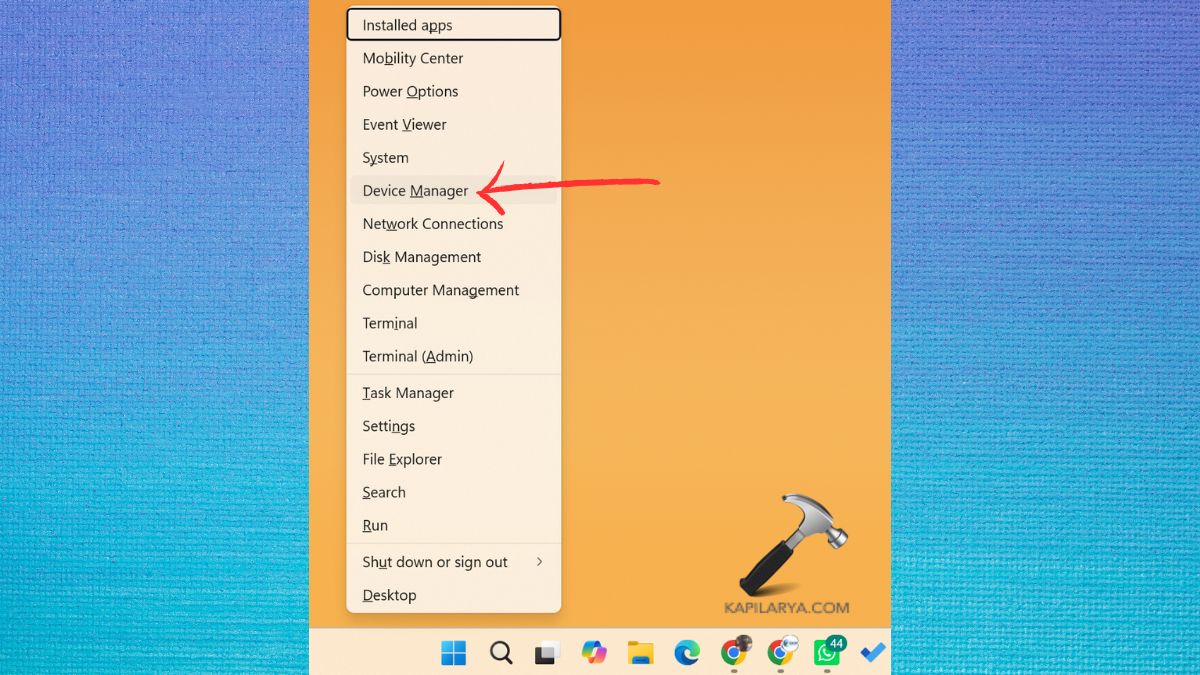
2. Expand Cameras. But if the camera is missing from Device Manager, follow this step-by-step guide.

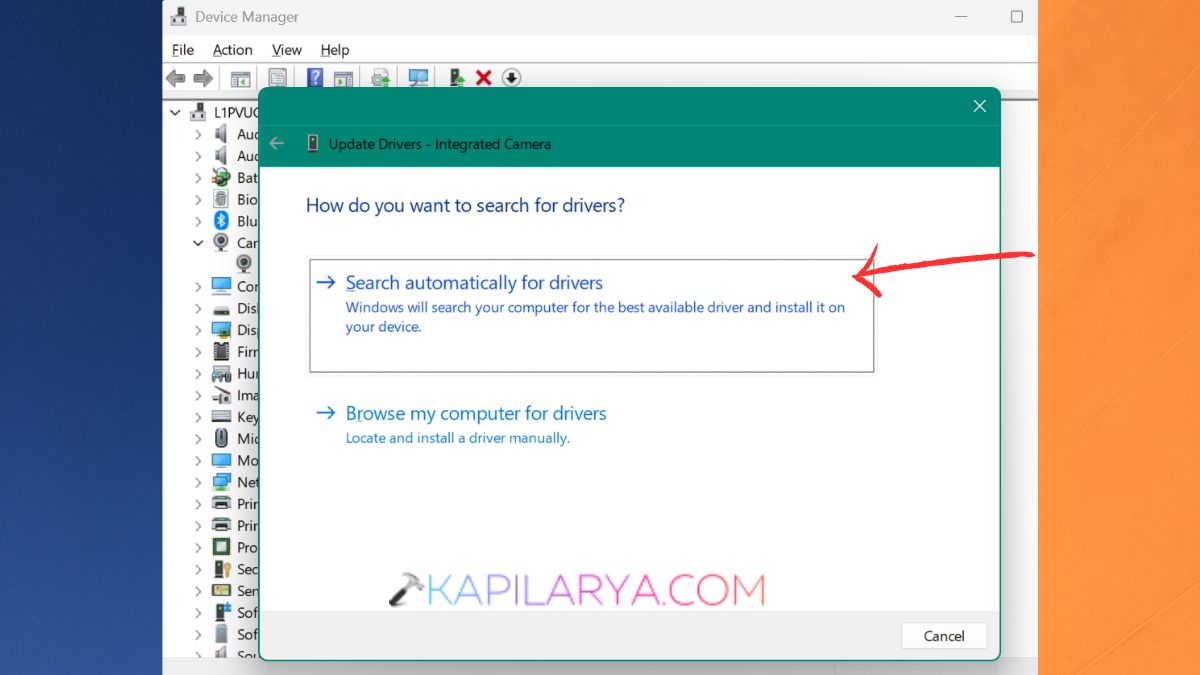
3. Find the webcam or camera built into your computer or plug-in. Right-click on the camera device. Select the Update driver option.
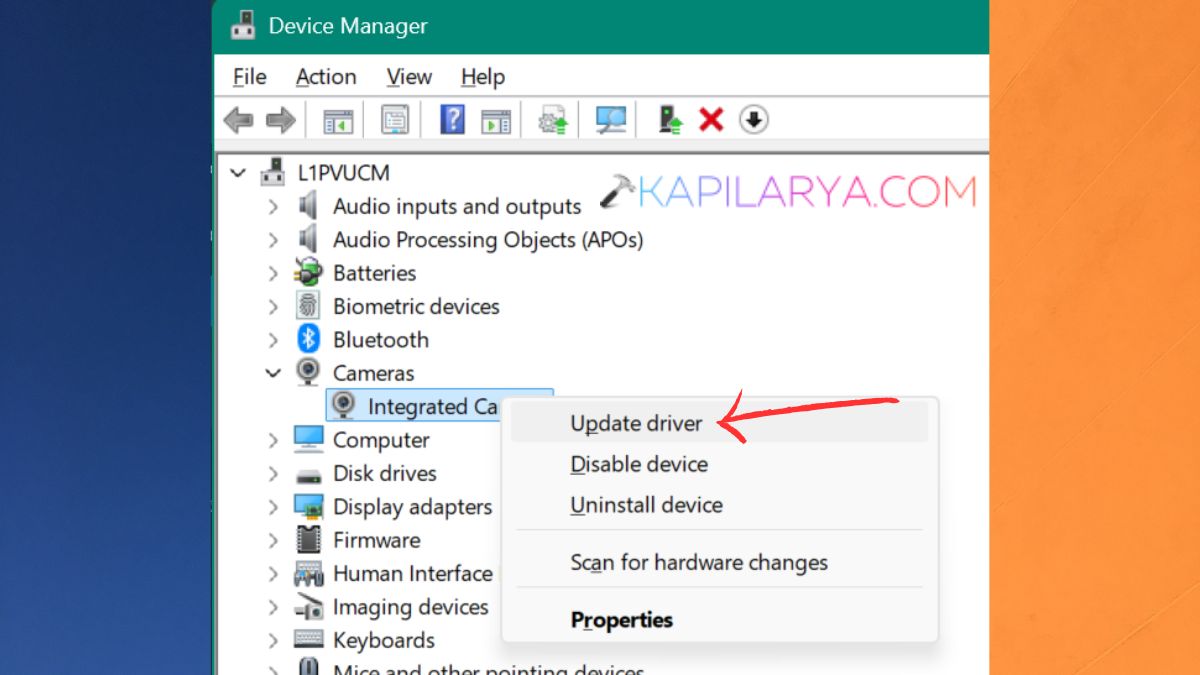
4. To find suitable drivers, choose “Search automatically for drivers”. Let Windows look for a driver, if one is available. If Windows does discover a driver, install it.
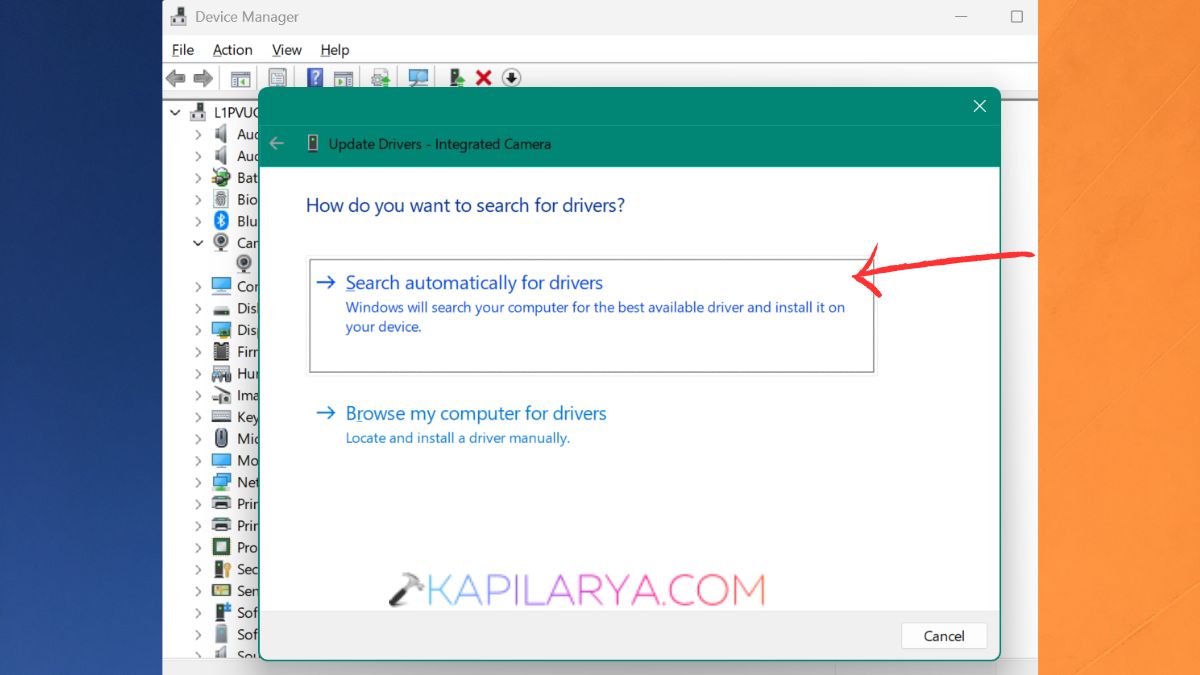
Once it starts, run the Camera app and see if the error code 0xA00F42A0 is gone.
Way 3: Run the Windows Camera Troubleshooter
Windows has included troubleshooting utilities to detect some hardware and system issue problems. If you can, try running the troubleshooter that is available, before making more advanced changes.
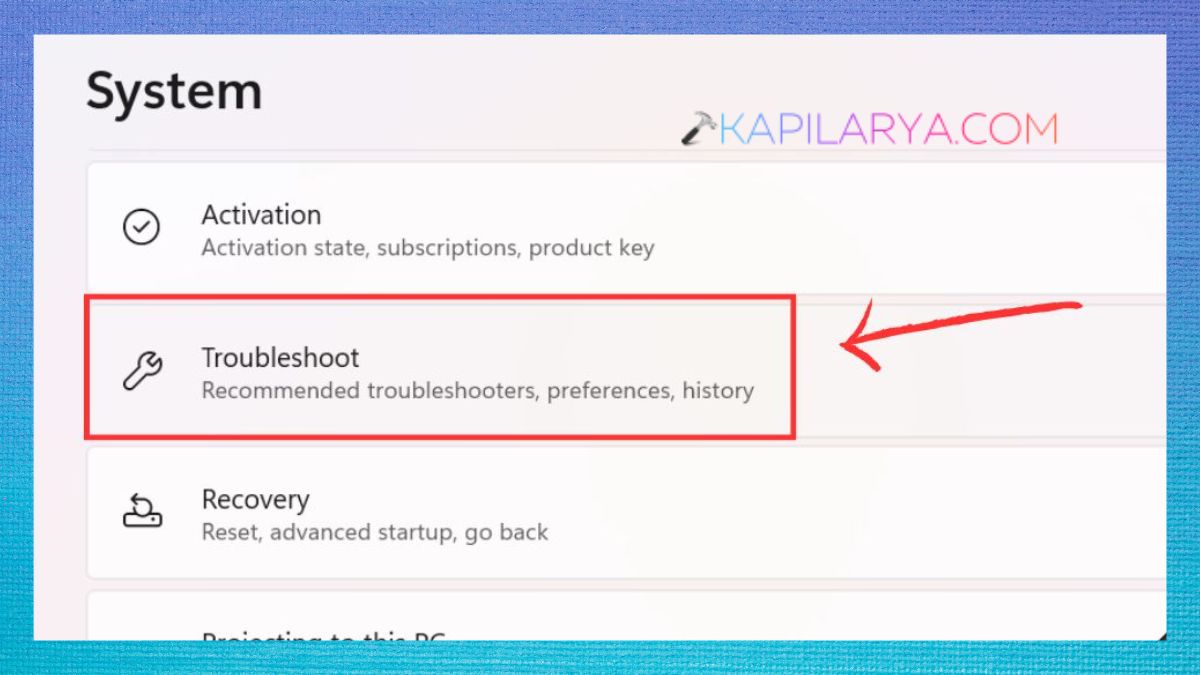
1. Use Win + I to drag to Settings. Select System > Troubleshoot.
2. Click Other troubleshooters.
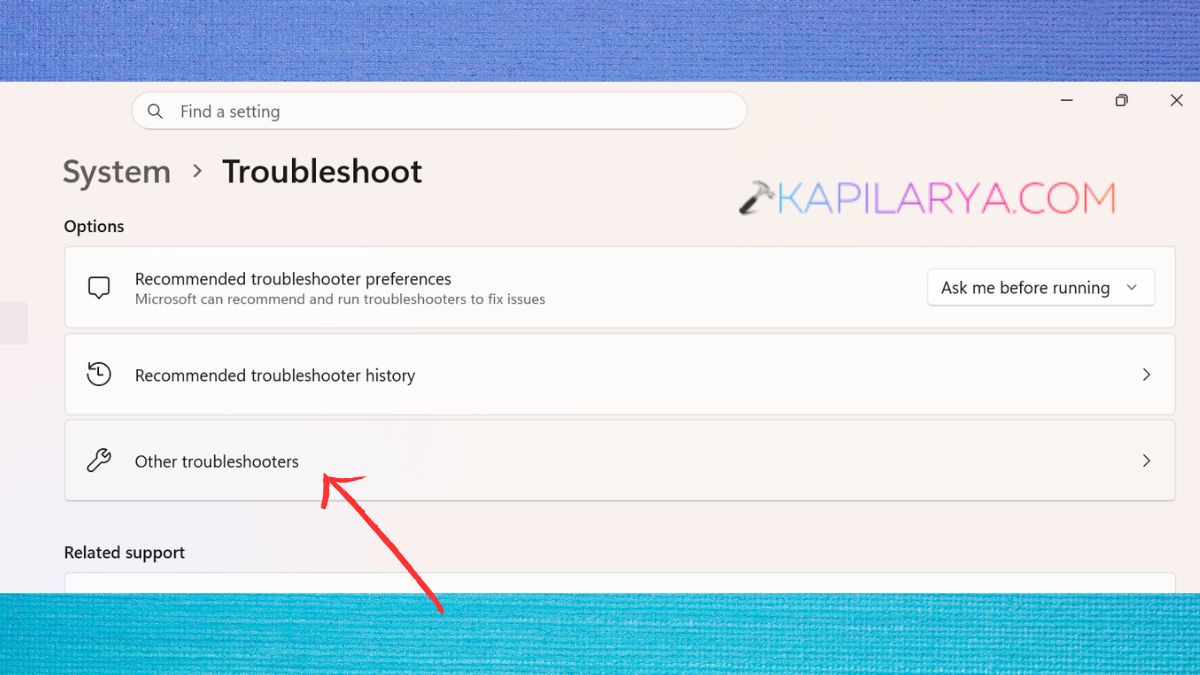
3. Find the appropriate troubleshooter for your camera/hardware. If available, press Run. Follow onscreen instructions. If there are any fixes recommended, implement them.
4. Once troubleshooting is complete, launch the Camera app and test it.
Way 4: Reinstall the Camera Driver
If updating the driver doesn’t solve the problem, the existing driver installation may be corrupt. You can uninstall the camera device from Device Manager and re-install its driver to refresh.
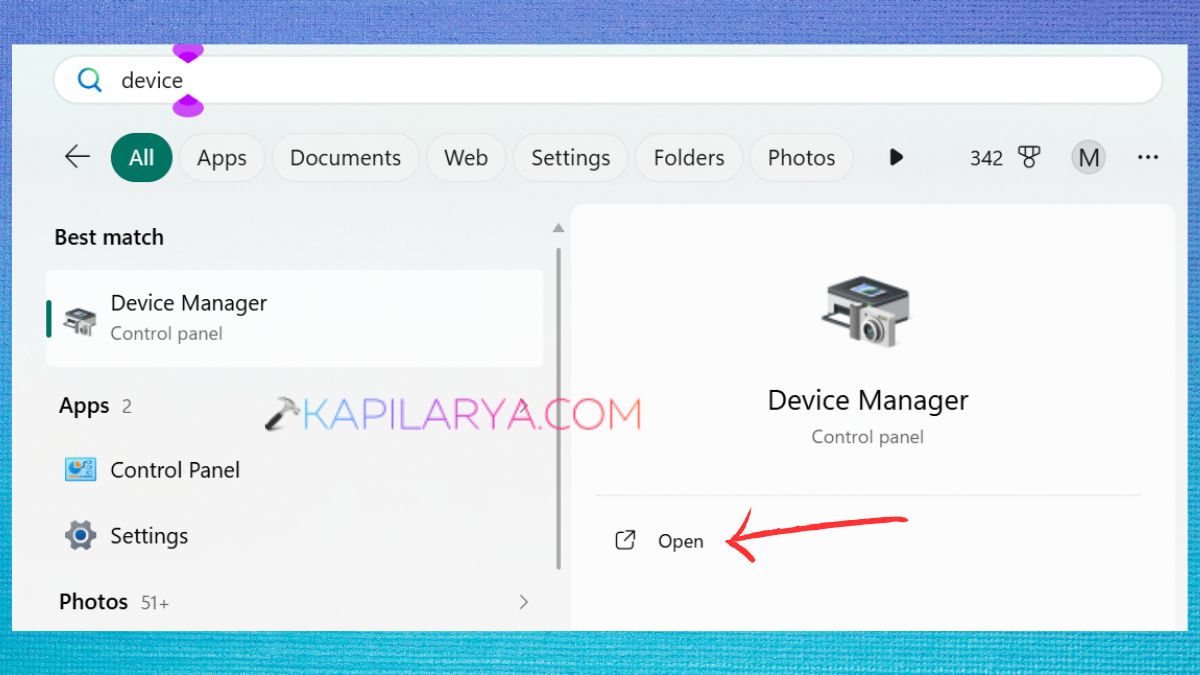
1. Once more, press the Win key to search and click Device Manager.
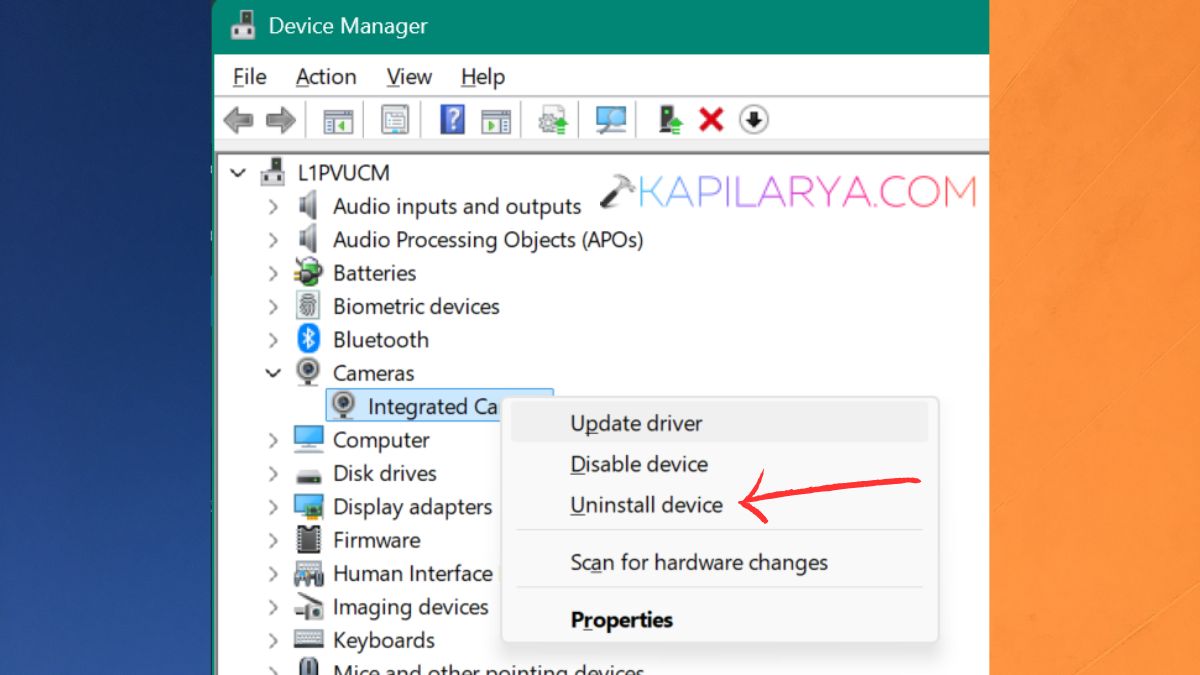
2. Expand Cameras. Right-click your camera. Select Uninstall device option.
3. If the window shows a pop-up that offers to remove the driver package, be sure to read the warning and make sure you want to choose it. Click Uninstall.
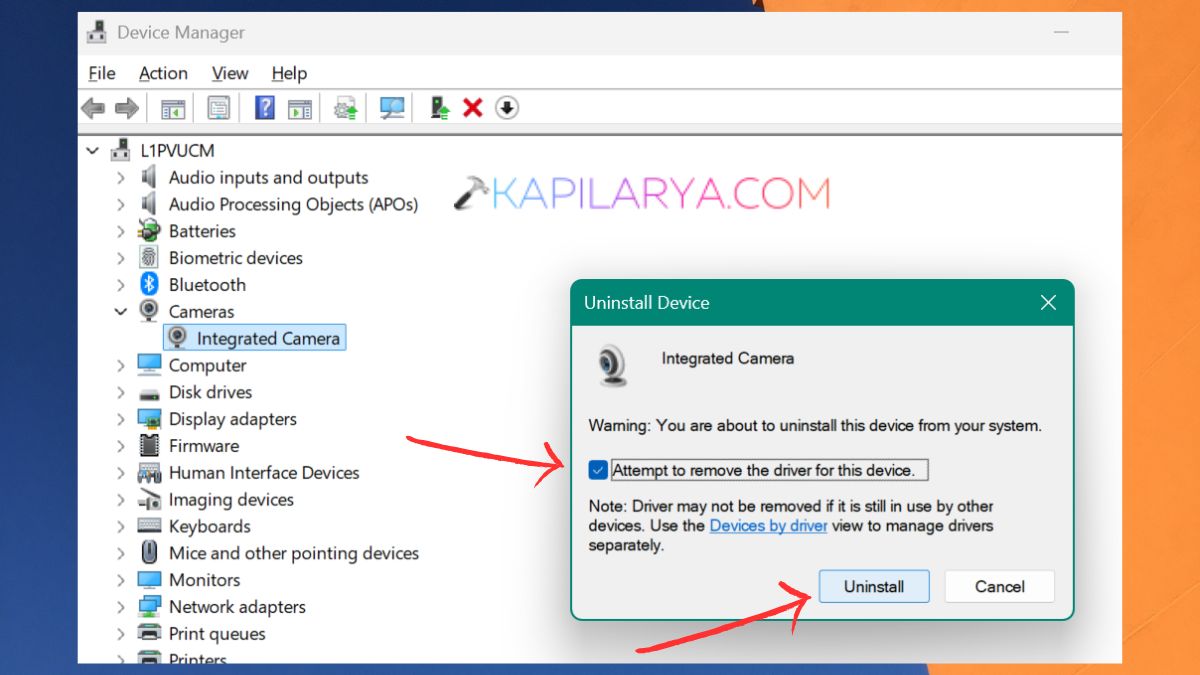
Once it has restarted, Windows will sense the camera hardware and install a proper driver.
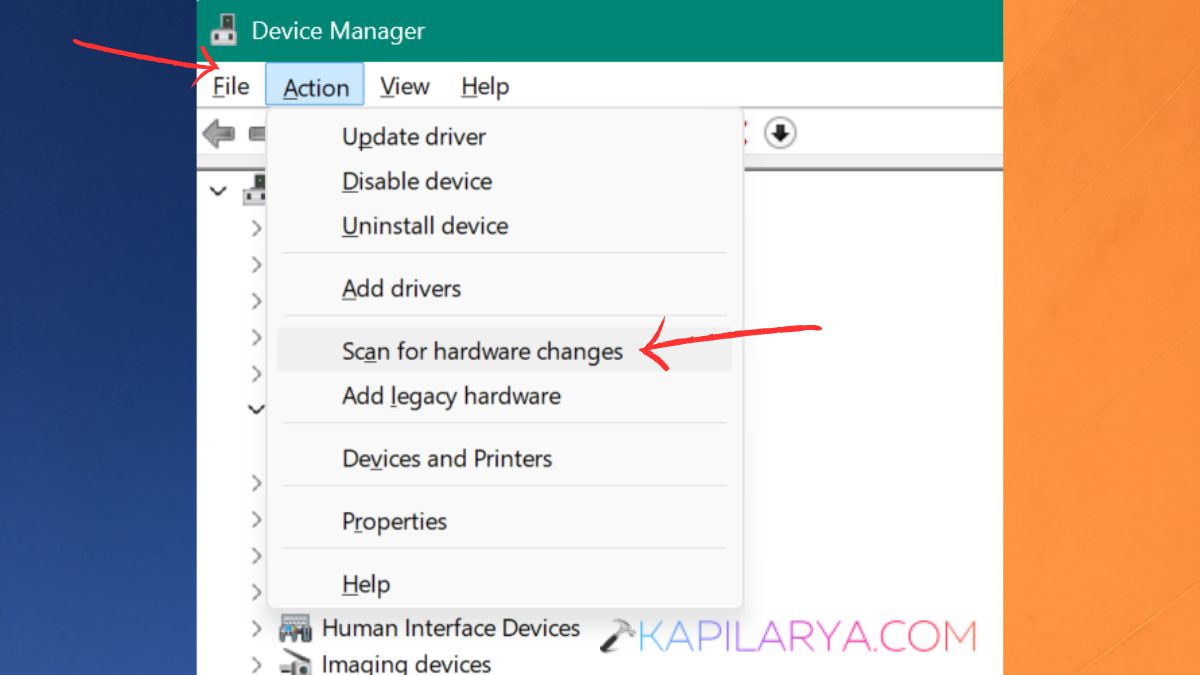
4. If Windows is unable to install the camera again, repeat the steps above and select Action > Scan for hardware changes in Device Manager. Windows will then try to find the camera.
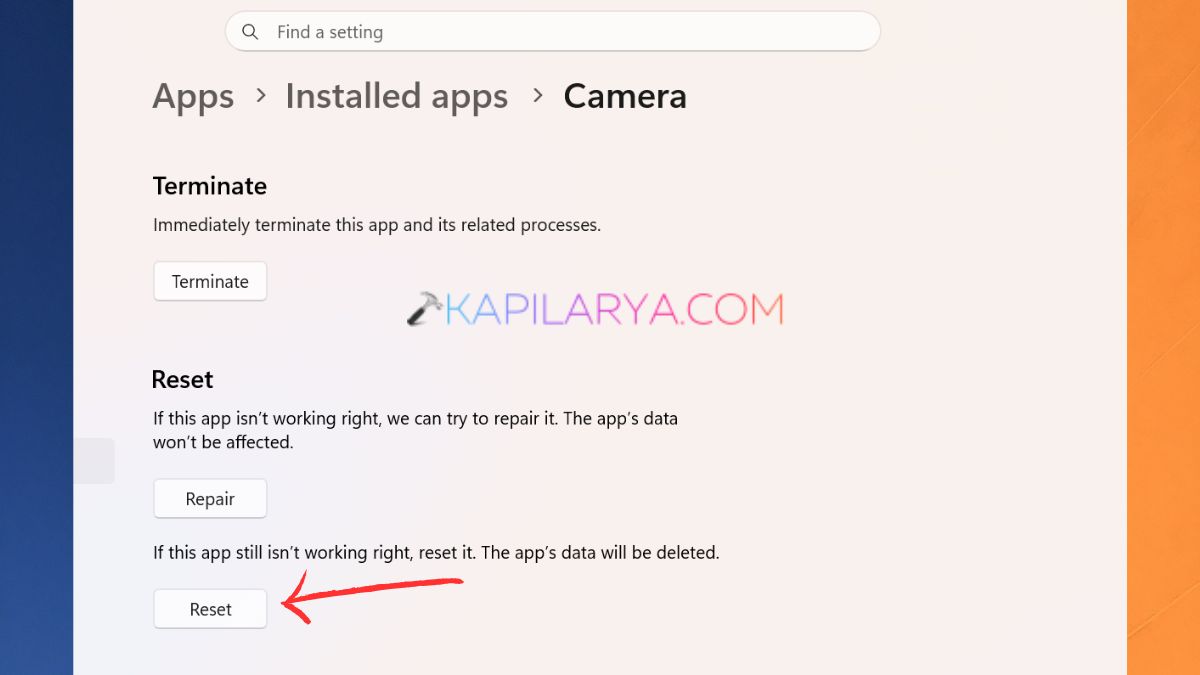
Way 5: Repair or Reset the Windows Camera App
The camera hardware and driver might be functioning properly. But the Windows Camera app might have become corrupt or damaged, and lost app data. You must be knowing, Windows 11 offers you options to repair or reset supported apps without having to uninstall them right away.
1. Open Settings. Select Apps. Click Installed apps.
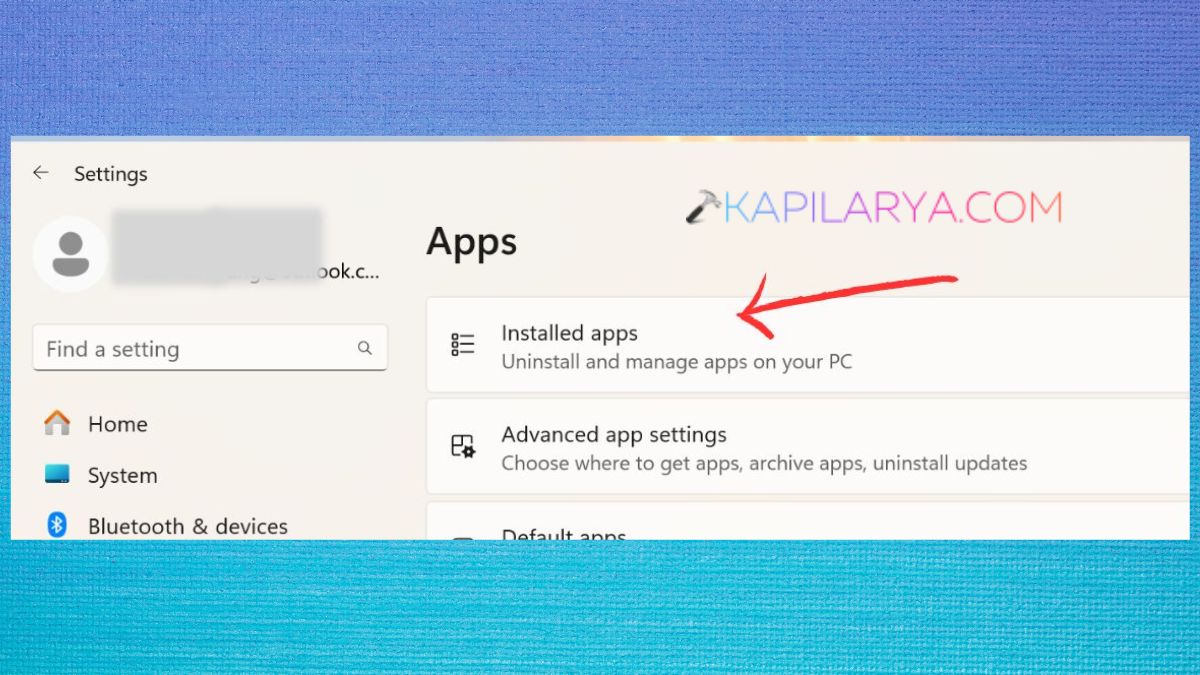
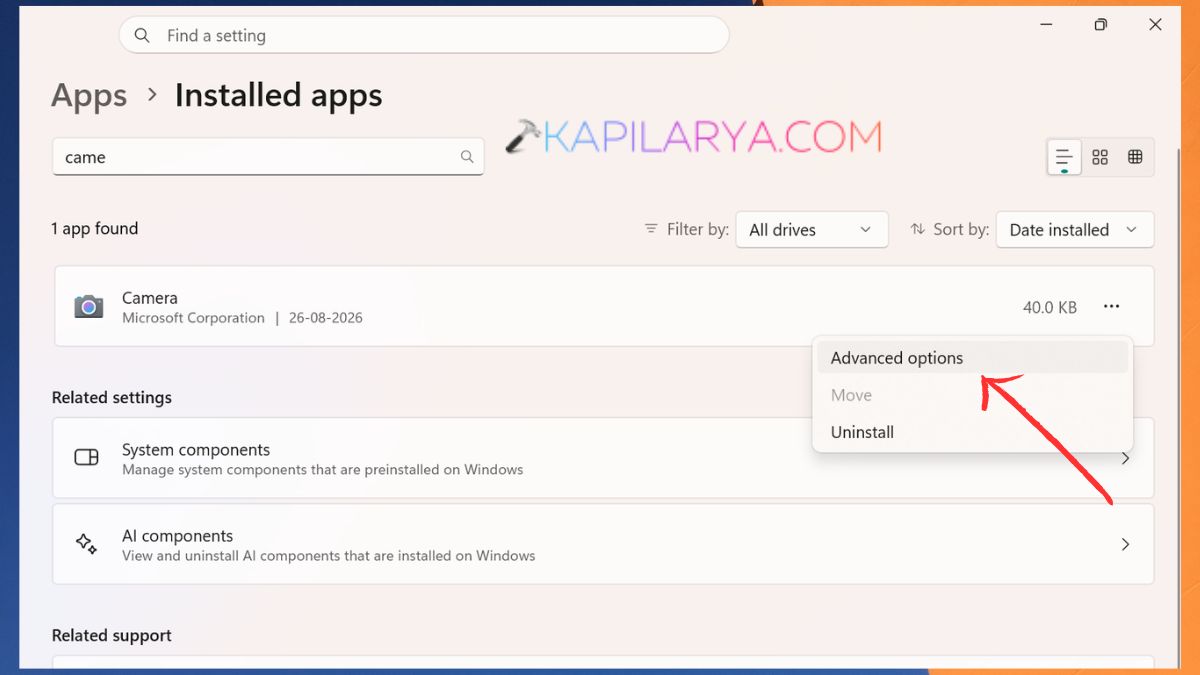
2. Search for Camera. Tap the three dots next to Camera. Select Advanced options.
3. Click Repair at the bottom. Wait until Windows has finished repairing itself.
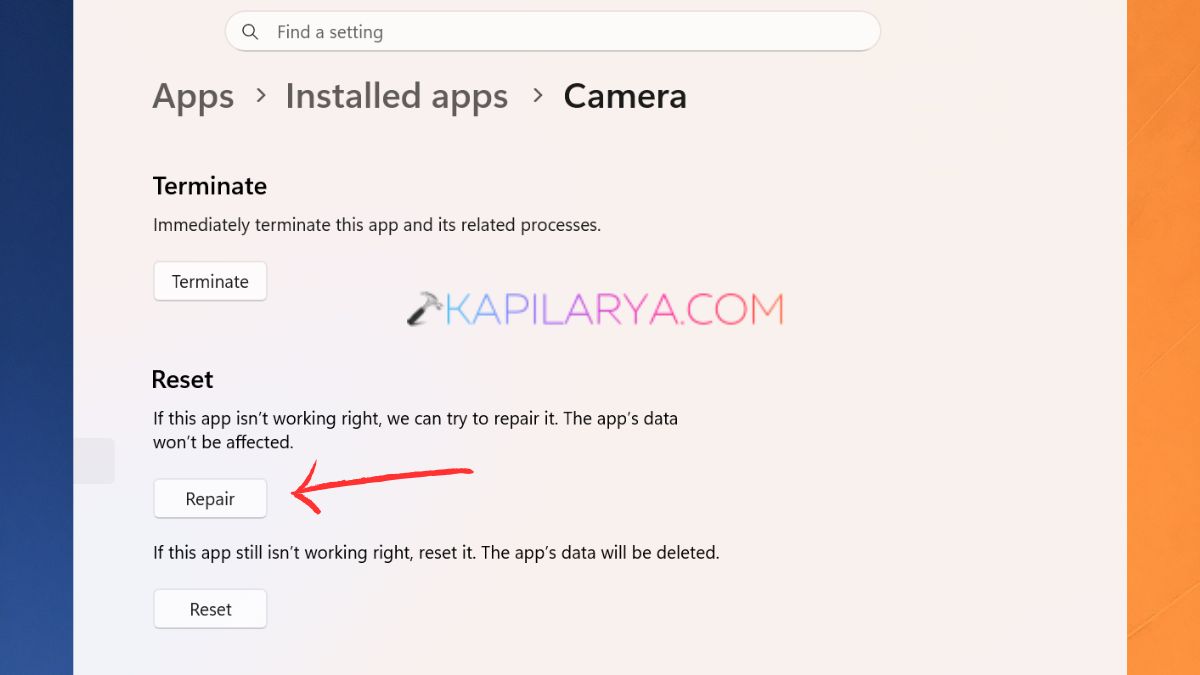
Use the Camera app and test it.
4. If repairing doesn’t work, return to Advanced options.
5. Click the “Reset” button. Confirm the action. Now, launch the Camera app again. As you notice, resetting will clear the app’s data and settings and should be used after Repairing has been done.
Frequently Asked Questions (FAQs)
That’s it!
![Fix: Camera doesn’t work in Windows 11 [2026 Fix]](https://www.kapilarya.com/assets/camera_privacy_1692031411.jpg)
![Guide to open RW2 files in Windows 11/10 [6 Options]](https://www.kapilarya.com/assets/Cam-2-768x508.jpg)
