
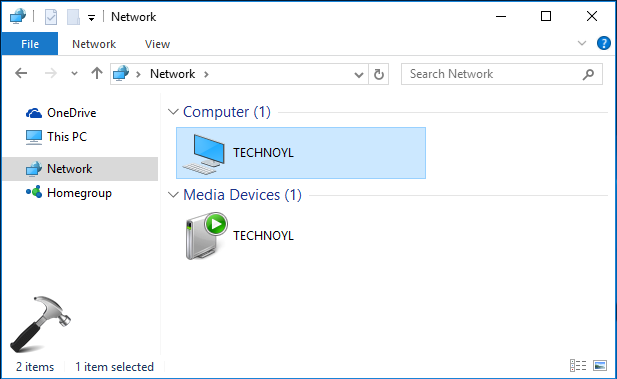
Password protected sharing is a networking based feature in Windows, with which you can allow or block other users on your system to access shared files, printers and public folders. By default, this feature is turned on and someone else having an user account on your system can go to Network pane in the File Explorer, to access the shared data. In this post, we’ll see how you can turn off Password Protected Sharing in Windows 11/10.
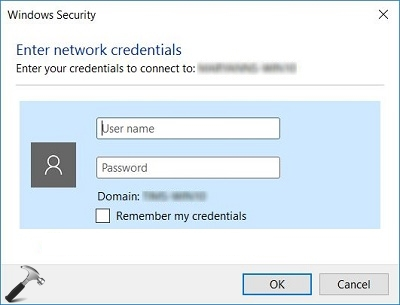
As I said that the password protected sharing is on by default, you’ll be asked to enter your credentials while accessing shared data:
Now if in your case, all the other members on your system are worth trusting and you do not want to let Windows ask them credentials each time they access shared data, you can turn off password protected sharing for them. There are two methods for it, discussed below. You should be an administrator of your machine to follow them.
Page Contents
How to turn off Password Protected Sharing in Windows 11/10
Method 1: Via Control Panel/Network And Sharing Center
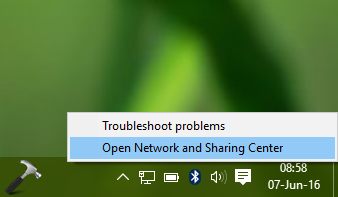
1. Right click on the network icon in taskbar notifications area and select Open Network and Sharing Center.
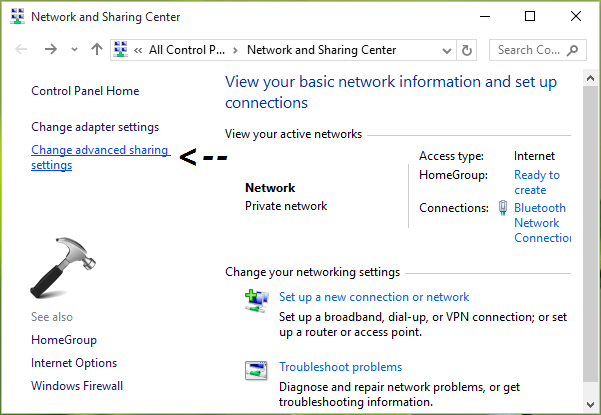
2. In the Network and Sharing Center window, click Change advanced sharing settings link as shown below.
3. Then in Advanced sharing settings window scroll down and expand All Networks. You’ll then find Password protected sharing heading. Under it, select Turn off password protected sharing option and click Save Changes.

You can now reboot your system and password protected sharing will be turned off after restarting your system. In case if the same doesn’t happens, you need to turn off password protected sharing by tweaking registry, which is mentioned in Method 2.
Method 2: Using Registry Editor
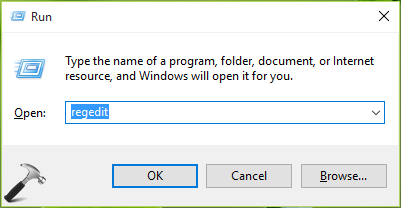
1. Press Windows + R and put regedit in Run dialog box to open Registry Editor. Click OK.
2. In the left pane of Registry Editor, navigate to following registry key:
HKEY_LOCAL_MACHINE\SYSTEM\CurrentControlSet\Control\Lsa
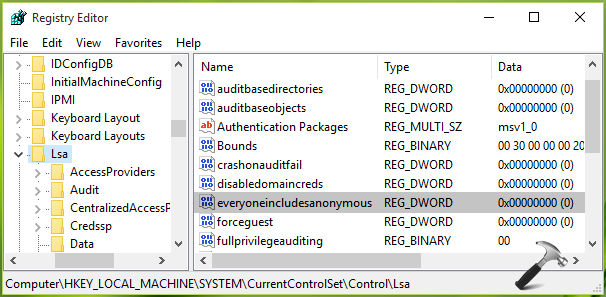
3. In the right pane of Lsa key, look for registry DWORD (REG_DWORD) named everyoneincludeanonymous which might have value set to 0. Double click on it to change the value.
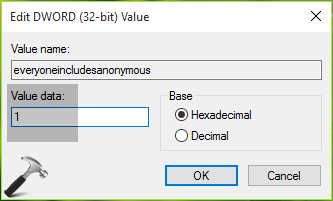
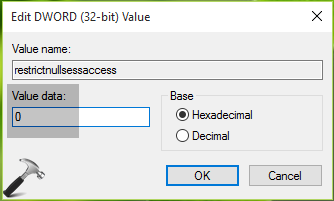
4. Now modify the Value data in Edit DWORD Value box and set it to 1. Click OK. Then navigate to following registry location:
HKEY_LOCAL_MACHINE\SYSTEM\CurrentControlSet\Services\LanmanServer\Parameters
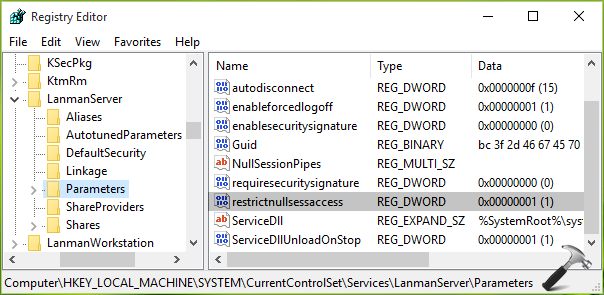
5. Lastly, in the right pane of Parameters key, set the registry DWORD (REG_DWORD) named restrictnullsessaccess from 1 to 0. Close the Registry Editor and reboot.
After reboot, you’ll find that password protected sharing is finally turned off.
Method 3: Using LUSRMGR
If you’re on upgraded Windows 10 Anniversary Update or later, above mentioned methods may not work for you. Our reader “Kissache” has shared an alternative method that you can use in this case.
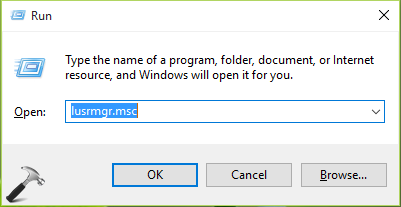
1. Press  + R and type lusrmgr.msc into Run dialog box, click/tap OK to open Local Users and Groups snap-in.
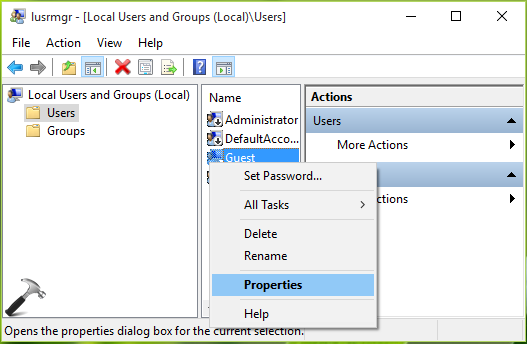
2. In next window, click Users.

3. Moving on, then right click Guest and select Properties.
4. Finally in Guest property sheet, check Password never expires and uncheck other options present there. Click Apply followed by OK.

Reboot, and Password Protected sharing should be turned off.
That’s it!
Originally written on JUNE 7, 2016. Updated for Windows 11.


The registry method does not work for me with anniversary edition.
[HKEY_LOCAL_MACHINE\SYSTEM\CurrentControlSet\Control\Lsa]
“everyoneincludesanonymous”=dword:00000001
[HKEY_LOCAL_MACHINE\SYSTEM\CurrentControlSet\Services\LanmanServer\Parameters]
“restrictnullsessaccess”=dword:00000000
^^ Have you rebooted after performing registry manipulation?
Thank you for your answer. Yes I’ve rebooted and checked the registry entries too, no permission error.
Still asking for password while they try to access my shared folder.
^^ I’ll check and get back to you. Thanks for your feedback!
Thanks, waiting for your reply.
^^ It’s working fine here, if you’re facing this issue with HomeGroup, you can unjoin it and join net shared workgroup.
Yes I’m trying to use it with homegroup. How can I join a net shared workgroup without a server? Couldn’t find anything useful in google.
Unable to turn off protected sharing after the Anniversary update, but was working fine before. After turning it ‘off’ and saving change, it returns to ‘on.’ Tried the registry changes, but didn’t fix it. After logging in with MS account, I am able to see /access files even when using the ‘local’ account, but this setting cannot be changed. Any ideas?
^^ Odd, I suggest you to report the issue to Windows team with the help of Feedback app. Don’t forgot to mention your Windows 10 edition with your message.
I solved this. This was as simple as Control Panel | Network & Sharing Centre | Advanced Settings | All network Options | Turn Off Password Protected Sharing. Seems the update flipped it back on.
^^ Might be the cause is upgrade. IMO, users with clean install won’t have that issue.
Same here it doesn’t work after upgrading to anniversary.
does not work… same problem as Daniel except I dont use groups…
After 2 hours (Jesus !) updating to anniv, turn off doesn’t work with either method. I had to go back to the previous windows version cause the office network did’nt work properly. Thanks Microsoft, you really did it this time. I really don’t know how many millions of work hours are wasted with this “free” update.
Right on Bokos, I’ve, intermittently, been trying to fix this for two days. I’m gonna do what you did, go back to previous version. What a waste of time.
This didn’t work for me either. I am running Windows 10 Pro. I noticed an error in the last upgrade. I looked at the registry in step two (services) when I was following your suggestion and noticed a line “EnableAuthenticaticateUserSharing” set at 1 and was wondering if this is the line that might need changing. I am no expert at this by the way. I also have 5 other computers networked as a workgroup and this one is the only one the seems to have the sharing
access issue. Any more recommendations would be appreciated. Thanks
I have the problem also. Only he windows drive I affected other drives on the same computer can be set shareable. I have several customers that have the problem after receiving the Premium upgrade..
Hello, after the Anniversary Update of my Windows 10, I had exactly the same issues as all the people here, but I found the solution on the web.
So…. everything that Kapil Arya wrote here works perfect, BUT ONLY if you also make sure to open the “Properties” dialog-box for the “Guest” built-in account in “Computer Management” and make sure that “Password never expires” is selected whilst all the other check boxes are NOT selected.
After doing that, the “Password protected sharing” will remain turned OFF no matter what method you use to turn it off.
Have a nice day everyone,
Kissache
^^ Thanks for your inputs on this 😊 I’ve updated the post with your method 😉
Hi there!
The Kissache’s solution works for me:
1.- Computer Management.
2.- Users
3.- Guest (properties)
4.- Check “Password never expires”
5.- Deselect other checkboxes.
Now “Password protectd sharing” can turned OFF.
Thank you so much.
^^ Great!
Also works for me. The guest set at “Password never expires” is the key. Simple and easy. I had fixed the problem temporarily by restoring system in past. Problem recurred with new update. Your solution is a fast fix if it happens again and may when update occurs later. This needs to be shared with MS.
Thanks
^^ Thanks for re-confirming it :) I’ve updated the post with Kissache’s method. Credits to him for sharing working solution!
In my version, Local Users and groups are not allowed, said “This snapin may not be used with this edition of windows 10. To manage user accounts for this computer, use the User Accounts tool in the control panel.” Please help.
^^ Refer: https://www.kapilarya.com/this-snap-in-may-not-be-used-with-this-edition-of-windows
I can’t do step 3 on home edition, and the fix given only works on Windows 8. Is there a command line tool to achieve the same result?
^^ You can try FIX 1 & 2 on Home edition.
If ever I needed a reminder why I hate MS, Win 10 is it.
All my office machines run Win 7, took the plunge and upgraded a laptop to Win 10 ver 1703, now have lost network connections from the Lap top to the MSHOME win 7 machines, can see them but denied access.
The option to turn off “password protected sharing” is not available, tried the above mentioned lusrmgr.msc solution, that does not work either, and, the Win 7 machines do not display the laptop in the network.
I have a business to run, and cannot waste time with MS Win 10, who is going to pay me for lost business MS, I doubt it.
I don’t know what the solution is, perhaps a different Operating system?
it work nicely , this is helpful for us. thank u so much.
^^ Glad we could help 😎
Changing the guest account fix my problem – again. It broke under the anniversary update and broke again with the creator update. Now, ‘protected’ stays ‘off.’ Still have the ‘master browser’ issue, a gift from the 1703 update, but there’s workarounds.
Thanks,
Dennis
^^ 😊
Thanks for the fix it works, I update Win 10 to 1703 last weekend since MS nag so much and than I can’t turn off password protect sharing, MS should have this FIX
^^ Glad the fix worked 😊
Dear Kapil,
I have Server 2016 and I had set my Password Protected Settings as “Turned OFF”. All of the sudden it became ON and now I am trying to Turn OFF but as soon I save changes and go back to check again under Advance Network Sharing Settings, I find it ON. Whatever I try its not getting off.
Please help me.
Regards
^^ Have you tried the registry and lusrmgr based fixes mentioned here?
Can you please include commandline alternatives? Thanks
Hi there I tried resetting the Guest password and guest what it works just don’t forget to uncheck the other and check the never expire password and it will go back smoothly.
^^ Thanks for your inputs 😊
it is amazing that we have to come here to get real helpful advice!
Still on MS’ Win10 support & help site no mention of all this.
What would we simple users do without guys like Kapil and Kissache?
a VERY B I G THANK YOU !!!
^^ Thanks a lot for your wonderful feedback!
In February 2018 and this problem remains in all Windows 10 machines purchased (and new) from both Dell and HP.
Method one: No matter how many times I reset the Turn off Password Protection in Control Panel > Network Sharing (and accessing the same page from other locations), the system automatically turns that setting back to “Turn on … ” after saving the pages and after saving the pages and rebooting the machine.
Method Two: Set those two registry values as recommended. Reboot the machine. Those values reamin. And Network Sharing still goes back to “Turn on …”
Method Three: lusrmgr.msc does not let this option work. It reports that Snap In not available with this reversion of Windows 10.
All machine purchased over six months ago (Windows 10 on Dells) work just fine. All machines purchased in the past few months will not longer permit “Turn off Password Protection “. I can always enable to option and save changes. And it always “Turns on Password Protection”
When will Microsoft fix a problem that once did not exist and that (from I can see) remains a constant problem with so many. I have spend, now, days trying all type of options (ie setting other options in the Network Sharing page) without any results.
Again, those Registry values remains changed as listed in Option 2. And still the system will no long turn off password protection.
have the same issues as Tom Wasson ^^^
my system:
1. a desktop running the free Win 10 Home anniversary version, upgraded two years ago or so from a cleanly installed Win 7 Home OS …
2. a laptop with Win 10 Pro, which is also probably a free anniversary upgrade version because it’s an old 2010 machine that I received as a gift … (have no idea what the older Windows version on this one had been though but guessing it was a Win 8 or 8.1 …)
the Windows 10 Home version on my desktop: 1803 (OS Build 17134.81)
the Windows 10 Pro version on my laptop: 1709 (OS Build 16299.192)
networking was quite fine on both machines until last week but I think some recent update from Micro$oft ruined my system that was working fine until last week …
could access either machine and most of their connected device from each one with very little problem but now i’m stuck!
none of the above methods given on this page have worked for me either and i’m guessing this is also another one of those cases where Micro$oft will not only leave unsolved, but will also make it worse with ‘new’ patches and updates etc!
am also guessing maybe the recent privacy policy changes every organization has done following the Facebook Cambridge Analytica scandal and the new GDPR thing might be the cause of this, possibly because Micro$oft is applying its own online and Internet security measures but i’m not sure about it and who cares, M$ **** big time as usual!
_ _ _
i’m also having these ‘obligatory’ updates (especially on my Win 10 Pro laptop) that sometimes restart the machine without even asking for my permission or any warnings in some cases! but well, that’s another problem i’m sure Micro$oft will never solve either!
None of these solutions work for me.Going crazy trying to fix it.
This seems insecure, “everyoneincludesanonymous” making anonymus get access to something that a user/guest has access to, is there a microsoft reference that says otherwise?
^^ Reference: support.microsoft.com/en-in/help/278259/everyone-group-does-not-include-anonymous-security-identifier
Just a bump that its September 2018 and I have the same as Tom Wasson, the sharing facilities do not work and none of these fixes listed work anymore, “This snapin may not be used with this edition of Windows 10. To manage user accounts for this computer, use the User Accounts tool in the Control Panel.” Absolute palava trying to sort this out!
Hi Kapil. I decided to try the lusrmgr method and it worked. Thanks!! like others the sharing issues with Windows 10 have been a worry. I have several PCs all updated to Windows 10 (Sept 14th 2018) I thought the problem with sharing files was because I also have an XP Pro PC. Still issues but at least I can apply a fix if any otghe others have the same problem.
^^ Happy to help Geoff 😎
I’ve got a Lenovo laptop running Windows 10 Home and I’ve just got an HP Tower running Windows 10 Home.
I can share HP folders so the Lenovo can read/write them but not the other way round.
The Lenovo keeps reverting to password protection with method 1.
I’ve tried method 2 and it still reverted.
I tried method 3 but “the snapin may not be used with this edition of Windows 10.”
I tried the [FIX] mentioned but that still said snapin may not be used with this edition of Windows 10.
Don’t see SYSTEM\CurrentController in my reg. In fact it shows just a a few entries, so I couldn’t use this procedure.
Running on most current version of win 10, build 1803. Noticed that on one of two my Laptops (Toshiba), I can turn off password protected sharing, but not on my desktop or my other laptop (HP). The desktop and the HP laptop can communicate with sharing on. So, I suspect that it is a leftover from when they were communicating using homegroup. There are windows credentials already setup. The Toshiba laptop was never part of the homegroup. So, I am back to square one. Nothing works
^^ You need to go CurrentControlSet after SYSTEM, not CurrentController.
In my Windows 10 PC, when I open Computer Management, the OPTION “USERS”…does not exist at all (!!!???). Instead, under the option “SHARED FOLDERS” there is an option “PERFORMANCE”…
Does anybody suffer a similar problem?
^^ You need to find “Users” option in lusrmgr snap-in, not in Computer Management snap-in.
Good with that and it work, but how can we change this password ? I long on my computer without any user/password,
I HAVE IT NOW:
Go to search and type control panel
Then search in control panel for user accounts.
Click the guest account and select Remove the password for the Guest Account or Turn off the Guest Account.
If that does not work then right click your start button and select run.
Type the following.
control userpasswords2
Select the Guest account and click Reset password.
Leave both fields blank.
Reboot and try the connection again.
^^ Thanks for your inputs!
It’s 2019-04-27. None of the suggestions works. It seems that one of the recent updates has completely removed the guest account.
^^ What is the current build you’re on?
Build: 17134.706
Version: 1803
^^ So you’ve KB4493464 installed recently and atm there are no such known issue of removing guest account with this update. I recommend you to install V1809 and see if that helps!
I went to updates. It is now downloading kb4346084
Now the updater says i am up to date. I am not being offered 1809.
^^ You can upgrade via ISO file: https://www.kapilarya.com/how-to-upgrade-to-windows-10-using-iso-file
Finally got 1809 installed. Suddenly there’s no problem giving access through the LAN without a password. Whatever the programmers did ths time: DON’T CHANGE IT!
Thank you for your time, Kapil Arya.
^^ Glad the issue is finally resolved 😊
method 3 is great, Thanks
^^ Thanks farhad!
Thank you,
I had previously performed Method 1 and 2 with no luck.
Method 3 was the step that allowed me to turn off Password Protected Sharing.
^^ Glad to help Karl!
AWESOME help, Worked well for me.. Thanks for posting!!!
^^ Glad to help Frank!
Worked fine on Windows 10 Pro, version 2004. Thank you!
^^ Glad to help Cristian!
I faced the same problem many times after update or after checking registry.
I now use the following method in my w10 home version which works always, but from time to time you have to check and maybe do it again. use now the latest W10 home version
Here it is:
go to command prompt
Type after system 32 : Net user guest * (be sure there is one space between guest and *)
It will ask then for password , do not fill in anything and Enter
confirm password and fill in nothing and enter .
Then look at all networks and password check is off and stays off.
However check from time to time
BvdH NL
^^ Thanks for adding this Ben!
Ran into trouble as well – using admin powershell I was able to disable password requirement for this messed-up Guest account (which I think was carried over from my windows 7 upgrade) via this command: net user guest /PASSWORDREQ:NO
I was then able to turn off password protected sharing
^^ Thanks Josh for adding this!
Thanks Pizza Calzone.
This fixed the problem on my win10 machine.
_______________________________________
Pizza Calzone
2 years ago
I HAVE IT NOW:
Go to search and type control panel
Then search in control panel for user accounts.
Click the guest account and select Remove the password for the Guest Account or Turn off the Guest Account.
If that does not work then right click your start button and select run.
Type the following.
control userpasswords2
Select the Guest account and click Reset password.
Leave both fields blank.
Reboot and try the connection again.
Method 3 worked like a charm! Thanx!
^^ Glad to help Ralph!