
These days most of the notebooks or laptops comes with webcam pre-installed. Also, in Windows 10, the Camera app comes pre-installed with the operating system. This eliminates extra steps for you to download the camera software independently from your device manufacturer. If the camera driver is installed on your system and is working fine, the camera app can easily connect it. So you can simply launch Camera app on Windows 10 and you are ready to use webcam, without following any extra steps. If you have privacy concerns with your camera and you want to disable webcam in Windows 10, this article is for you.
Due to significant increase in web crimes, privacy is one of the most concerned matter in online world. There have been some cases where hackers have used victim’s own webcam and have recorded them without their consent. Hackers can compromise the system and gain access to monitor your activities. Hence, it is really important that you should take care of the privacy settings on your device. So if you are not using webcam on your system, you can simply disable it. And of course, you can enable it only when you need it.
So here is how to disable your webcam in windows 10.
Page Contents
How to disable webcam in Windows 10
Method 1 – Using Settings app
1. Right click Start Button or press  + X keys and select Settings.
2. In the Settings app, navigate to System > Privacy.
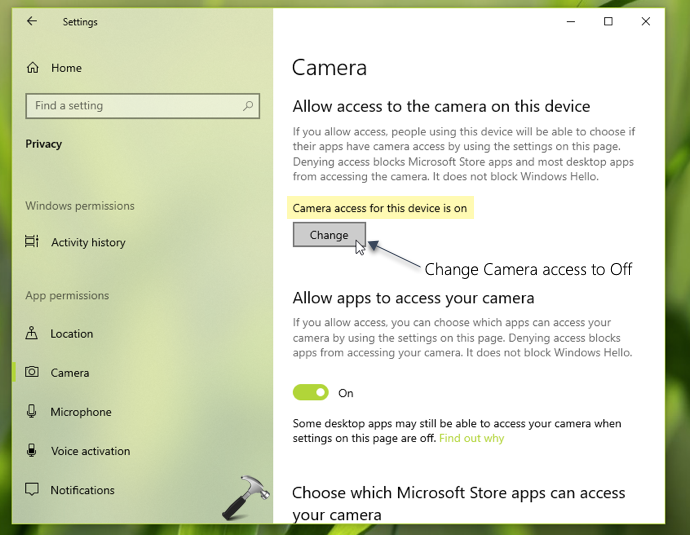
3. In the right pane of Privacy, Under Allow access to the camera on this device, click on Change and set camera access to Off.
Your settings should be immediately saved and applied.
Method 2 – Using Device Manager
1. Press + R and type devmgmt.msc in the Run, hit Enter key to open Device Manager snap-in.
2. In Device Manager, under Imaging devices, locate your camera device/driver and right click on it, select Disable device.

3. The device should be immediately disabled now and you can then close Device Manager.
—
If you later need to enable webcam again, simply change Camera access to On (using Method 1) or right click on camera device and select Enable device method (using Method 2)
That’s it!
![Guide to open RW2 files in Windows 11/10 [6 Options]](https://www.kapilarya.com/assets/Cam-2.jpg)