In Windows 10, Windows Hello Face is integrated into Windows Biometric Framework (WBF). This feature is designed to offer enterprise grade identity verification to customers. You might have heard that Windows Hello Face is only available on devices which have its compatible hardware installed. That’s true and the camera used in the Windows Hello Face authentication is specialized in near infrared (IR) imaging.
If you’re using Windows 10 V1607 or later, Microsoft has provided the ability to automatically dismiss lock screen, when your face is recognized. You can manually turn on this option using either of methods mentioned below.
Page Contents
Automatically Dismiss The Lock Screen When Windows Recognizes Your Face
WAY 1 – Using Settings App
1. Right click Start Button or press  + X keys and select Settings.
2. In the Settings app, navigate to Accounts > Sign-in options.
3. In right pane of Sign-in options, under Windows Hello Face, turn On the Automatically dismiss the lock screen if Windows recognizes your face option.
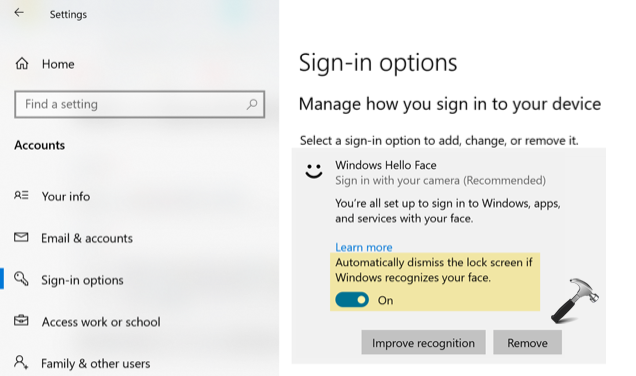
4. Your settings should be immediately applied. You can now close Settings app and return to Desktop.
Method 2 – Using Registry
1. Right click on and select Command Prompt (Admin). In the administrative Command Prompt window, type following command:
wmic useraccount where name='<USERNAME>' get sid
*Replace <USERNAME> with your actual user account name.
Once command is executed, note down the security identifier (SID).
2. Press + R and type regedit in Run dialog box to open Registry Editor (if you’re not familiar with Registry Editor, then click here). Click OK.
3. Go to HKEY_LOCAL_MACHINE\SOFTWARE\Microsoft\Windows\CurrentVersion\Authentication\LogonUI\FaceLogon\<YOUR SID>.
*Substitute your user account SID obtained in step 1.
4. In the right pane, double click on the AutoDismissOn registry DWORD (REG_DWORD) and set it to 1 to automatically dismiss lock screen, when Windows recognizes your face.
5. Close Registry Editor and reboot to make changes effective.
Hope you find the guide useful!
![Windows Hello not working in Windows 11/10 [2026 Fix]](https://www.kapilarya.com/assets/Windows-Hello-768x343.jpg)