If you often need files from Office.com for your work, this article may interest you. With the latest Preview Builds of Windows 11, Microsoft has added ability to get files from Office.com directly into the File Explorer Home. Worth to mention here that famous Quick Access feature is now renamed to File Explorer Home. In this article, learn how to show or hide files from Office.com in Windows 11 File Explorer Home.
There are multiple ways you can configure and enable this option. All of these ways are mentioned here.
Page Contents
Show or hide files from Office.com in Windows 11 File Explorer Home
Method 1 – Via Folder Options
1. Run control folders command to open Folder Options.
2. Inside Folder Options, under Privacy, check Show files from Office.com to enable the feature. If you ever want to disable the feature, uncheck this option.
3. Click Apply, OK.

Method 2 – Using Group Policy
IT Pros and system administrators can use this method to manage the feature for their clients.
1. Press  + R and put
 gpedit.msc in Run dialog box. Click OK to open Group Policy snap-in.
2. Go to following location:
Computer Configuration > Administrative Templates > Windows Components > File Explorer

3. Double click on Turn off files from Office.com in Quick Access view to edit. Select Enabled to enable the feature or Disabled to disable the feature.
4. Click Apply, OK.
Method 3 – Using Registry
You can configure this feature on per user basis with below registry tweak.
 Registry Disclaimer: It is recommended to create a System Restore point first, if you’re not familiar with registry manipulation.
1. Run regedit command to open Registry Editor.
2. In left pane of Registry Editor window, navigate to:
HKEY_CURRENT_USER\Software\Microsoft\Windows\CurrentVersion\Explorer
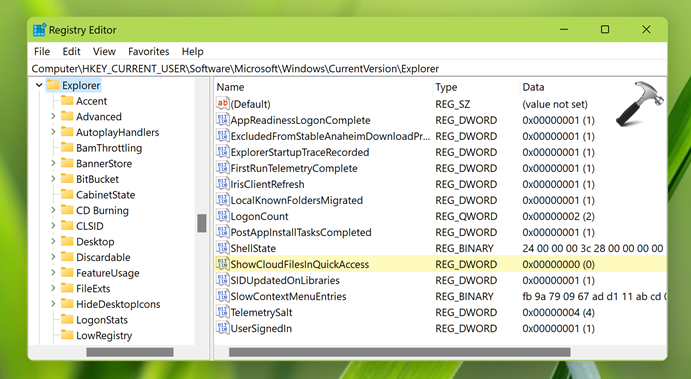
3. In the right pane of Explorer registry key, locate or create ShowCloudFilesInQuickAccess. When you set its Value data to 1, the feature would be enabled. When you set it to 0, the feature will be disabled.
4. Close Registry Editor, sign out and sign in back to make changes effective.
That’s it!