
If you’re habitual with Airdrop feature on your iDevices and want similar feature on your Windows 10, here it is. With Windows 10 V1803/April 2018 Update, Microsoft has added Airdrop equivalent feature to Windows, and it is called Nearby sharing.
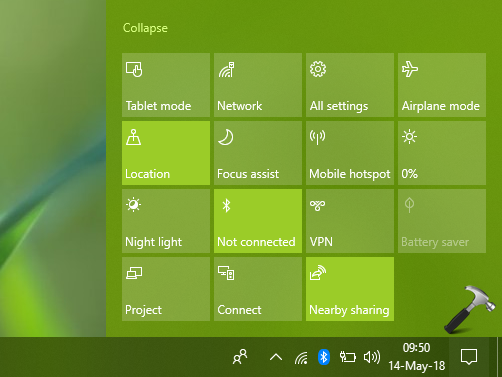
If you’ve two Windows 10 V1803 or later running devices, you can send/receive files, images, links and other content between these devices, using nearby sharing. Enabling nearby sharing is quite easy and you can do it via Action Center.
However, to configure the nearby sharing feature fully, you can use either ways mentioned below.
Page Contents
How To Enable Nearby Sharing In Windows 10
WAY 1 – Via Settings App
1. Right click Start Button or press  + X keys and select Settings.
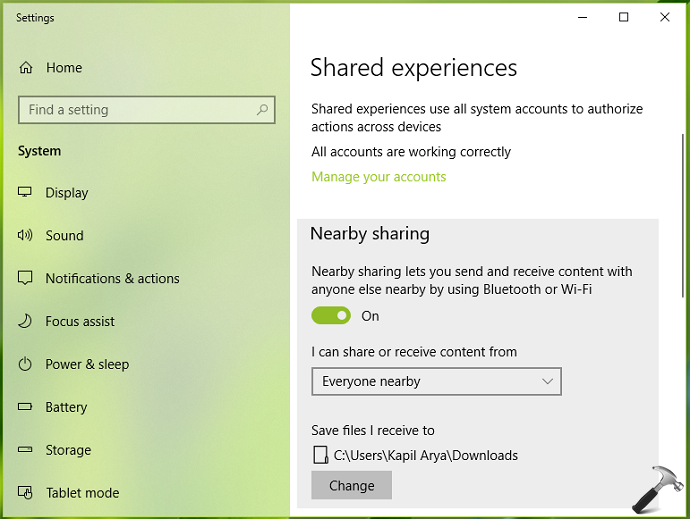
2. In the Settings app, navigate to System > Shared experiences.
3. On the right pane of the window, under Nearby sharing, turn On the option. Choose your preferred option to receive content from My devices only or Everyone nearby. You can also adjust here the content receiving location.
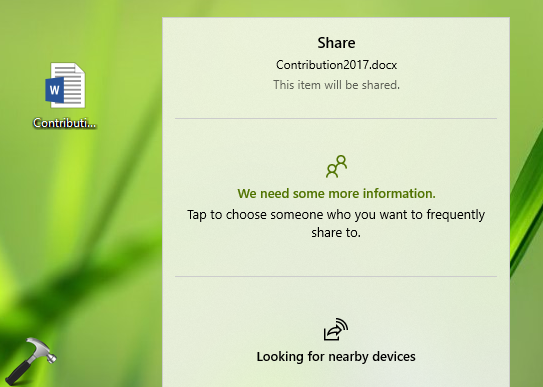
4. To share your content, right click on the item and select Share. In the context appearing next, you’ll be able to locate the nearby sharing devices. Simply select your device and allow on another device to receive the content, just like we use Bluetooth feature.
You can also use registry tweak to enable this feature, as mentioned below.
WAY 2 – Via Registry
Registry Disclaimer: The further steps will involve registry manipulation. Making mistakes while manipulating registry could affect your system adversely. So be careful while editing registry entries and create a System Restore point first.
1. Press + R and put regedit in Run dialog box to open Registry Editor (if you’re not familiar with Registry Editor, then click here). Click OK.

2. In left pane of Registry Editor window, navigate to following registry key:
HKEY_CURRENT_USER\Software\Microsoft\Windows\CurrentVersion\CDP
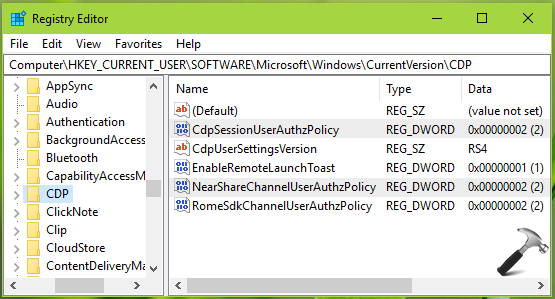
3. Now in the right pane of CDP registry key, make sure CdpSessionUserAuthzPolicy and NearShareChannelUserAuthzPolicy named registry DWORDs (REG_DWORD) exists. You can set these DWORD’s Value data as follows – 0 to disable nearby sharing, 1 to enabling nearby sharing for ‘My devices only’ and 2 to enable nearby sharing for ‘Everyone nearby’. Close Registry Editor and reboot to make changes effective.
So this is how you can enable and use nearby sharing in Windows 10.
Hope you like this new feature and found it useful!


in the earlier version of microsoft i used homegroup feature to share my data in one laptop in the network and used to work on my other laptops using the same data. now when i am sharing the data with other devices it is not visible there. is there a third party software or any other way to share the data with ease and work on the same data in a lan
I use to be able to give take 2 laptops and a desktop and just mark a directory even a drive as shared.
I still have no idea how to do that. I use my computers professional and totally uninterested in sharing pictures, music, videos, etc. I just want to give another laptop (maybe with the same userid access to the other system.
I’m a 45 computer veteran retired after writing, managing and shipping microcode, drivers, OS’s, and state of the art communication hardware and software . Your bank and stockbroker depend on the stuff I shipped. Just can’t get my head around the what the crap to do.