
Your user account issues could be the cause of the PIN not functioning. An example of how this issue could manifest is if your user account is corrupt. The issue can be related to the antivirus software or Updated Windows have introduced a bug. Not being able to use your PIN can be a big problem, this tutorial will show you to Fix PIN not working in Windows 11.
A Windows PIN is a series of digits that can be used to log into your Windows 10/11 computer. Unlike a password, it is easier to type and remember especially when you are using a touchscreen device.
In some other cases, it could be a hardware issue, and you may need to change your computer keyboard.
Fix: PIN not working in Windows 11
Here we have 13 solutions that are proved to be effective to Fix PIN not working in Windows 11:
- Remove Antivirus
- Temporarily remove the laptop battery
- Recreate New PIN
- Roll back to the previous build
- Delete everything from the Ngc folder
- Uninstall Dell Data Protection security tools
- Use I forgot PIN option
- Choose Sign-in options from the login screen
- Use On-screen keyboard
- Change Local Group Policy Editor
- Change startup type of IPsec Policy Agent
- Create Local account
- Restart your computer PIN phase
Method 1: Remove Antivirus
You need to temporarily uninstall your antivirus to fix this issue. To remove your antivirus follow the below steps:
1. Open Control Panel and click on “Programs”.
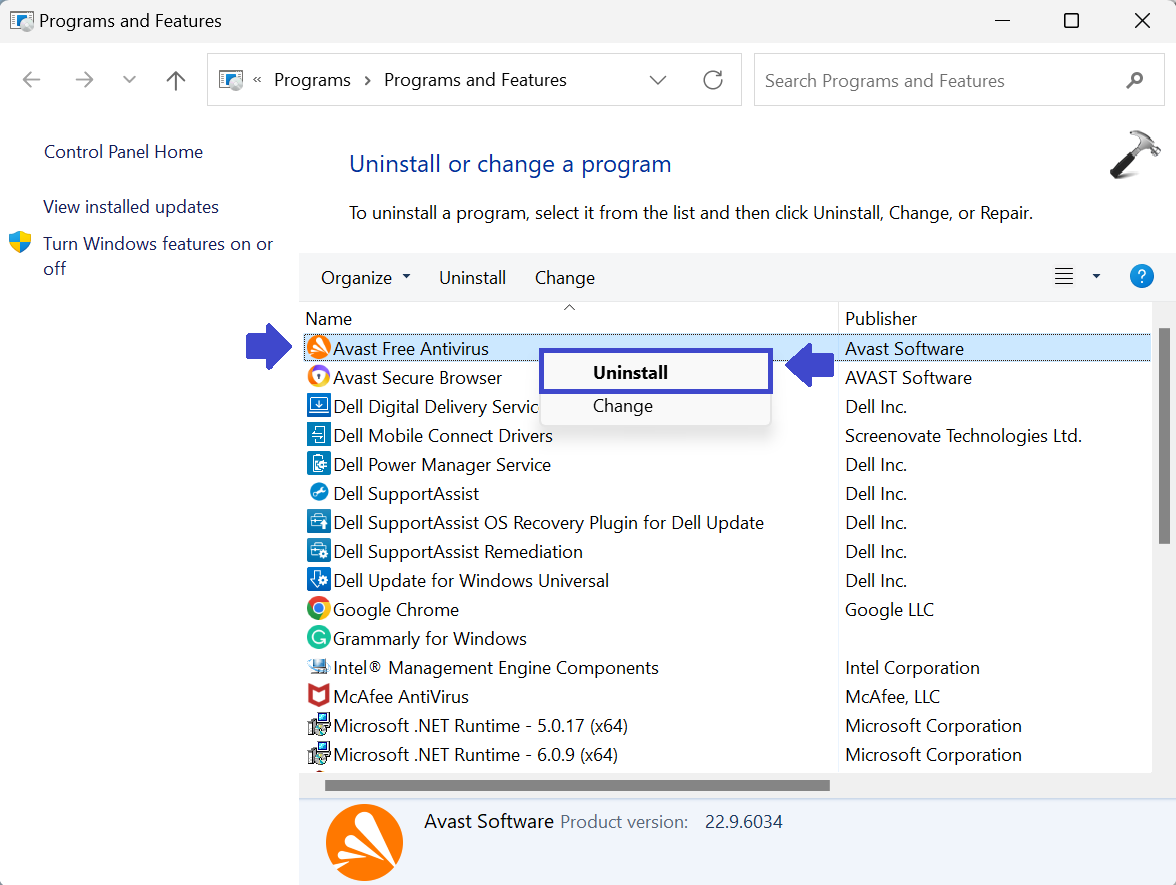
2. Right-click on antivirus and select “Uninstall”.
3. Close the Window and restart your PC.
Method 2: Temporarily remove laptop battery
You can simply solve this issue by removing their laptop battery.
1. Remove the battery and disconnected the laptop from the power adapter.
2. After that, put back the battery.
Now, check whether it worked or not to solve your problem.
Method 3: Recreate New PIN
STEP 1: Remove the PIN
1. Open the Settings App and go to Accounts.
2. Now, click on “Sign-in” option. Under the PIN section, click on Remove.
3. Windows will ask you to confirm that you want to remove your PIN.
Click on “Remove”.
4. Prompt box will appear.
Enter the password and click OK.

5. This will remove your PIN. You can set your PIN again.
STEP 2: Set up your new PIN
1. Open Settings App and go to Accounts.
2. Now, click on “Sign-in”. Under the PIN section, click on “Add”.
3. Enter the new PIN. Click OK.
Method 4: Roll back to the previous build
1. Open the Start Menu and click on Power icon. Choose “Restart” option.
2. A list of options will appear.
Click on “Troubleshoot” and then click “Advanced options”.

3. Now, click on “See more recovery options”.
4. Click on “Go back to the previous build” and choose your administrator account.
You may have to enter your administrator password.
5. This process will take sometime and let the process to complete.
6. Restart your PC.
Method 5: Delete everything from the Ngc folder
Follow the 3 steps to delete everything from the Ngc folder and get the access to the Ngc directory without any problem.
STEP 1: Access the Ngc folder and delete its contents
1. Open File Explorer and navigate the below path:
C:\WINDOWS\ServiceProfiles\LocalService\AppData\Local\Microsoft
If you see the below message, click Continue.

2. You are not allowed to directly delete the Ngc folder due to permissions issues. You need to first change the permissions for this folder and then delete it. To do this, you need to right-click the Ngc folder and select Properties.
3. Now, go to Security and click on “Advanced” option.

4. Click on “Change”.

5. Under Enter the object name to select, write Administrator if your are using Administrator account or your username. After that, click “Check Names” followed by OK.

6. It goes back to the Advanced Security Settings for Ngc interface. But this interface is not the same as before. Now, you can see the Replace owner on subcontainers and objects option under Owner. You need to check this option to continue.
7. Click OK followed by Apply.
8. Now, open Ngc folder. Select all files and delete them.
STEP 2: Create New PIN
1. Open Settings App and go to Accounts.
2. Click on Sign-in option and select “Add a PIN”.
3. Follow the instruction and add a new PIN.
STEP 3: Reset permission on the Ngc folder using Command Prompt
1. Open Command Prompt and select “Run as administrator”.
2. Copy and paste the below command:
ICACLS * /T /Q /C /RESET

3. Hit Enter.
After this, you will be able to access the Ngc directory without any issues.
Method 6: Uninstall Dell Data Protection security tools
You PIN might not work due to third-party security tools. Dell users reported that PIN is not working on their PC, and the leading cause for this problem was Dell Data Protection security tools. You need to uninstall these tools from your PC to fix this problem.
Method 7: Use I forgot PIN option
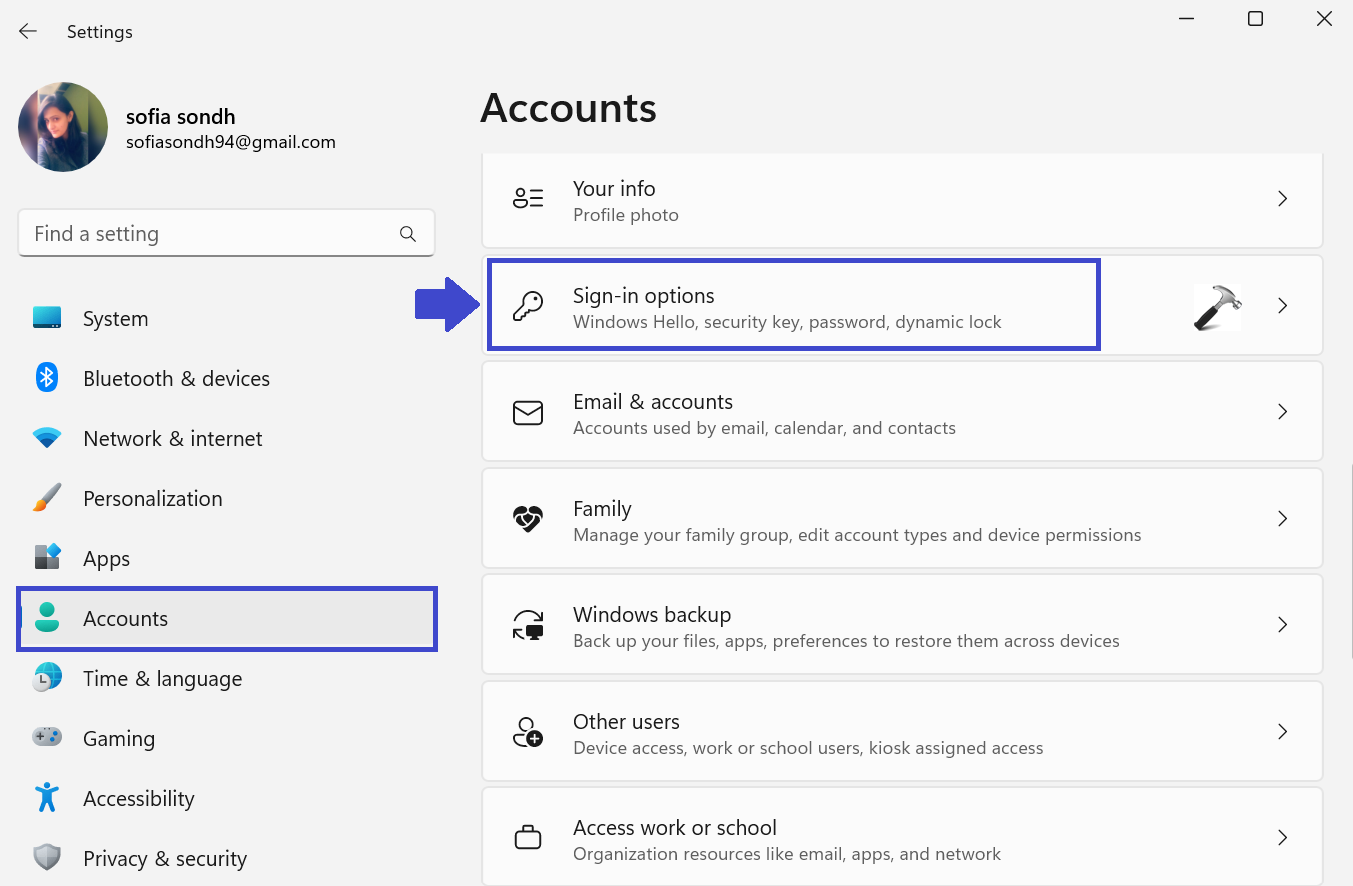
1. Open Settings App and select “Accounts”.
2. Navigate to the Sign-in options. Under PIN section, click on “I forgot my PIN”.
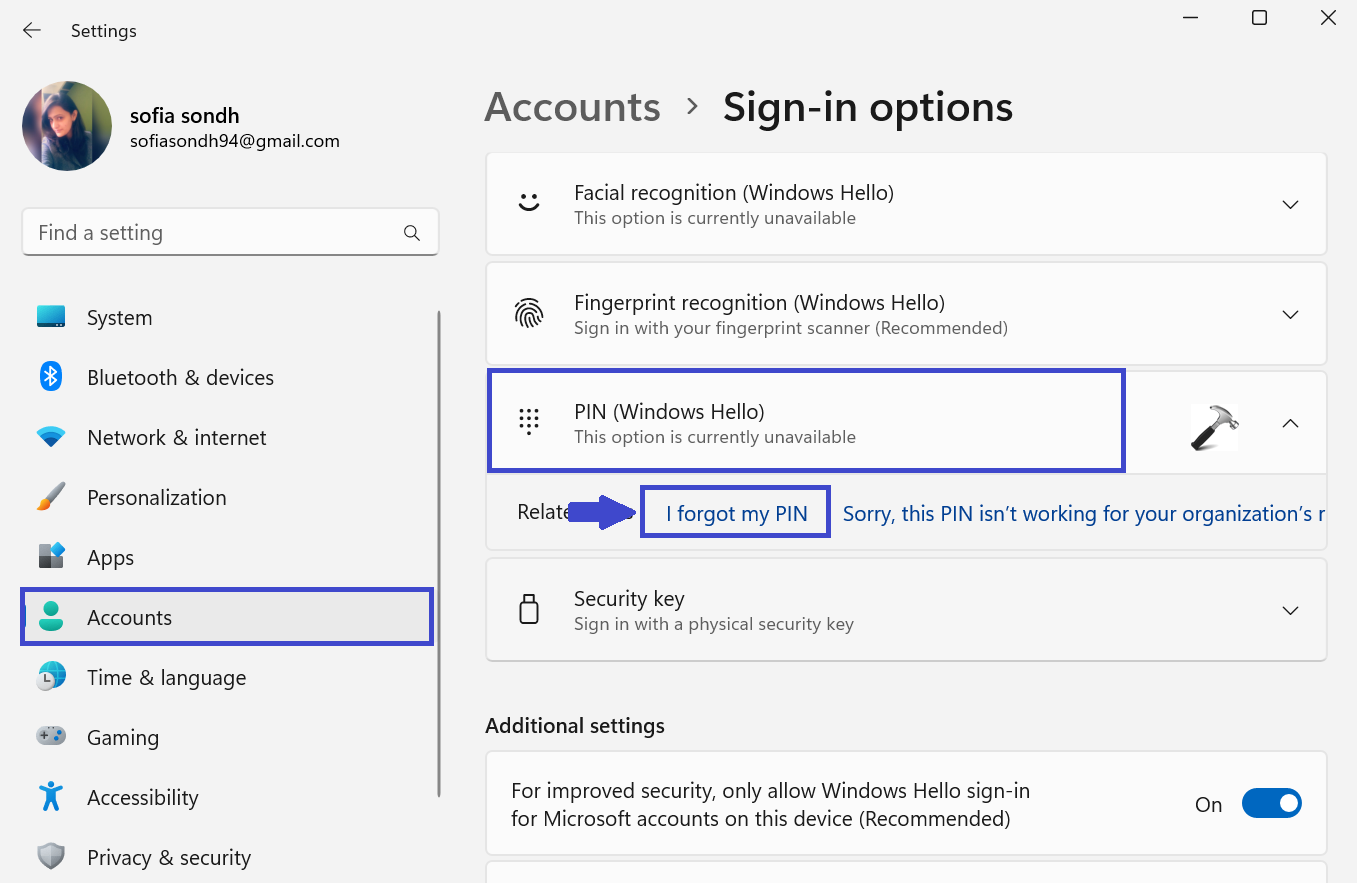
3. A confirmation message will appear. Click on Continue.

4. Now, enter new PIN and click OK.
Method 8: Choose Sign-in options from the login screen
You can fix this problem by clicking on the “Sign-in options”. You will be able to choose PIN sign-in or password sign-in.
By simple pressing TAB key on the keyboard, you can switch to password login. After that, you will be able to click on Sign-in options and choose PIN login from the menu.
Method 9: Use On-screen keyboard
On the login screen, there’s a virtual keyboard button that you can use to activate the on-screen keyboard.
After doing that, use the virtual keyboard to enter your PIN.
Method 10: Change Local Group Policy Editor
1. Press the Windows key + R. Type gpedit.msc and click OK.
2. Navigate the path:
Computer configuration > Administrative Templates > Logon
3. In the right panel, double click on “Turn on convenience PIN sign-in”.

4. A prompt box will appear.
Select “Enabled”.
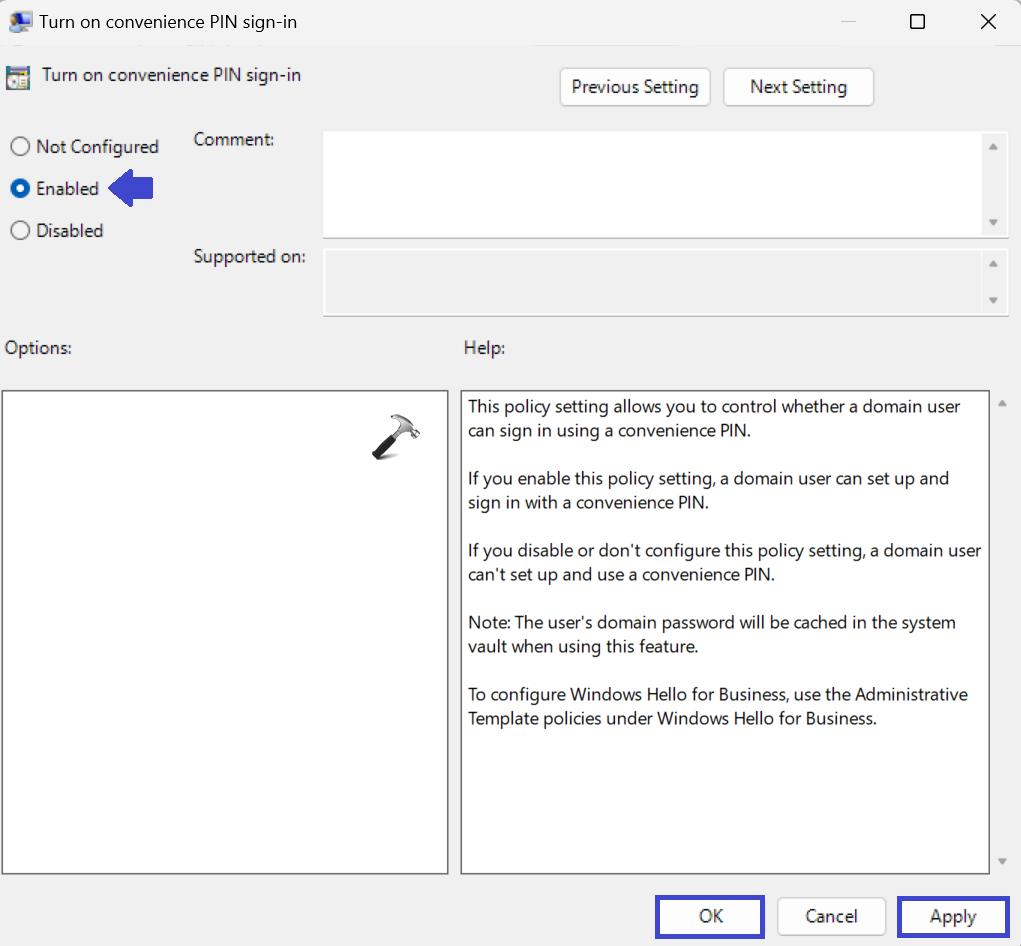
5. Click OK followed by Apply.
6. Close the Local Group Policy Editor Window and restart your PC.
Method 11: Change startup type of IPsec Policy Agent
If the PIN is not working, you might be able to fix this issue by changing the Startup type of the IPsec Policy Agent service. Follow the below steps:
1. Press the Windows key + R. Type Services.msc and click OK.
2. Double click on “IPsec Policy Agent” and select “Properties”.
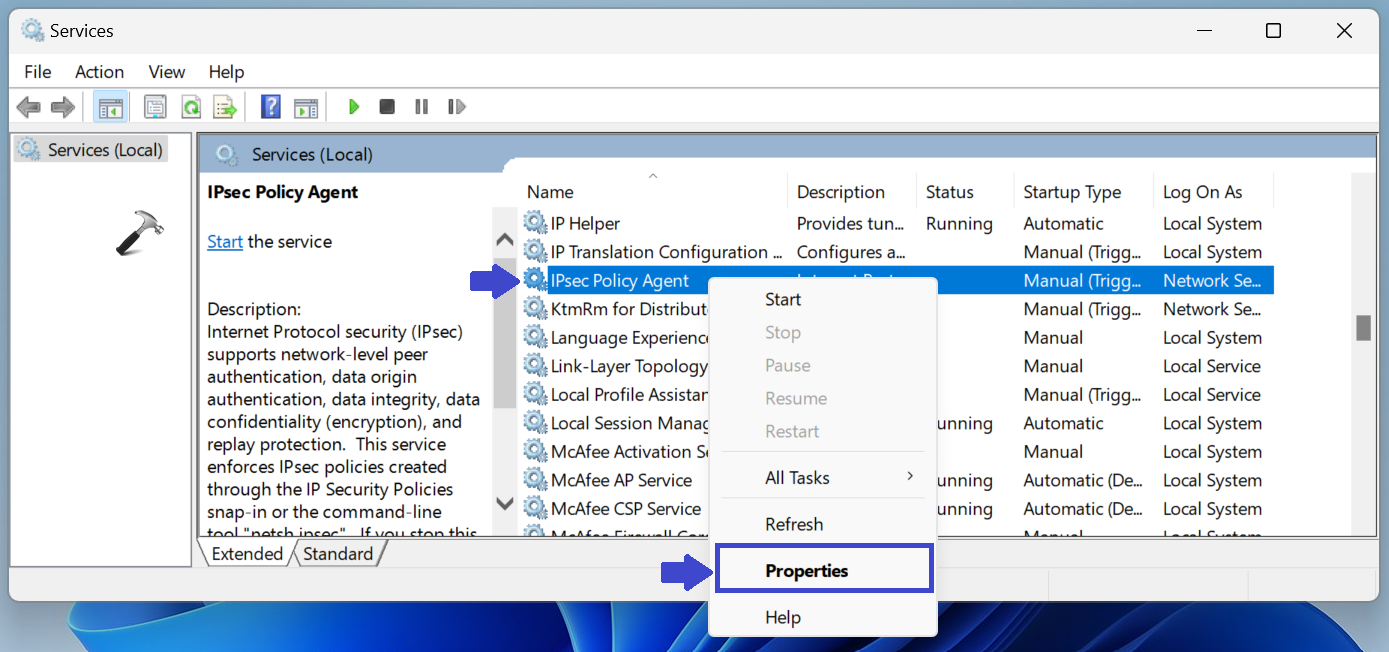
3. Under startup type, select Automatic.
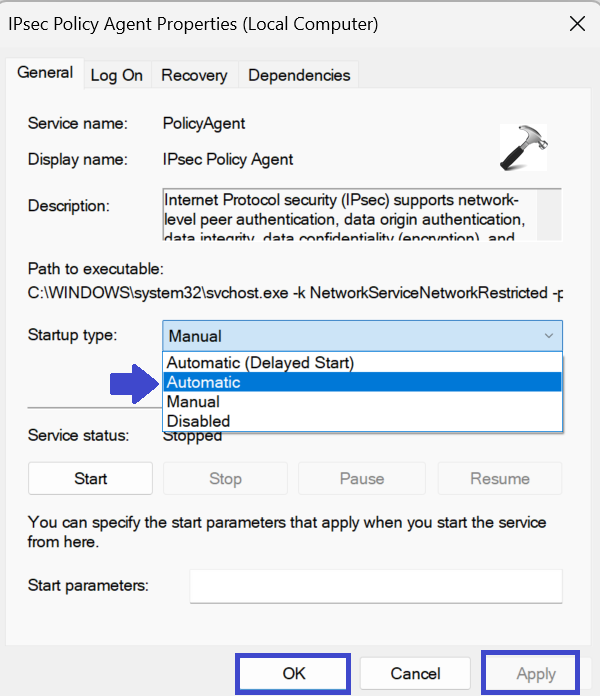
4. Click OK followed by Apply.
Method 12: Create Local account
STEP 1: Convert your Microsoft Account to Local Account
To fix the issue, you need to convert your Microsoft account to a local account. You can do that by following the below steps.
1. Open Settings Apps and click Accounts.
2. Now, click on “Your info”.

3. Click “Sign in with local account instead”.

4. Now, enter the username and password.
5. Now, click on “Sign out and finish”.
STEP 2: Create New user Account
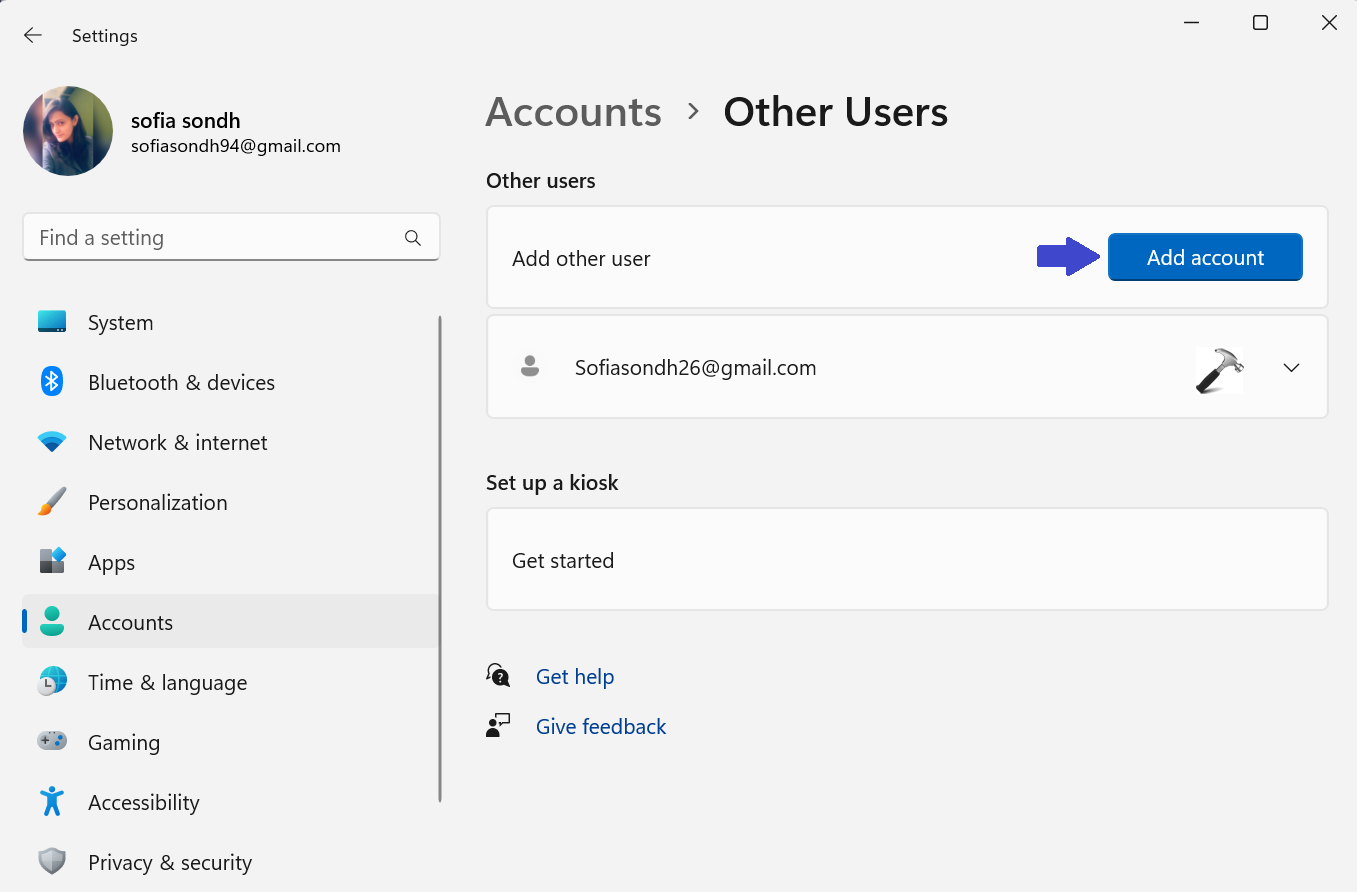
1. Open Settings App and click Accounts.
2. Now, Click on “Other users”.

3. Under Other users, click on “Add someone”.
4. Now, select “I don’t have this persons’s sign-in information”.

5. Click on “Add a user without a Microsoft account”.

6. Enter username and password. Click Next.
Method 13: Restart your computer PIN phase
1. Press and hold the ON/OFF button for 20 seconds when your PIN is not accepted.
2. Now, Turn ON your computer.
3. When PIN dialog box will appear. Enter the PIN.
4. Now, delete the PIN.
5. Again, turn OFF your computer.
6. When a message says “others may be using the computer”, click on “Shut down anyway”.
7. Restart your PC and check if it works or not.
Video fix
For more help, you can also checkout this video fix:
That’s It!

Thanks!!!!
finally you showed me the solution.
thank you so much
best easiest option would be run powershell as admin and execute below:
# Disable Windows Hello PIN for the current user
Set-ItemProperty HKLM:\SOFTWARE\Policies\Microsoft\Windows\System -Name “AllowDomainPINLogon” -Value 0
# Clear the NGC folder (where Windows Hello data is stored)
Start-Process cmd -ArgumentList ‘/s,/c,takeown /f C:\Windows\ServiceProfiles\LocalService\AppData\Local\Microsoft\NGC /r /d y & icacls C:\Windows\ServiceProfiles\LocalService\AppData\Local\Microsoft\NGC /grant administrators:F /t & RD /S /Q C:\Windows\ServiceProfiles\LocalService\AppData\Local\Microsoft\Ngc & MD C:\Windows\ServiceProfiles\LocalService\AppData\Local\Microsoft\Ngc & icacls C:\Windows\ServiceProfiles\LocalService\AppData\Local\Microsoft\Ngc /T /Q /C /RESET’ -Verb runAs
certutil.exe -deletehellocontainer
clear-tpm
initialize-tpm
restart -process explorer.exe
tpm.msc
^^ Thanks for sharing this powershellwiz!