
If your Windows operating system critical files are corrupted, it will break some functionalities on the system. Usually in that case, you’re advised to run System File Checker (SFC) scan.
SFC usually scans the integrity of system files and if it found any violations, it replaces the system file with known good version. If SFC is unable to find a good version of repair-able system file, you’ll receive Windows Resource Protection found corrupt files but was unable to fix some of them error. Now, you’ll need to use Deployment Imaging and Servicing Management (DISM), a command-line tool to fix this issue.
DISM comes built-in with Windows 10 and it can be used to service and prepare Windows image (.wim). The reason of SFC scan failure is generally corrupt or broken Windows image which is unable to provide good version of critical system files. DISM can be used to repair this broken Windows image. Once you repair the Windows image, SFC will be able to fix corrupted system files as well.
You can use DISM command-line tool in Windows PowerShell and Command Prompt. Unlike SFC scan, the DISM tool may require Internet access to process specific commands or parameters. Here’s how you can repair your Windows 10 via DISM.
Page Contents
How To Repair Windows 10 Using DISM Command-line Tool
DISM can be used to repair Windows image in .wim or .vhd file. For this purpose, we’ll use Repair-WindowsImage cmdlet. You can read about all supported parameters for this cmdlet in this documentation.
Perform following steps to use DISM command-line tool.
1. Right click Start Button or press  + X keys and select Windows PowerShell (Admin).
2. First we’ll check if the component store is repairable. This step is optional and if you like, you can skip it and directly go to step 3. So to check component store corruption, type/paste following in administrative Windows PowerShell window and press Enter key:
Repair-WindowsImage -Online -ScanHealth
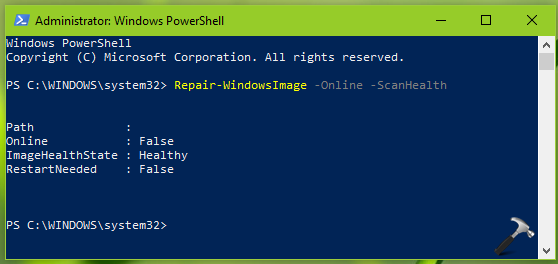
Note: In above results, only if ImageHealthState says False, the Windows image is corrupted and requires to restore as mentioned in next step. If you’re using DISM in Command Prompt, execute Dism /Online /Cleanup-Image /ScanHealth command instead.
3. To repair Windows image corruption, type/paste following and press Enter key:
Repair-WindowsImage -Online -RestoreHealth

Note: If you’re using DISM in Command Prompt, execute Dism /Online /Cleanup-Image /RestoreHealth command instead.
4. Once you done with command execution, close Windows PowerShell or Command Prompt and reboot.
The DISM writes logs for these operations and they can be located at C:\Windows\Logs\CBS\CBS.log and C:\Windows\Logs\DISM\DISM.log, assuming Windows is installed on C:.
You can check this video to illustrate working of DISM with Command Prompt:
Known Issues
| # | Issue | Resolution |
|---|---|---|
| 1 | DISM error code 0x800F0954 | You can use Add-WindowsCapability cmdlet instead of DISM to bypass error 0x800F0954. Complete fix mentioned here. |
| 2 | DISM error code 14098; The component store has been corrupted. | Repair Windows Update database. Read the complete fix here. |
| 3 | DISM error 1726; The remote procedure call failed | Read the complete fix here. |
| 4 | DISM error 0x800f081f; The source files could not be found. | Read the complete fix here. To fix similar error message with code 0x800f0906 on Windows 10 V1703, refer this fix. |
So this is how you can use DISM to repair your Windows 10.
That’s it!


Thanks Kapil, I followed above instructions but arrived at an error code 0x800f0950 which is not in error code list. How shall I proceed from here? I am using HP Elitebook 1040 G4 if this helps.
Heaps of thanks,
George
Hi Kapil, fixed. Just went back one step and used your Fix 2 on sfc /scannow page to get this update problem fixed. Cheers, George
^^ Glad the issue is resolved George!
If there are corrupted system files on your computer, you may also encounter the Dism error 87 windows 7. Thus, to fix this problem, you need to check and repair the corrupted system files firstly. Hence, the Windows built-in tool System File Checker is a good choice to repair the corrupted system files.
Hello, I tried the Powershell and command prompt in admin mode and got error message code 0x8000ffff
^^ What is the error message associated with this code?
what should do if ImageHealthState : Repairable? should i go for next step?
^^ Yes, please! Go ahead and try step 3.
I received the following error after performing the command “Repair-WindowsImage -Online -RestoreHealth”
PS C:\WINDOWS\system32> Repair-WindowsImage -Online -RestoreHealth
Repair-WindowsImage : The restore operation failed. Either the repair source was not found or the component store
cannot be repaired.
At line:1 char:1
+ Repair-WindowsImage -Online -RestoreHealth
+ ~~~~~~~~~~~~~~~~~~~~~~~~~~~~~~~~~~~~~~~~~~
+ CategoryInfo : NotSpecified: (:) [Repair-WindowsImage], COMException
+ FullyQualifiedErrorId : Microsoft.Dism.Commands.RepairWindowsImageCommand
any ideas are appreciated.
^^ You need to define a source for DISM to complete this operation. Refer this fix: https://www.kapilarya.com/dism-error-0x800f081f-the-source-files-could-not-be-found-windows-10.
Hi Kapil, just wanted to say how appreciated this resources are and how useful these tips are at a glance even, thank you.
^^ Glad you find it useful!