If your USB Type-C port or connected device stops working in Windows 11 and there’s no data transfer, power issues, or connection failures, the problem is usually due to cable damage, driver issues, or improper configuration.
Page Contents
Fix USB Type-C problems in Windows 11
Below are six effective fixes. Try them one by one and test the port after each.
Fix 1: Inspect the cable and port
1. Disconnect the USB-C device and carefully check both the cable and the port for any physical damage or debris.
2. If possible, use a different USB-C cable to rule out cable faults.
3. Attach the device to another computer. If it fails elsewhere too, the problem likely resides in the device or its cable, not Windows.

Fix 2: Connect the device directly (avoid hubs or docking stations)
1. If you are using a hub or dock, unplug it and connect the USB-C device directly to the laptop or PC port.
2. If the device works properly when connected directly, the hub or dock may be faulty or unable to supply enough power for the device.
Fix 3: Reset BIOS/UEFI settings to defaults
1. Restart your computer and enter BIOS/UEFI setup (typically by pressing F2, Del, or a manufacturer-specified key).
2. Select the option to load default or setup defaults.
3. Save the settings and exit BIOS.
4. Boot into Windows again and test the USB-C port with your device.

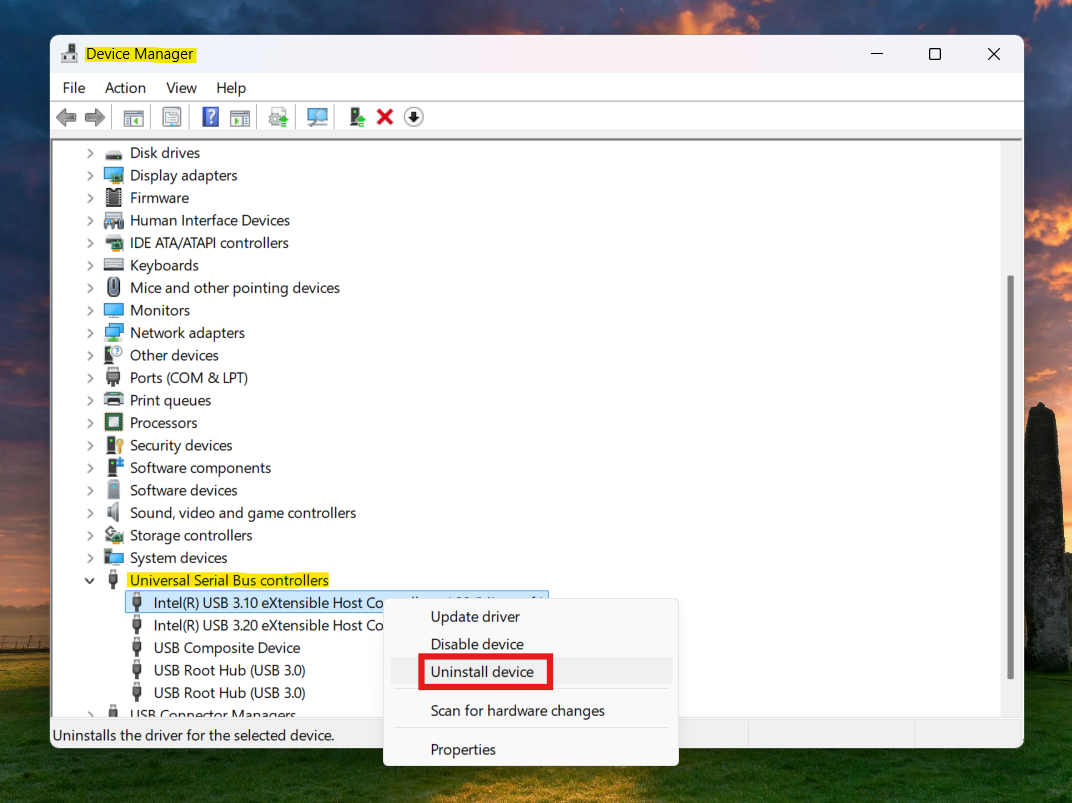
Fix 4: Reinstall USB and controller drivers
1. Open Device Manager and expand the Universal Serial Bus controllers section.
2. Right-click each USB Root Hub, Host Controller, or USB-C/Thunderbolt controller and select Uninstall device.
3. After uninstalling all relevant entries, restart your PC. Windows will automatically reinstall drivers.
4. Reconnect the USB-C device and check if it works correctly.
Fix 5: Update BIOS and chipset or USB-C related drivers
1. Visit the laptop manufacturer’s support site and download the latest BIOS and chipset/USB-C controller drivers for your model.
2. Install the updates, then restart your PC.
3. Once rebooted, test the USB-C port again to see if functionality is restored.
Fix 6: Use System Restore or reset Windows (as a last resort)
1. If USB-C worked previously and stopped after recent changes, use System Restore to revert to a point when it functioned correctly.
2. Alternatively, back up your data and perform a clean Windows install or reset. This often clears complex software conflicts that block USB-C functionality.

Quick tips
1. Avoid using low-power, cheap hubs or uncertified cables; always use good-quality USB-C cables rated for your device’s power and data requirements.
2. If connecting external displays via USB-C, ensure your port supports DisplayPort or video output.
3. After driver or BIOS updates, reboot your computer before testing the USB-C connection again.