Google Chrome now offers various AI-powered features including, AI Mode, Help Me Write, AI tab organization, Gemini integration, and AI-driven search tools. For some users, these features can be helpful on Windows 11. While others may want to disable them for reasons related to privacy, performance, or a more conventional browsing experience.
Page Contents
How to Disable Google Chrome AI Features
If you just configure Google Chrome settings, they may not permanently disable these AI features and can re-enable them later. To permanently disable Chrome AI features on Windows 11, you can try these methods:
Method 1: Disable Google Chrome AI Features Using Registry Editor
This is the most reliable and permanent method because it applies Chrome Enterprise policies directly through the Windows Registry. These settings work across Stable, Beta, Dev, and Canary versions of Chrome.
1. Press Win + R, type regedit, and press Enter.
2. Navigate to:
HKEY_LOCAL_MACHINE\SOFTWARE\Policies
3. Create the keys Google and then Chrome inside it, if they do not already exist.

4. Inside the Chrome key, create these DWORD (32-bit) values with Value data set to 1:
GenAiDefaultSettings
TabOrganizerSettings
HelpMeWriteSettings
TabOrganizerSettings
HistorySearchSettings
CreateThemesSettings
TabCompareSettings
SearchContentSharingSettings
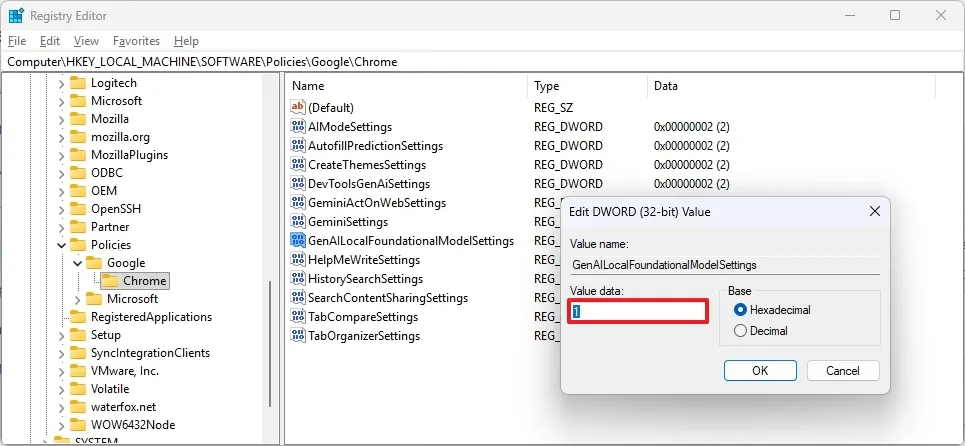
5. Restart your PC.
Above configuration may disable major AI features such as AI Mode, Gemini integration, AI writing assistance, and AI tab organization. Once configured with registry, these are harder for Chrome updates to overwrite compared to normal browser settings.
Method 2: Disable Google Chrome AI Features Using Commands
If you don’t want to manually apply registry changes, you can apply them using Command Prompt. This method automatically creates the required policy entries without manually editing the Registry.
1. Open Command Prompt (Admin).
2. Copy and paste the following commands one-by-one, pressing Enter after each:
reg add "HKLM\SOFTWARE\Policies\Google\Chrome" /f
reg add "HKLM\SOFTWARE\Policies\Google\Chrome" /v GenAiDefaultSettings /t REG_DWORD /d 1 /f
reg add "HKLM\SOFTWARE\Policies\Google\Chrome" /v HelpMeWriteSettings /t REG_DWORD /d 1 /f
reg add "HKLM\SOFTWARE\Policies\Google\Chrome" /v TabOrganizerSettings /t REG_DWORD /d 1 /f
reg add "HKLM\SOFTWARE\Policies\Google\Chrome" /v HistorySearchSettings /t REG_DWORD /d 1 /f
reg add "HKLM\SOFTWARE\Policies\Google\Chrome" /v CreateThemesSettings /t REG_DWORD /d 1 /f
reg add "HKLM\SOFTWARE\Policies\Google\Chrome" /v TabCompareSettings /t REG_DWORD /d 1 /f
reg add "HKLM\SOFTWARE\Policies\Google\Chrome" /v
SearchContentSharingSettings /t REG_DWORD /d 1 /f
3. Restart your PC.
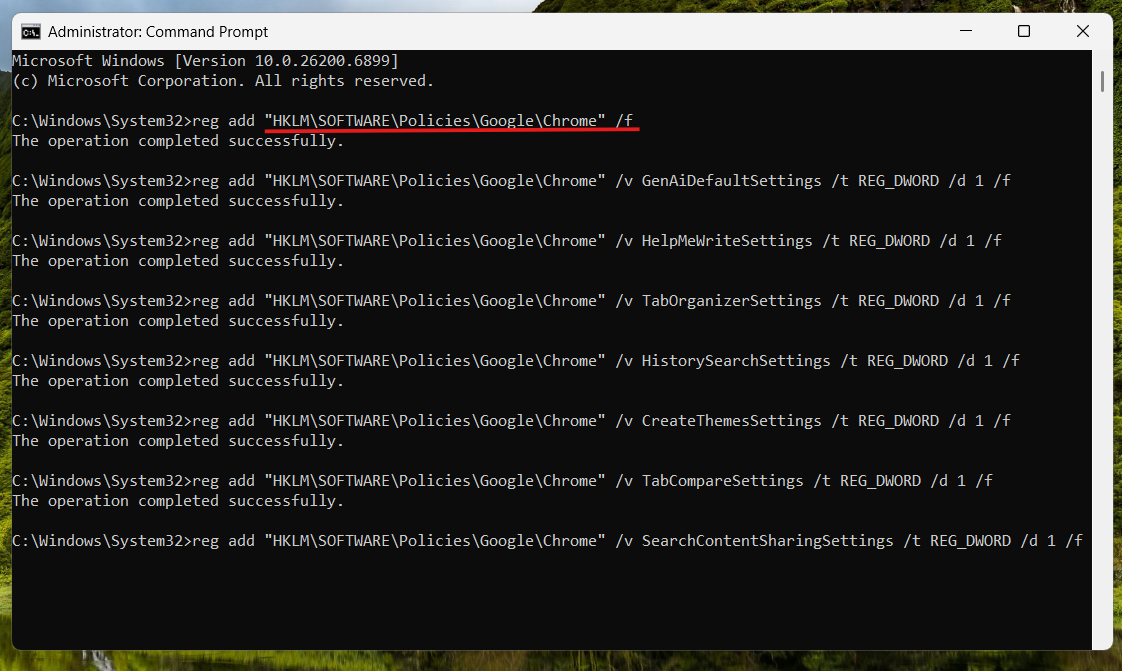
This instantly applies Chrome AI feature restrictions system-wide. You can also add additional commands later to disable newer AI tools introduced in future Chrome updates.
Summary
Once you restart Chrome, navigate to chrome://policy in the address bar to bring up the Chrome policy pages, which will show policies listed as Machine Level (active), and the related AI features will be completely greyed out or removed from your normal Chrome settings menu.
Using the Registry Editor method provides more in-depth, manual management of each AI item in Chrome, allowing you to customize your browser. However, using commands from the Command Prompt saves time and energy and is quicker than managing each AI item individually in the Registry.
Both processes will help you have a more standard browsing experience in Chrome that does not have any of the possible unwanted AI browsing features you may not wish to keep in your browser.
P.S. If you ever need to restore AI features in Google Chrome later, you can revert the registry changes (Method 1).