
Whenever you are reaching out forums for support, a screenshot can help you to get better assistance. Basically screenshot is the picture of your screen showing relevant information to others so that they can help you out. In Windows 10, you can press  + PrtScr or + Fn + PrtScr keys to capture screenshot natively. Also, some UWP or Desktop apps you will use on Windows may have ability to take screenshots. In this article, we’ll see how you can allow or prevent apps to take screenshots in Windows 10.
To maintain privacy of your system, Microsoft has implemented many privacy settings in Windows 10. For controlling the ability of apps to take a screenshot, we have to configure one of those privacy settings. Here are the steps you will need to follow for this.
Page Contents
Allow or prevent apps to take screenshots in Windows 10
Method 1 – Using Settings App
1. Right click Start Button or press + X keys and select Settings.
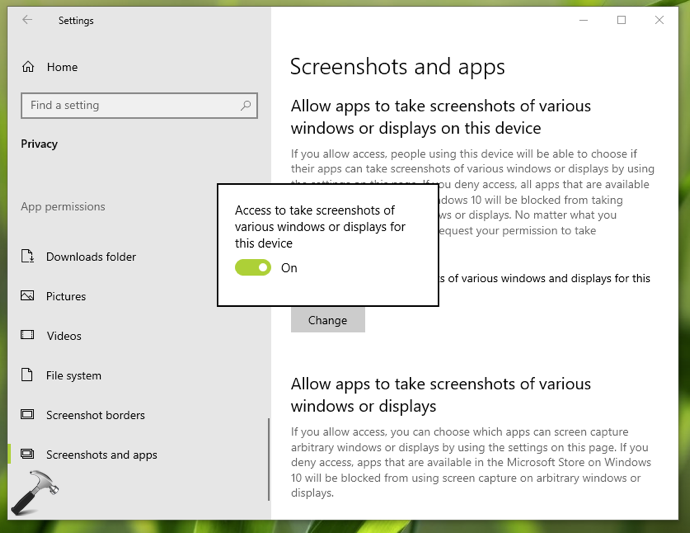
2. In the Settings app, go to the Privacy and then Screenshots and apps.
3. Under Screenshots and apps, in the right pane, click on Change button. A pop-up will appear, in which you can turn On or Off the Access to take screenshots of various windows or displays for this device option. By default, the option is On and it means apps can take screenshots. If you set it to Off, apps will not be able to take screenshots on your Windows device.
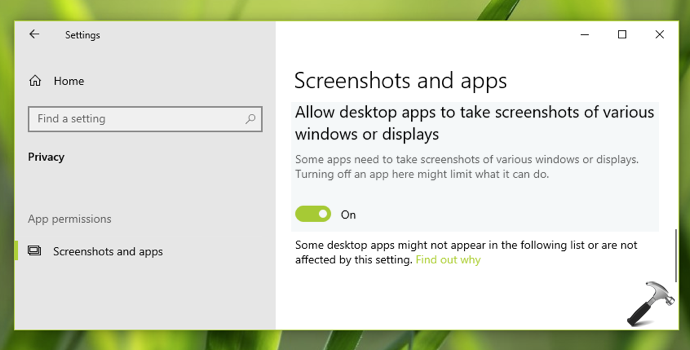
4. If you want to block only Desktop apps to take screenshot, scroll down in that window. Set the option Allow desktop apps to take screenshots of various windows or displays to Off.
Your settings should be saved and applied immediately.
Method 2 – Via Registry
You can also allow or prevent apps to take screenshot using registry. IT Pros can deploy below mentioned setting to client machines using this guide.
1. Run regedit command to open Registry Editor.
2. In left pane of Registry Editor window, go to:
HKEY_CURRENT_USER\SOFTWARE\Microsoft\Windows\CurrentVersion\CapabilityAccessManager\ConsentStore\graphicsCaptureProgrammatic

3. In the right pane of graphicsCaptureProgrammatic registry key, you’ll find Value named as registry string set to Allow by default. You can set its Value data to Deny to block apps to take screenshot.
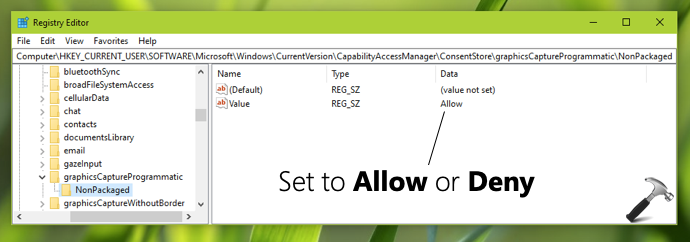
4. To block only Desktop apps to take screenshot, go to this registry key:
HKEY_CURRENT_USER\SOFTWARE\Microsoft\Windows\CurrentVersion\CapabilityAccessManager\ConsentStore\graphicsCaptureProgrammatic\NonPackaged
5. Set the Value registry string (REG_SZ) to Deny to block Desktop apps from taking screenshots.
6. Close Registry Editor and sign out, sign in back to make changes effective.
That’s it!


I hav no such an option on my 20H2 , which verison do you use ?
^^ Should be available in 21H1 release. Steps illustrated with Preview build 21296.
Thank you Kapil, Nice tip
They are not included in my current 21H1 :(
Need to correct in steps as in snapshots REGTYPE is REG_SZ but in steps its DWARD.
^^ Corrected, thanks!