
Start Button, Start Menu and Start Screen are the three crucial components of Windows series for which users are pretty much habitual. Thanks to Microsoft, for making all of them available in Windows 10, so that we can use them as per our requirement. The Start Screen introduced by Windows 8 which displays beautiful lives tiles and real-time updates, is disabled by default in Windows 10.
However, Start Screen is still present in Windows 10, here it is:
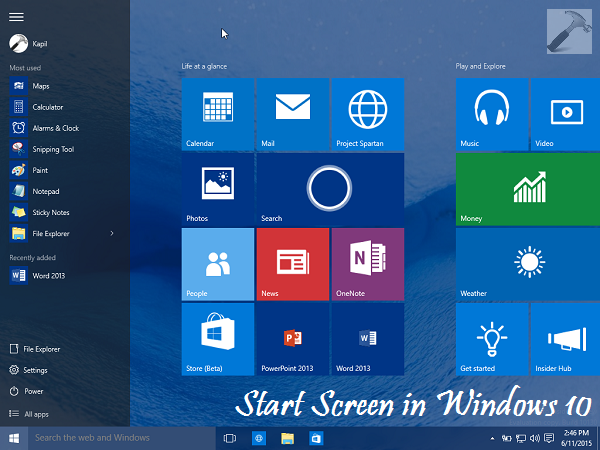
It’s the Start Menu which is pre-enabled on Windows 10 by default, and we need to follow additional steps in order to enable Start Screen. It’s obvious that if you activate the Start Screen, Start Menu will no longer be available. Although, you can alter the settings again and enable Start Menu even after enabling Start Screen. Thus in short, at a time you can either have Start Menu or Start Screen activated, but not both.
So without wasting anymore time, let’s see how to enable Start Screen in Windows 10:
How To Enable Start Screen In Windows 10
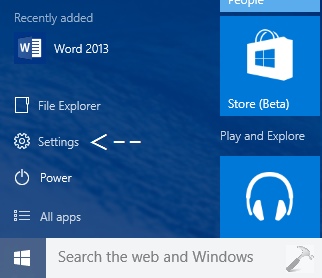
1. Click on the Start Button and then click Settings in Start Menu.
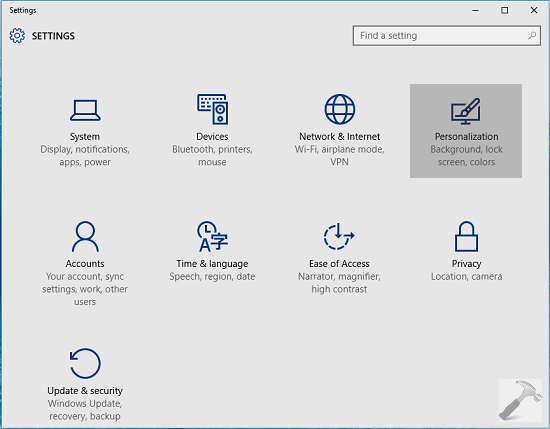
2. Next, in the Settings window shown below, pick the Personalization option:
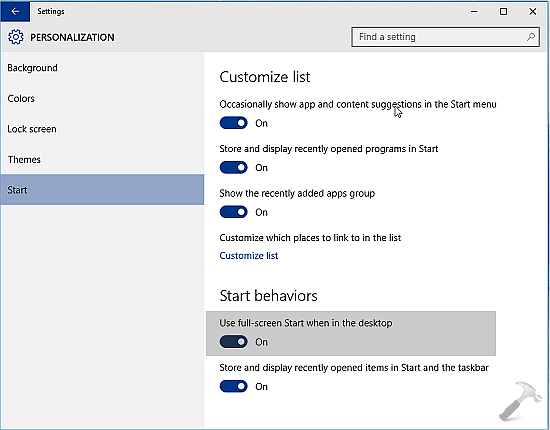
3. Moving on, in the Personalization screen shown below, click Start in the left pane. Finally in the right pane, under the hood of Start behaviors, look for the Use full-screen Start when in the desktop option. The option must be disabled by default, so simply enable it.
Once you enabled the above mentioned options, the Start Screen is activated instantaneously and you can confirm it by clicking on Start Button. Thus Start Menu is now disabled, and in case if you again want to enable it in future, disable the option or set it to default.
Checkout the live demonstration:
That’s it! If Start Button is not working, try the Start Menu troubleshooter to fix it.


Much appreciated post, thanks for this tip.
^^ Glad you liked it :)
omg dats tooo odd but thanks for logical post…….
thank God Microsoft didn’t remove start screen else I have to go Mac. Finally the Windows 10 of our choice. Haha
Trying to resolve the Critical Errot – Start menu not workin…came across your post – went to Personalization but it is “locked” on the themes section and so I can’t get to the StartScreen option
Your suggestion looks like it may resolve what Microsoft haven’t judging ny multitude of complaints..hope that I can – with your help – can get to the enable strart screen option
I was having the same issue, I tried all of the suggestions, several time without positive results. I tried reinstalling Win10 several times and they failed. I happened to search for a fix for Cortana which also did not work and came across this fix, which by chance also fixed my start window.
Giridhar J replied on
Microsoft
Hi,
Thank you for your interest in Windows 10.
I suggest you to follow the suggestions below and check if that works for you:
Open the Task manager. Here’s a tip: Press CTRL+Shift+ESC.
Click File > Run New Task.
Make sure you have a check mark beside “Create this task with administrative privileges”
Type CMD.
Type the following 4 commands at the CMD prompt:
dism /online /cleanup-image /restorehealth
sfc /scannow
powershell
Get-AppXPackage -AllUsers |Where-Object {$_.InstallLocation -like “*SystemApps*”} | Foreach {Add-AppxPackage -DisableDevelopmentMode -Register “$($_.InstallLocation)\AppXManifest.xml”}
Close the CMD window
Check to see if the issue is resolved. If not, restart the PC.
Hope this information is helpful. Please do let us know if you need further assistance, we’ll be glad to assist you.
I opened the CMD window and just copied and pasted each of the 4 commands and let each one run. Didn’t even have to restart my computer. Hopefully it will hold when I do. If not I will try again.. Good luck