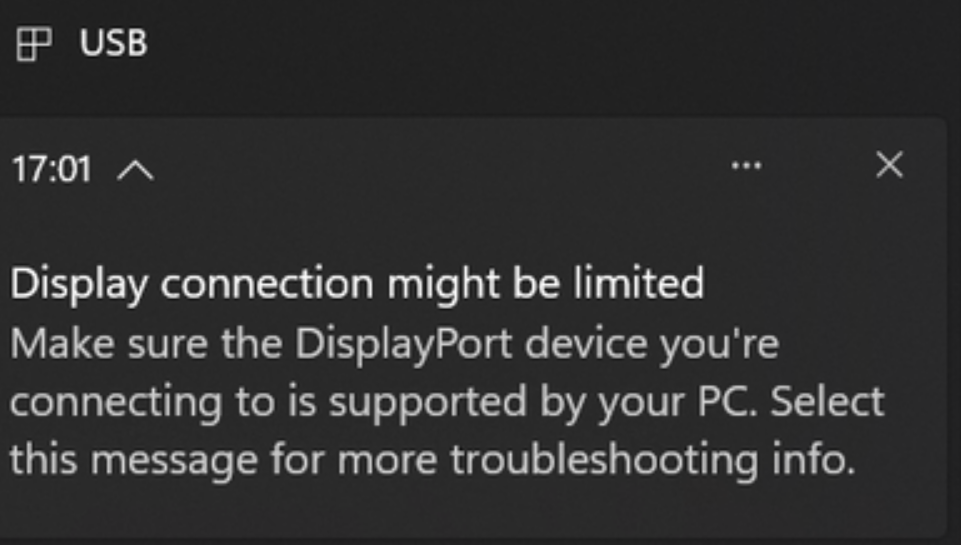
The ‘Display connection might be limited’ is an annoying error message that usually pops up when you’re trying to connect your Windows computer to an external display via a USB-C cable. This error can be caused by several reasons, such as faulty cables, incompatible displays, incompatible ports, and outdated or faulty drivers.
If the “Display connection might be limited” error keeps occurring on your Windows 11 PC, follow these solutions to fix this display error.
Page Contents
Fix: ‘Display connection might be limited’ on Windows 11
Method 1: Check the USB Cable and Ports
First, you need to check the USB cable and ports you’re using, Make sure the Type-C cable you are using supports the Display Port and Thunderbolt 3.
The ‘Display connection might be limited’ error can also appear if the cable is damaged or not properly connected. Try plugging in a spare or new cable and see if it fixes the problem.
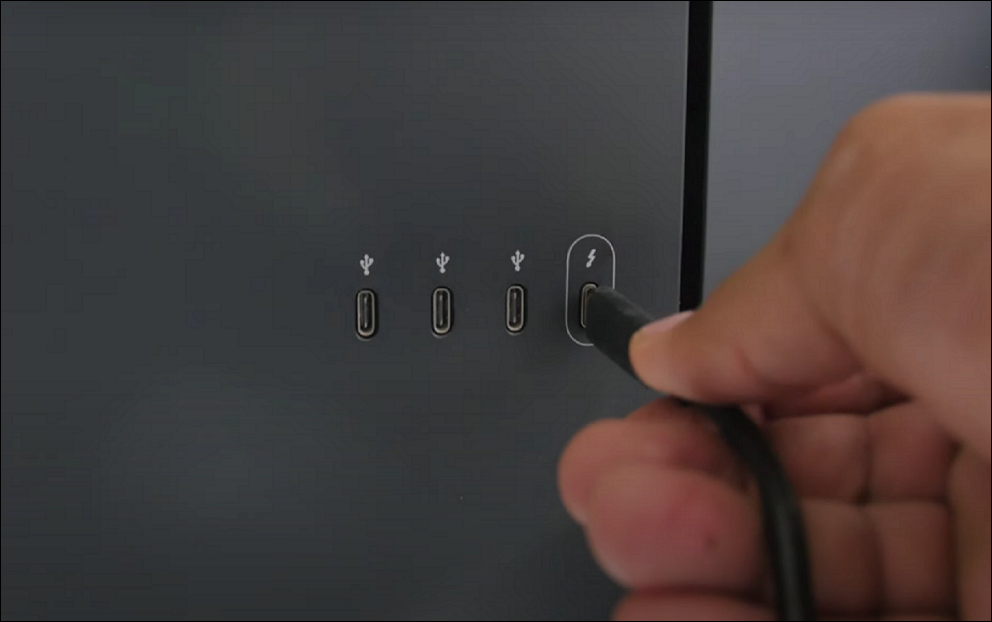
You might also see this error if you connect a display to a port without power delivery. You can try a different port that supports power delivery (with a lightning bolt symbol) and see if it fixes the problem.
Method 2: Check the Device Compatibility
Another reason common for this ‘Display connection might be limited’ error is device incompatibility. Not all USB-C ports are created equal. Some offer additional features like DisplayPort Alt Mode, which allows a single USB-C cable to transmit video, audio, and even power all at once.
While, some computers might only support some Alt Modes, but not others. So, if your computer’s Alt Mode capabilities aren’t compatible with your monitor’s requirements, you might experience errors.
Check your computer and monitor’s manuals or manufacturer websites to make sure they are fully compatible with each other. If your USB-C ports aren’t compatible, you can try connecting your computer to the display using an HDMI cable.
Method 3: Run Hardware and Devices Troubleshooter
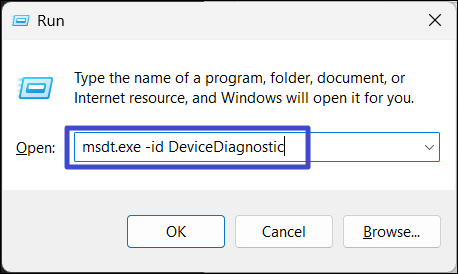
1. Press Windows + R to open the Run dialog box, then, type the following command and press Enter to launch the Hardware and Device Troubleshooter:
msdt.exe -id DeviceDiagnostic
2. In the Hardware and Device troubleshooter, click “Advanced“.

3. Check the “Apply repairs automatically” option and click “Next“.

Method 4: Update Device Drivers
1. Right-click the Start menu and select “Device Manager” from the menu.

2. Expand the “Universal Serial Bus Controller” option, right-click the driver you want to update, and select “Update driver“.

3. Then, select “Search automatically for drivers” and follow the on-screen instructions to update the driver.

Method 5: Disconnect and Reconnect the Display
The loose and dirty ports can sometimes cause this error. Disconnect the cable from both the display and the computer. Gently clean the connectors and ports on both the display and computer to remove any dust and debris. You can use a can of compressed or soft brush to do this. Then, reconnect the display to the computer and ensure the connection is secure.
Method 6: Clean Boot Your Windows
Sometimes, a third-party program or driver could interfere with the display driver, potentially leading to the “Display connection might be limited” error.
When you perform a clean boot in Windows, it temporarily disables all non-essential startup programs and services. This allows you to find any program or driver that might be causing the issue.
1. Start your computer in a clean boot mode and try connecting it to the display. If you can connect successfully without any display issues, then a third-party program might be causing the problem.
2. Re-enable your startup programs and services one by one. Restart your computer after enabling each group or program to see if the display error returns.
3. Once the error reoccurs, the program you just enabled is likely the culprit. You can then uninstall it to fix the display issue.
Method 7: Update the Windows
1. Press Windows + I to open Windows Settings.
2. Go to the “Windows Update” tab and click “Check for updates“.

3. Then, download and install any pending updates. After the update, restart your PC.

Method 8: Reset the BIOS
1. Open BIOS Settings on your Windows PC.
2. Once you’re in the BIOS menu, navigate to the “Advanced” Settings, and press the “F9” to load the default settings.
3. Then, select “Yes“.
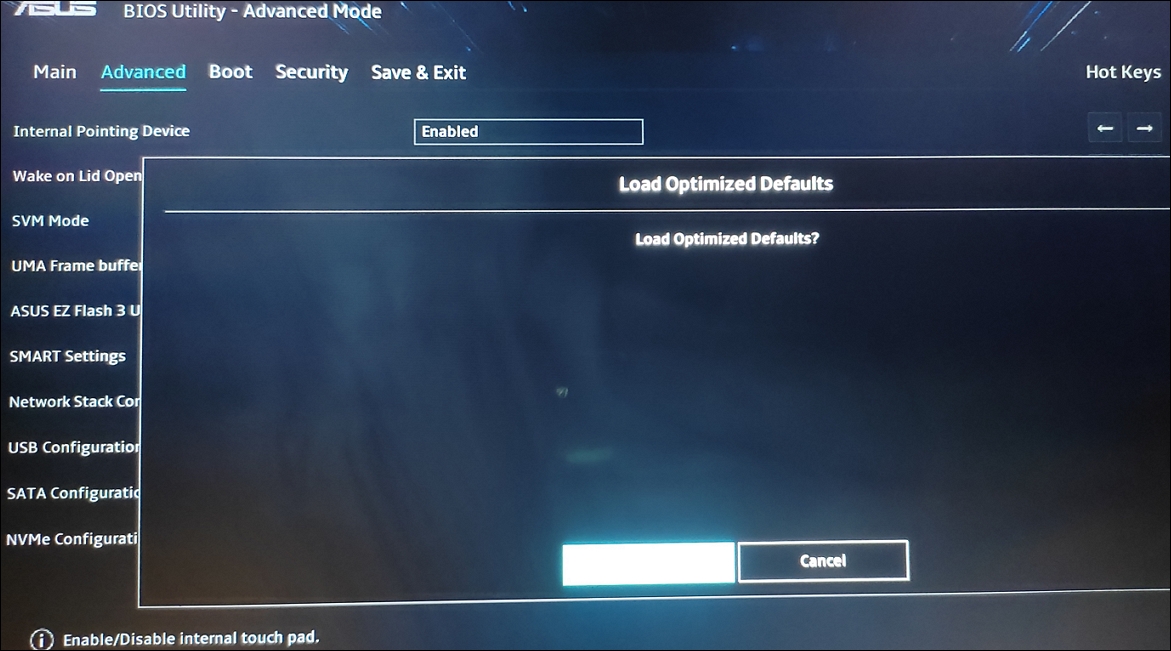
4. Press “F10” to save the changes and exit the BIOS. Then, your computer will restart and automatically boot into Windows.
That’s it.