
With Windows 10 V1803 (April 2018 Update), Deployment Image Servicing and Management (DISM) has got some abilities. Microsoft has now added feature updates management capabilities to DISM. This means you can now use DISM to manage feature updates for Windows 10, in following manners:
- Initiate removal of the feature update, in other words, rolling the installation back to previous Windows version
- Prevent users from uninstalling Windows feature update
- You can set the number of days, after which an user can initiate uninstall of Windows upgrade
- Identify the number of days after which OS can be uninstalled, after the Windows upgrade.
Since these options are added to command-line, they will be very helpful to IT professionals and system administrators. Now the system administrators can easily manage their client machines with few commands.
Page Contents
How To Use DISM To Manage Feature Updates In Windows 10
The command-line switches added to DISM are mentioned below. These are usually run against an online image. You must be running administrative Command Prompt to operate these switches.
/Get-OSUninstallWindow
This switch is useful to find out after how many days after Windows upgrade, an uninstall can be initiated.
To use this switch, in the administrative Command Prompt window, type DISM /Online /Get-OSUninstallWindow and press Enter key.
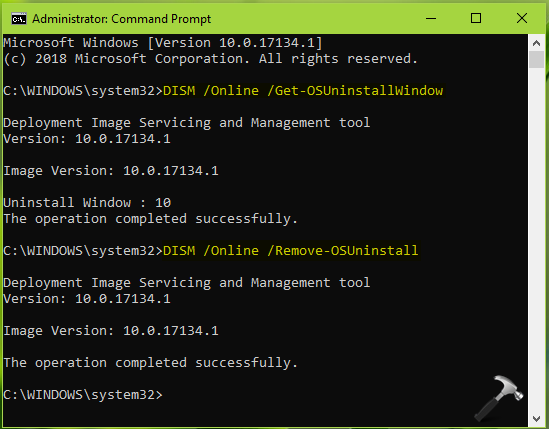
/Remove-OSUninstall
Be careful to use this switch because it will remove the ability of user to uninstall the feature update.
To use this switch, in the administrative Command Prompt window, type DISM /Online /Remove-OSUninstall and press Enter key.
/Set-OSUninstallWindow
This command-line switch can be used to set the number of days after an upgrade, an uninstall can be initiated.
To use this switch, in the administrative Command Prompt window, type DISM /Online /Set-OSUninstallWindow /Value:15 and press Enter key. You can can replace 15 with number of days of your wish.
/Initiate-OSUninstall
Using this switch will initiate uninstall of the feature update. This works actually like downgrading your Windows to previous edition.
To use this switch, in the administrative Command Prompt window, type DISM /Online /Initiate-OSUninstall and press Enter key.
Hope you find these DISM switches helpful!


This command seems to no longer be an option