Earlier, we have shared you following guide to show how to connect Windows remotely to other machines:
How to use Remote Desktop feature to connect Windows to other devices
Usually, Windows 10 comes with Remote Desktop feature turned off. Many times, users need to enable or disable this feature as per requirement. It is often recommended to have this feature disabled due to security reasons. Because if you enable this feature, you’re actually granting administrators on other machine to remotely access your machine. So make sure you turn on this feature, only when it is required.
Here’s how to quickly enable/disable Remote Desktop feature in Windows 10.
Page Contents
How To Enable/Disable Remote Desktop Connection In Windows 10
WAY 1 – Via Settings App
1. Right click Start Button or press  + X keys and select Settings.
2. In the Settings app, navigate to System > Remote Desktop.
3. Moving on, under Remote Desktop, set Enable Remote Desktop option to turn On/Off to enable/disable Remote Desktop Connections to Windows 10, respectively.
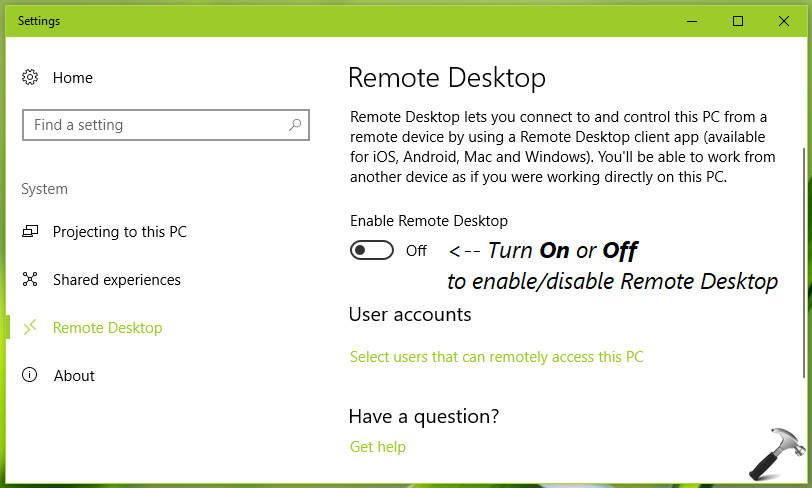
These settings are saved immediately. You can close the Settings app and return to the Desktop, if you like.
You can use registry as well to configure the above mentioned setting.
WAY 2 – Via Registry
Registry Disclaimer: The further steps will involve registry manipulation. Making mistakes while manipulating registry could affect your system adversely. So be careful while editing registry entries and create a System Restore point first.
1. Press + R and put regedit in Run dialog box to open Registry Editor (if you’re not familiar with Registry Editor, then click here). Click OK.

2. In left pane of Registry Editor window, navigate to following registry key:
HKEY_LOCAL_MACHINE\SYSTEM\CurrentControlSet\Control\Terminal Server
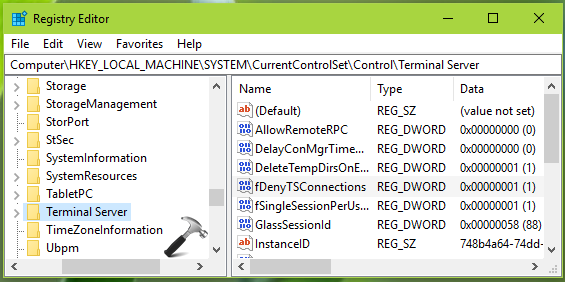
3. Now in the right pane of Terminal Server registry key, you must find fDenyTSConnections named registry DWORD (REG_DWORD) which is set to 1. This means that Remote Desktop is disabled with that Value data. So double click on this registry DWORD to modify its Value data:
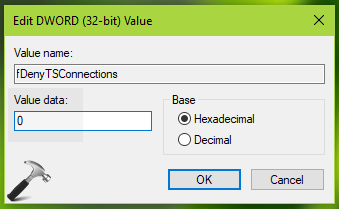
4. Finally, set the Value data to 0 and click OK. This should enable Remote Desktop on your Windows 10. Close Registry Editor and reboot to make changes effective.
So this is how you can configure Remote Desktop Connections to Windows 10.
That’s it!