
As we know that with Windows 10 Version 1803 or later, the XPS Viewer does not came pre-installed. We’ve also shared you following guide to enable or add XPS Viewer to Windows 10:
How to install XPS Viewer in Windows 10
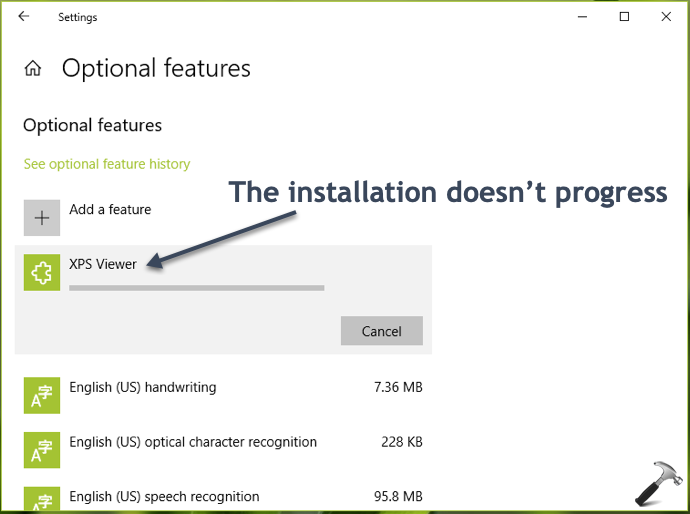
However, following the methods mentioned in above guide might not work for some users and this post will address them. Some users may see that XPS Viewer is not available as optional feature. While some says, even if XPS Viewer is listed as optional feature, nothing happens after clicking Install button. The installation simply doesn’t progress. And others may receive DISM error 87 while enabling the feature using Command Prompt.
If you’re facing exactly above mentioned symptoms, here is how to resolve:
Page Contents
FIX: Cannot Install XPS Viewer In Windows 10
FIX 1 – Via Registry
Registry Disclaimer: The further steps will involve registry manipulation. Making mistakes while manipulating registry could affect your system adversely. So be careful while editing registry entries and create a System Restore point first.
1. Press  + R and type
 regedit in Run dialog box to open Registry Editor (if you’re not familiar with Registry Editor, then click here). Click OK.

2. Navigate to following registry key:
HKEY_LOCAL_MACHINE\SOFTWARE\Policies\Microsoft\Windows\WindowsUpdate\AU
3. In the corresponding right pane of AU registry key, you’ll see a registry DWORD (REG_DWORD) named UseWUServer which might be set to 1. Double click on it to modify its Data.
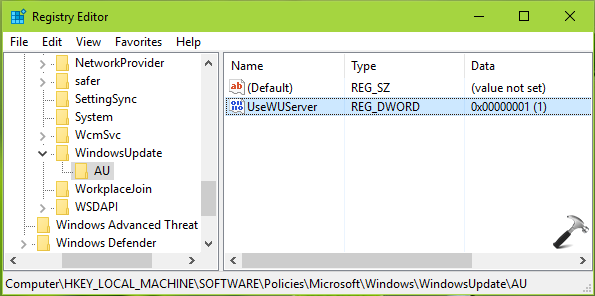
4. Then in Edit DWORD Value box, put the Value data as 0. Click OK and close the Registry Editor window.

5. Now retry to install XPS Viewer again and it should work this time.
6. After installing XPS Viewer, you must restore UseWUServer registry DWORD to Value data as 1.
FIX 2 – Via Group Policy
Users want to fix this issue on multiple machines in their organization/workplace can effectively use this method.
NOTE: This fix is not applicable to Windows 10 Home users.
1. Press + R and put gpedit.msc in Run dialog box to open GPO snap-in. Click OK.
2. Go to Computer Configuration > Administrative Templates > System.
3. Double click on Specify settings for optional component installation and component repair policy setting and set it to Enabled. Make sure you check Download repair content and optional features directly from Windows Update instead of Windows Server Update Services option. Click Apply, OK.

4. You should be able to install XPS Viewer now.
5. Once you installed, you can restore Specify settings for optional component installation and component repair policy setting to Not configured status.
Hope this helps!


FIX 1 – Via Registry worked perfectly. Thank you.
^^ Glad to help Dave!
FIX 2 helped me, thanks! Windows 10 Enterprise 20H2
^^ Glad to help 😎