Windows 11, with its sleek design and enhanced user experience, is a favorite among many users. However, like any operating system, it can encounter occasional quirks and issues. One common issue that some Windows 11 users encounter is the desktop not refreshing automatically. When this problem occurs, you might notice that newly added files or changes to the desktop don’t appear immediately, leading to a less-than-ideal user experience. In this article, we will explore this issue and provide you with effective solutions to fix Windows 11 Desktop not refreshing automatically. We’ll walk you through the troubleshooting steps to ensure your Windows 11 desktop refreshes automatically as it should.
Page Contents
Fix: Windows 11 Desktop not refreshing automatically
The issue of the Windows 11 desktop not refreshing automatically can be caused by a variety of factors. While it may not be possible to pinpoint a single root cause, here are some common factors that can contribute to this problem:
- File Explorer Issues: Windows relies on File Explorer to handle desktop and file management. If there are issues with the File Explorer process, it can lead to desktop refresh problems.
- System or Software Glitches: Bugs or glitches in the operating system or third-party software can disrupt the normal functioning of Windows, including desktop refresh.
- Corrupted System Files: Corrupted or missing system files can impact various aspects of Windows, including desktop behavior.
- Malware or Viruses: Malware or viruses can interfere with system processes and cause desktop issues.
- Incompatible or Outdated Drivers: Incompatible or outdated hardware drivers can lead to compatibility problems, which may affect desktop refresh.
- Resource Consumption: High resource usage by applications or background processes can slow down the desktop refresh.
- Customization and Shell Extensions: Third-party desktop customization or shell extensions can sometimes conflict with Windows and lead to refresh issues.
Below are the effective solutions to Fix: Windows 11 Desktop not refreshing automatically issue:
Fix 1: Clear File Explorer History and Restore Defaults
Let’s start with a simple yet effective fix. If you’ve noticed delays in desktop updates, or files and folders not appearing as they should, it could be due to a cluttered File Explorer history or customized settings causing conflicts.
Here’s how to clear your File Explorer history and restore it to its default state:
1. Open File Explorer. Now, click on Menu “(…)” and select “Options“.
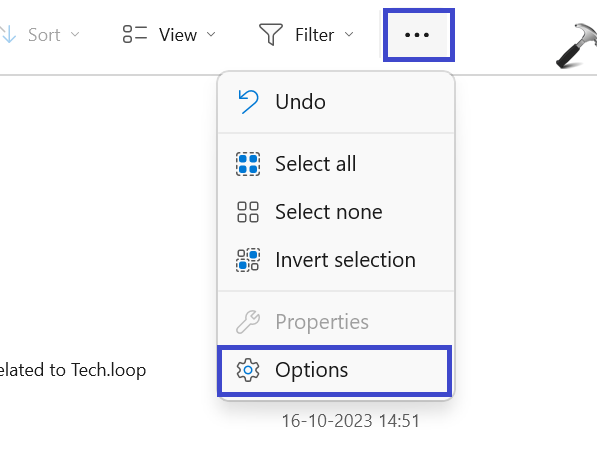
2. Under the Privacy, tick all the boxes and click “Clear“.

3. After that, click on the “Restore Defaults” option.
Fix 2: Terminate the Windows Explorer Process
let’s try a slightly more proactive approach. In this fix, we will terminate the Windows Explorer process and allow it to restart, potentially resolving any underlying issues. Here’s how to do it:
1. Open Task Manager. Navigate to “Processes“.
2. Right-click on “Windows Explorer” and click “End Task“.

Restart the PC and check whether the issue is solved or not.
Fix 3: Remove the Desktop Folder from OneDrive
Another potential solution to the Windows 11 desktop not refreshing automatically involves addressing any synchronization issues with OneDrive. If your desktop is linked to OneDrive, and you’ve experienced issues with files not appearing as expected, you might need to remove the desktop folder from your OneDrive synchronization.
Here’s how you can do it using both the OneDrive app and Windows Explorer:
Using OneDrive App
1. Open the taskbar and right-click on OneDrive. Select “Settings“.
2. Now, click on “Manage backup“.
3. A prompt box will appear. Toggle off the “Desktop” option.
Using Windows Explorer
1. Open File Explorer and go to “OneDrive Personal“.

2. Right-click on the “Desktop” folder and select “Delete“.
Fix 4: Run SFC Scan
If you’re still grappling with the issue of your Windows 11 desktop not refreshing automatically, it’s time to delve deeper into system integrity checks. Running the System File Checker (SFC) scan can help identify and resolve potential issues within your operating system.
Here’s how to perform an SFC scan:
1. Open the Command prompt and run as administrator.
2. Copy and paste the below command:
sfc /scannow
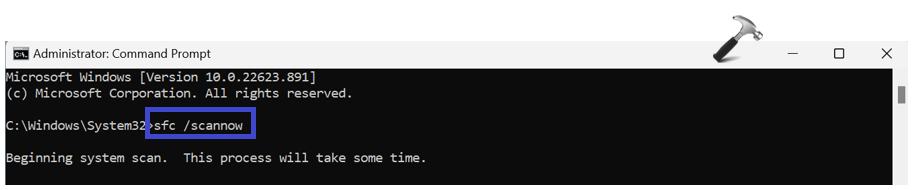
Press Enter.
3. Wait till the scanning is completed. Restart your PC and check whether the issue is resolved or not.
That’s It!