
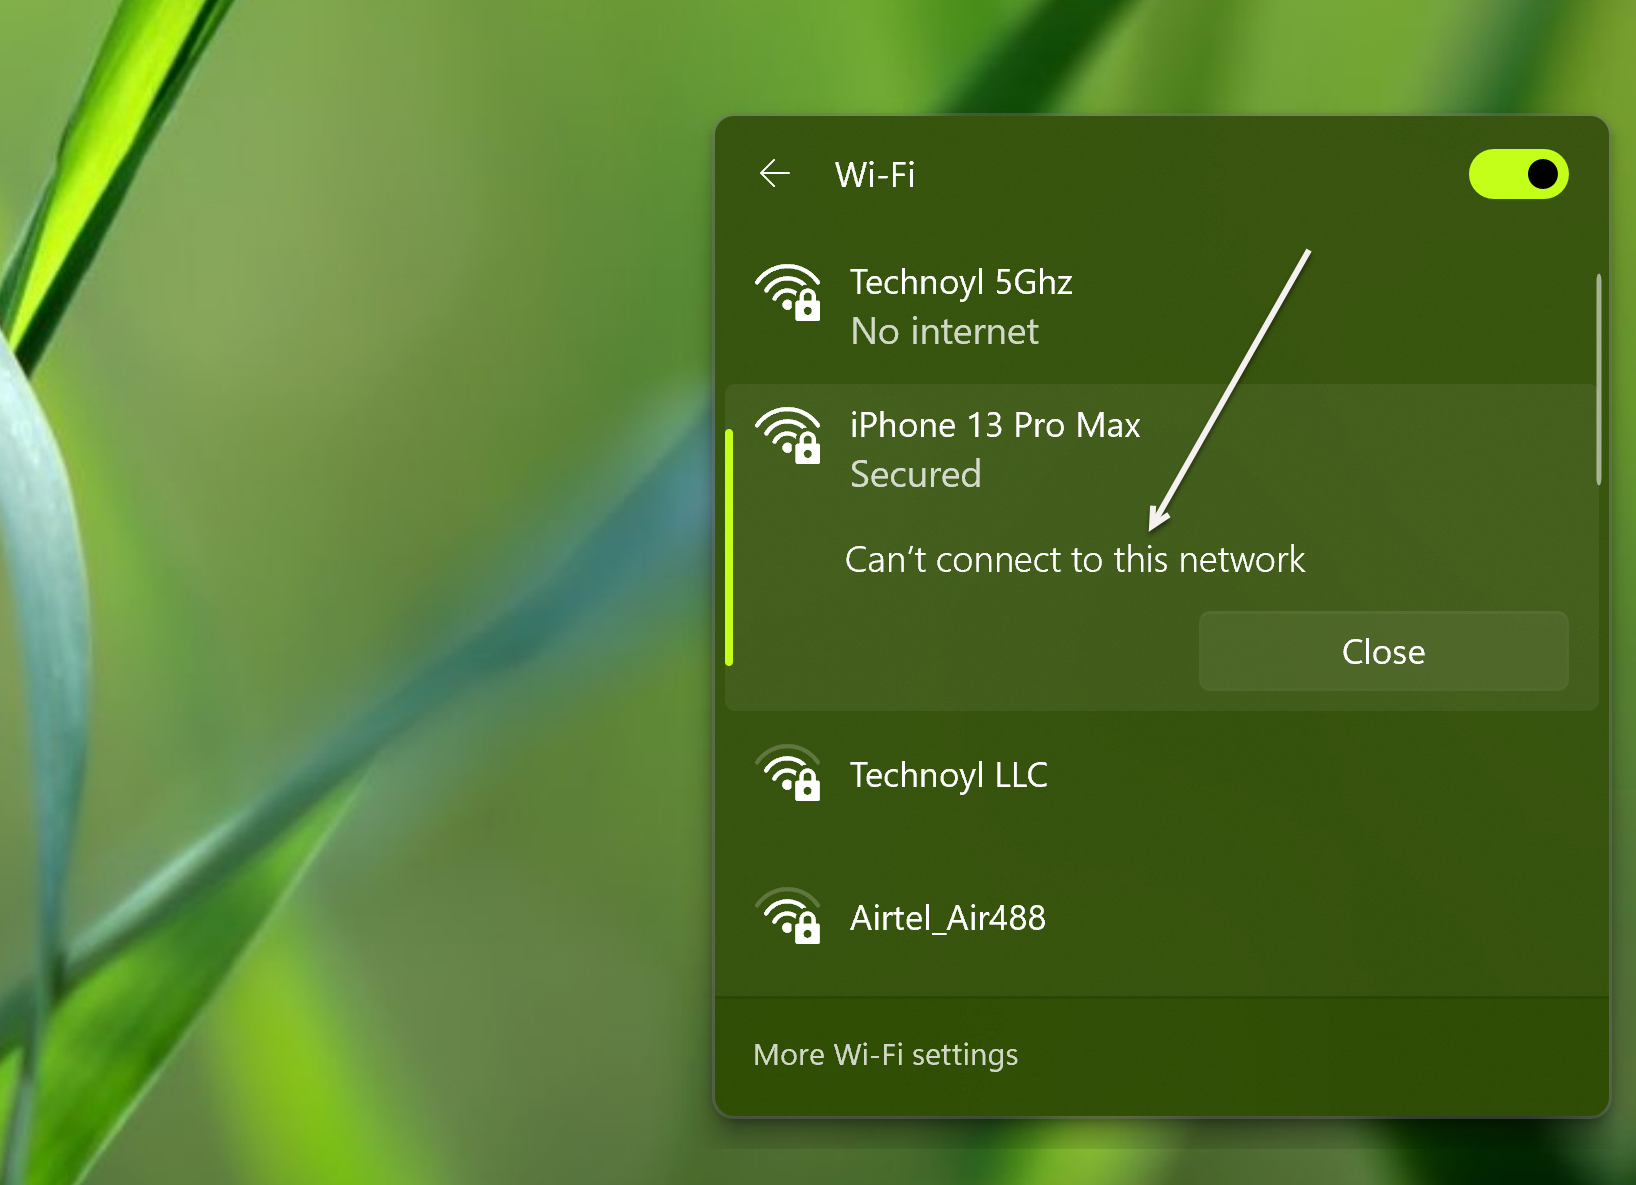
Experiencing network connectivity issues can be frustrating, especially when encountering the “Can’t connect to this network” error on Windows 11. This error message indicates a problem with establishing a connection to a wireless network. However, there are several troubleshooting steps you can take to resolve this issue and restore your network connectivity. In this guide, we will explore the methods in detail, providing you with the necessary steps to troubleshoot and fix the “Can’t connect to this network” error on Windows 11.
Page Contents
Fix: Can’t connect to this network error on Windows 11
Fix 1: Change Network Adapter Settings
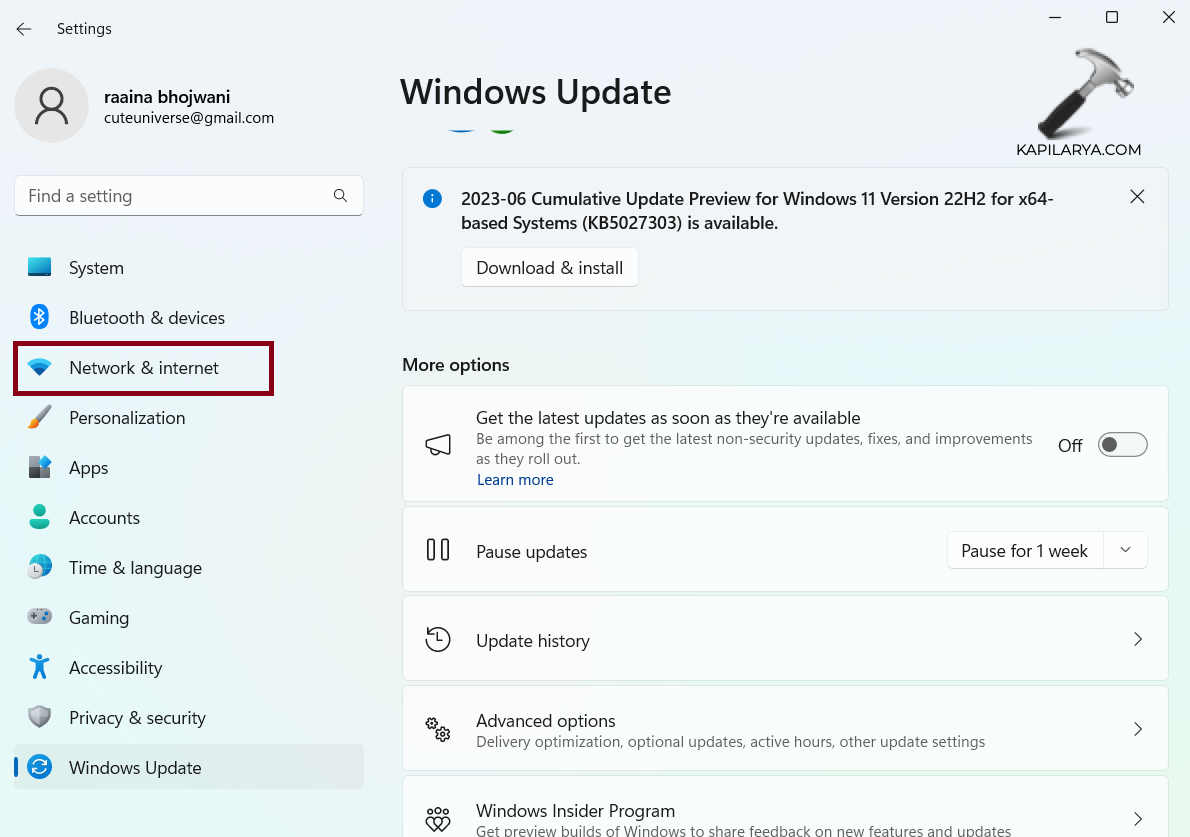
1. Open Settings by pressing Windows + I keys.
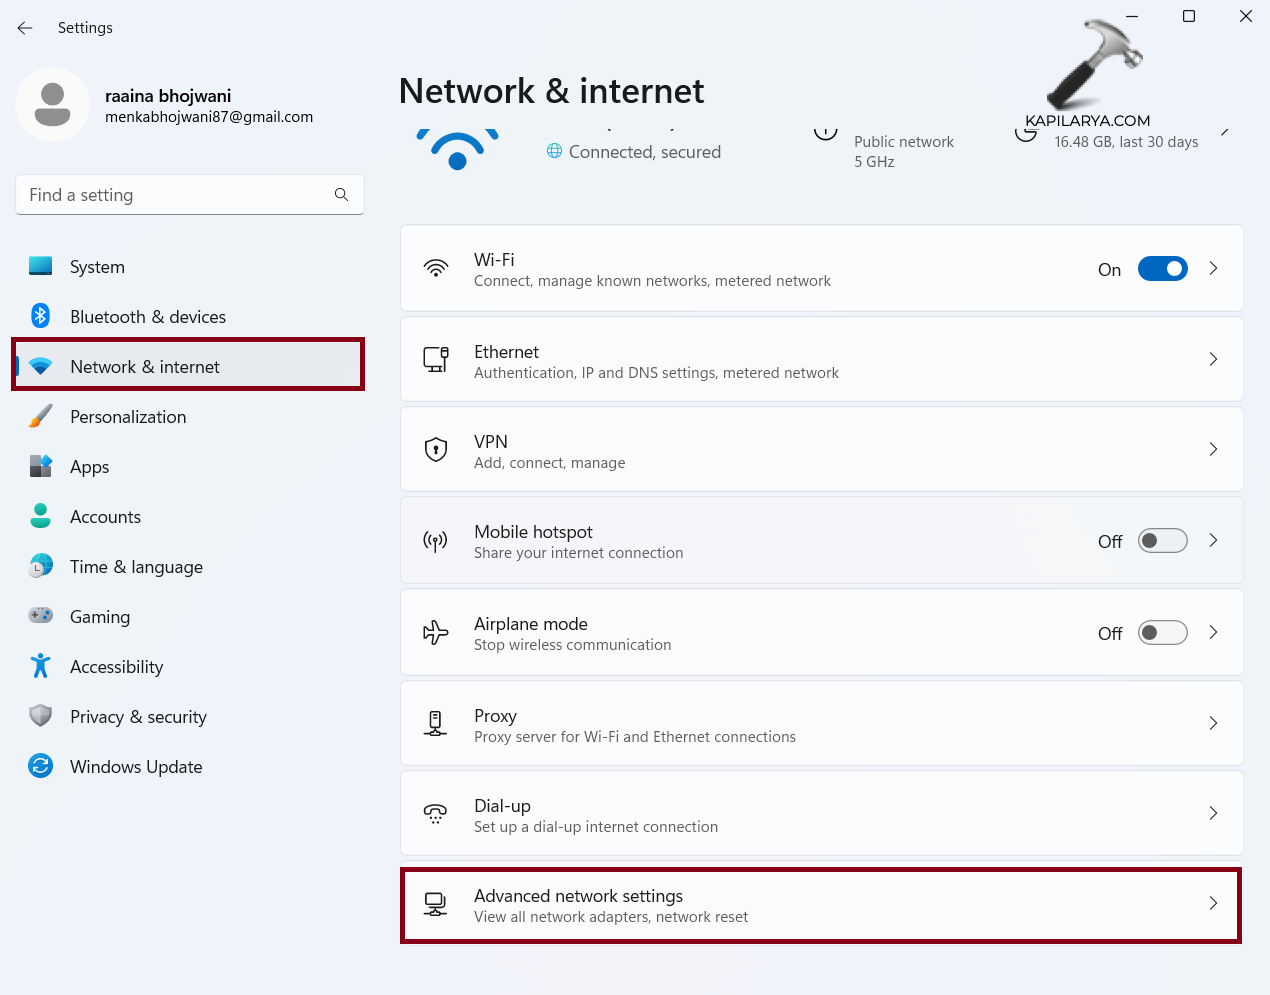
2. Click on “Network & internet”.
3. Click on “Advanced network settings”.
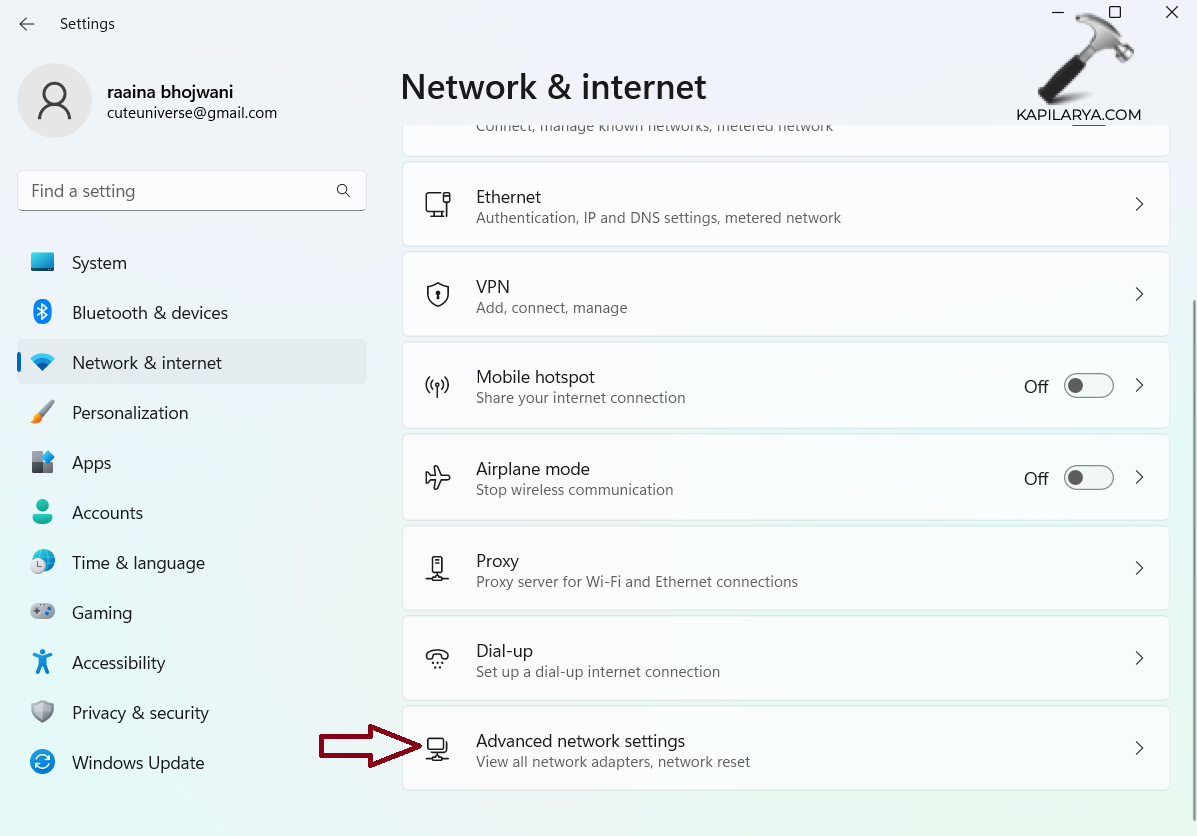
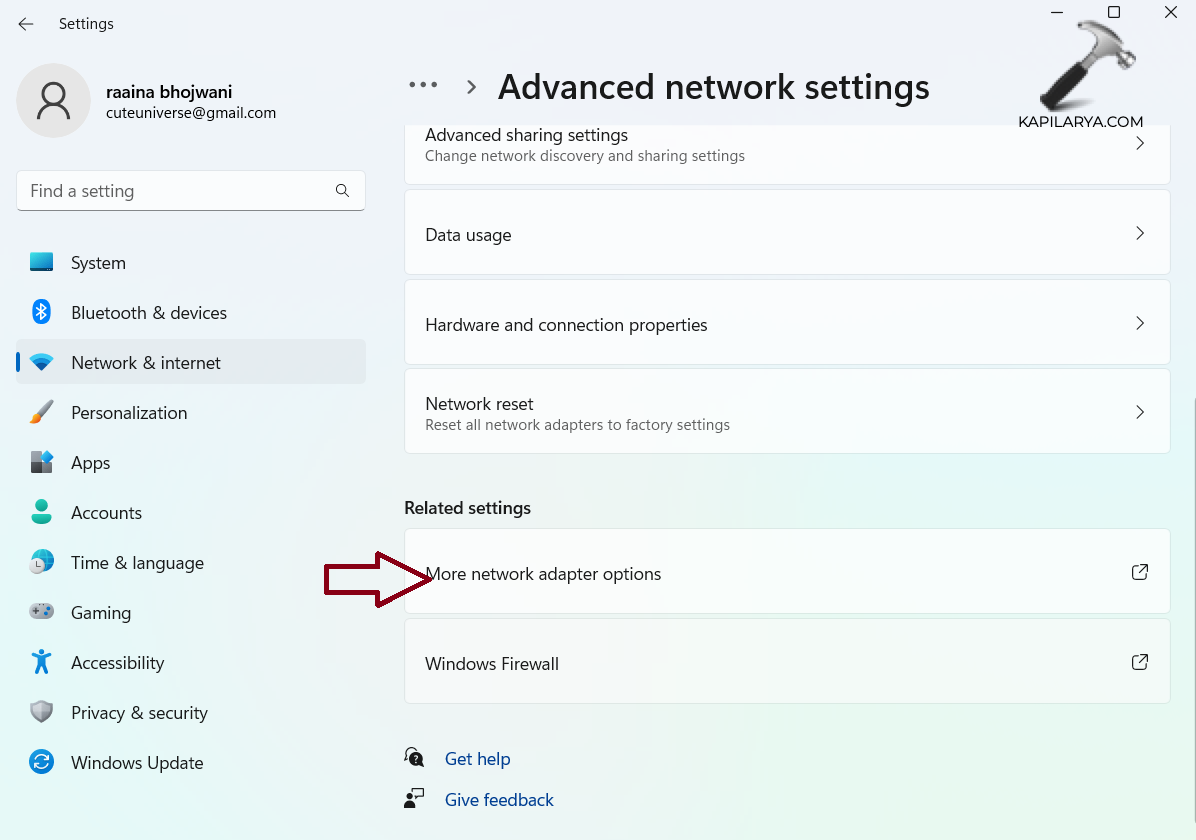
4. Click on “More network adapter options”.
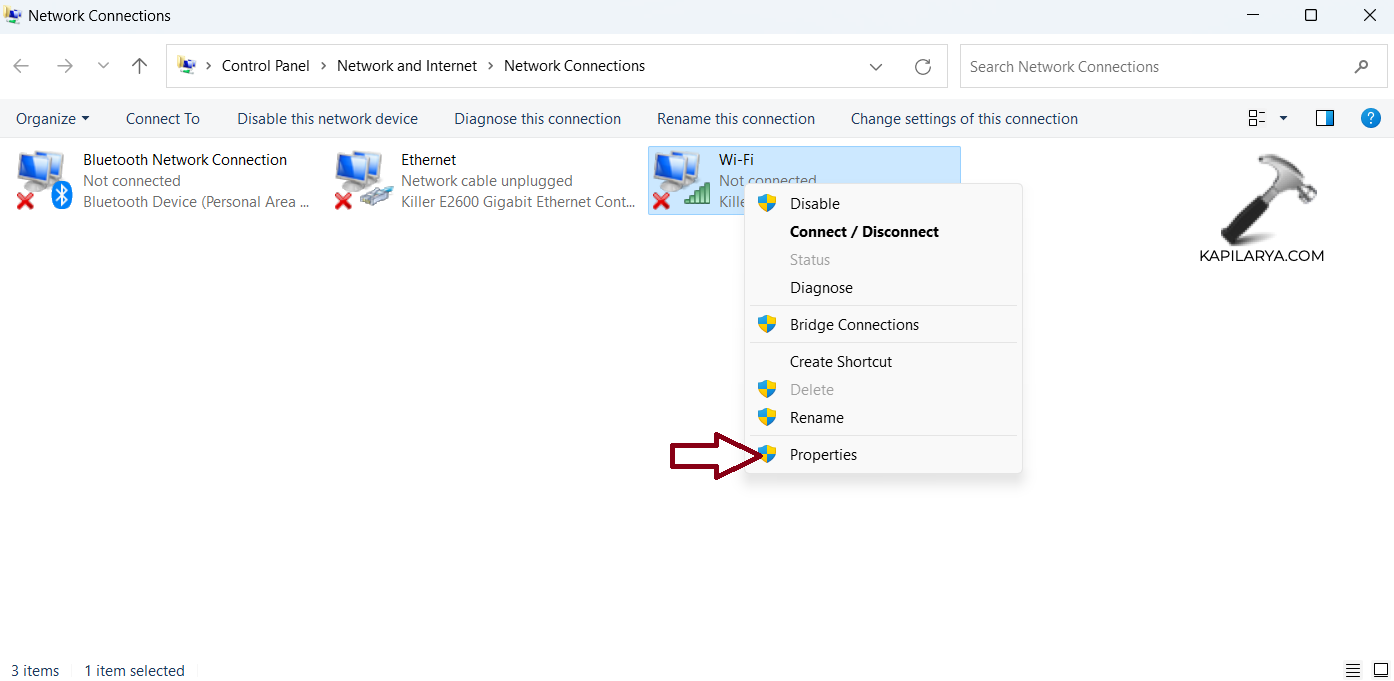
5. Right click on Wi-Fi and choose “Properties”.
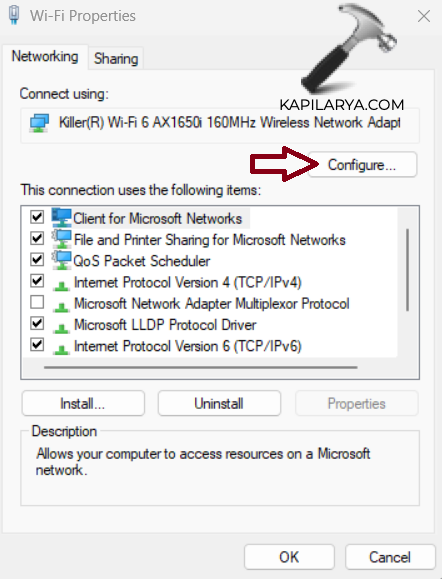
6. Click on “Configure”.
7. Click on “Advanced” tab and select 801.11d from the “Property” list and change the value to “Enabled”.
Fix 2: Disable IPv6 to fix issue Can’t connect to this network error on Windows 11
1. Open Settings by pressing Windows + I keys.
2. Click on “Network & internet”.
4. Click on “Advanced network settings”.
5. Click on “More network adapter options”.
6. Right click on Wi-Fi and choose “Properties”.
7. Uncheck “Internet Protocol Version 6 (TCP/IPv6)”.
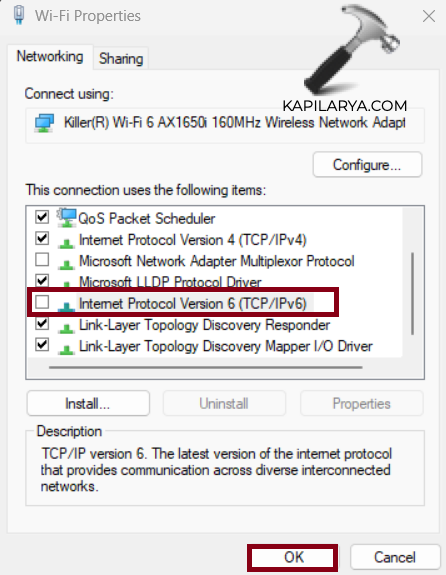
8. Click “OK” and restart your computer.
Fix 3: Forget Network
1. Press Windows + A keys to open Quick Access menu.
2. Click on arrow next to WiFi icon.

3. Right-click on the network name and choose “Forget”.

Fix 4: Run Network Troubleshooters
1. Shared Folders Troubleshooter
Open Run prompt and type this command:
msdt.exe /id NetworkDiagnosticsFileShare
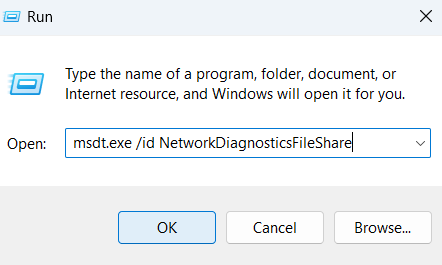
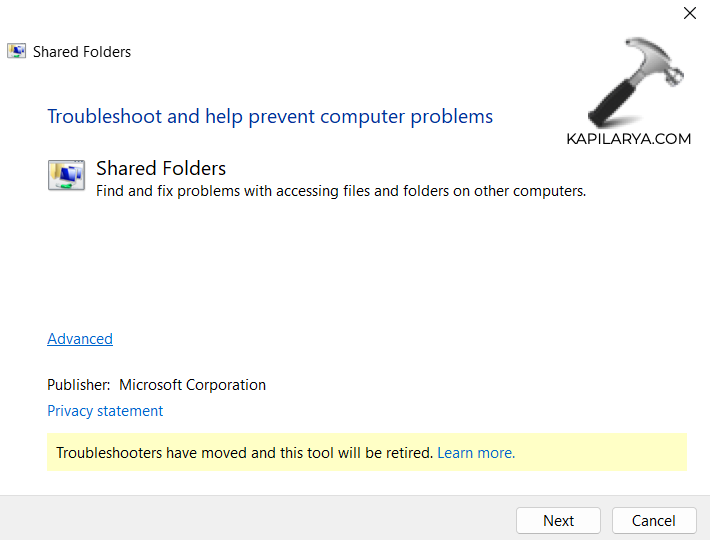
Click “Next” to run the troubleshooter.
2. Network Adapter Troubleshooter
Open Run Prompt and type this command. Press Enter.
msdt.exe /id NetworkDiagnosticsNetworkAdapter
Click “Next” to run the troubleshooter.

3. Internet Connections Troubleshooter
Open Run Prompt and type this command. Press Enter.
msdt.exe /id NetworkDiagnosticsWeb
Click “Next” to run the troubleshooter.

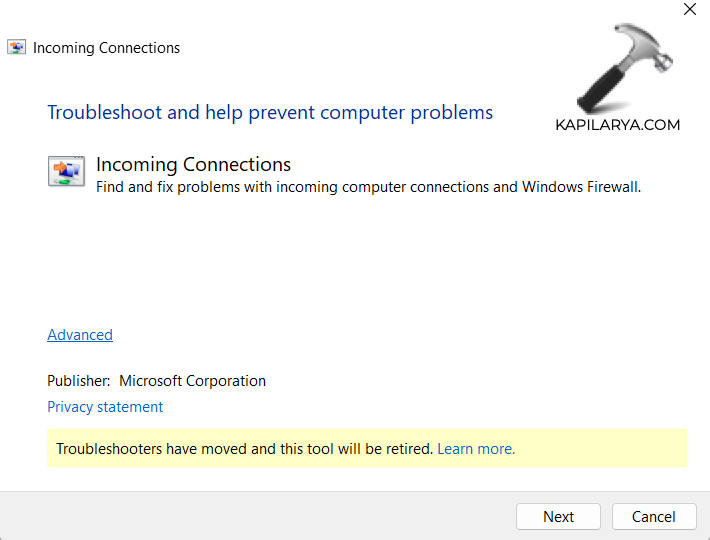
4. Incoming Connections Troubleshooter
Open Run Prompt and type this command. Press Enter.
msdt.exe /id NetworkDiagnosticsInbound
Click “Next” to run the troubleshooter.
5. Connection to Workplace using DirectAccess Troubleshooter
Open Run Prompt and type this command. Press Enter.
msdt.exe /id NetworkDiagnosticsDA
Click “Next” to run the troubleshooter.
Fix 5: Upgrade Network Driver
Visit your manufacturer’s site and download the latest driver. Then follow these steps:
1. Open Device Manager.
2. Expand “Network adapters”.
3. Right click on network driver and choose “Update driver”.
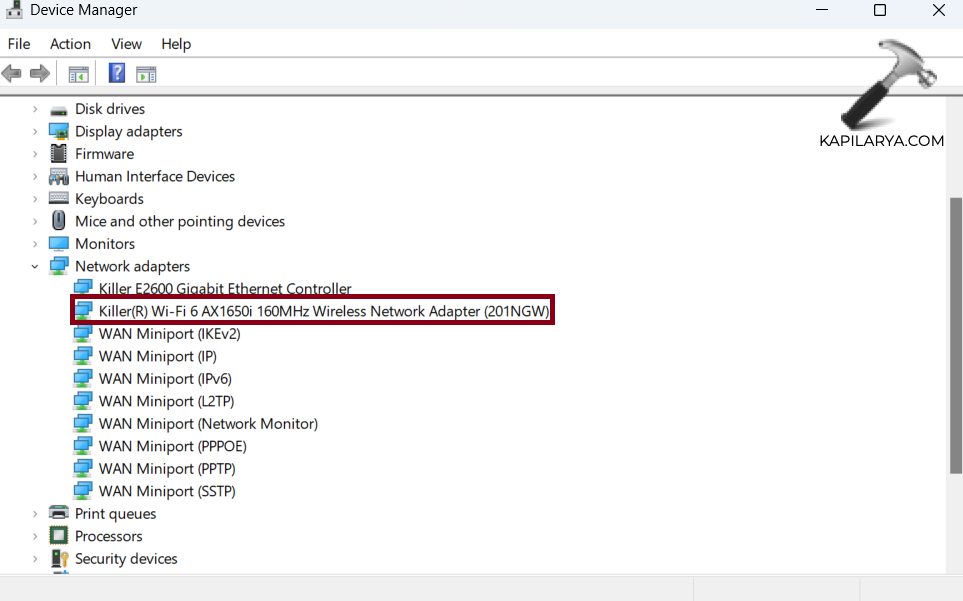
4. Follow the on-screen instructions.
Fix 6: Update Windows to fix issue Can’t connect to this network error on Windows 11
1. Open Settings by pressing Windows + I keys.
2. Click on “Windows update”.
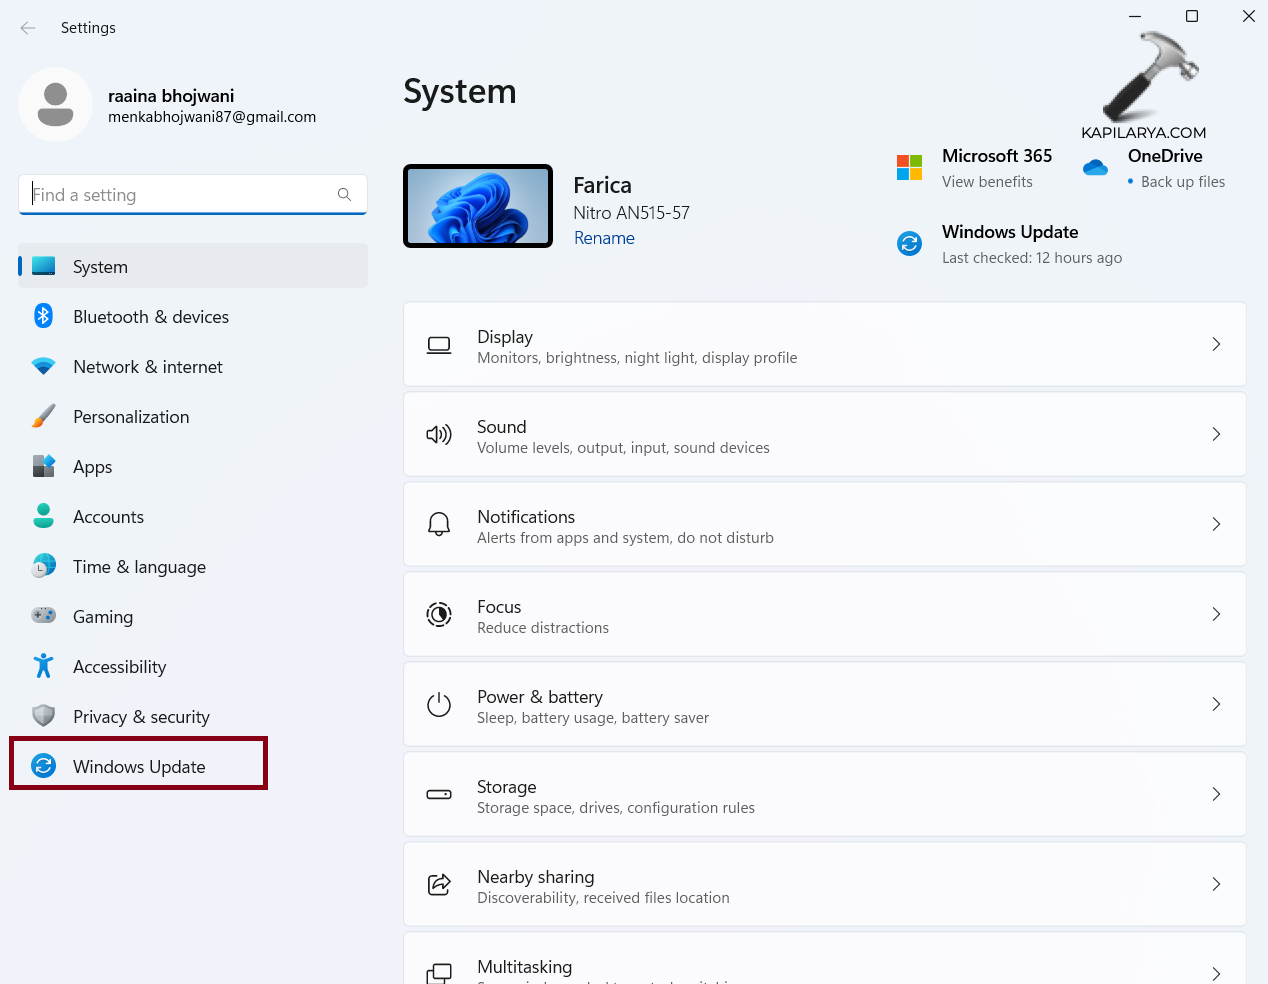
3. Download and install updates if its showing on your screen.
Fix 7: Make sure your network source is near
A weak or distant network signal can result in connection issues. First, check the physical proximity of your device to the router or access point, ensuring there are no obstacles or interference hindering the signal strength. If possible, try moving closer to the network source to establish a stronger connection. Additionally, make sure there are no other electronic devices or objects causing interference in the vicinity. By ensuring a close and unobstructed network source, you can troubleshoot and improve your Windows 11 network connectivity.
Fix 8: Reset Network to fix issue Can’t connect to this network error on Windows 11
1. Open Settings by pressing Windows + I keys.
2. Click on “Network & internet”.
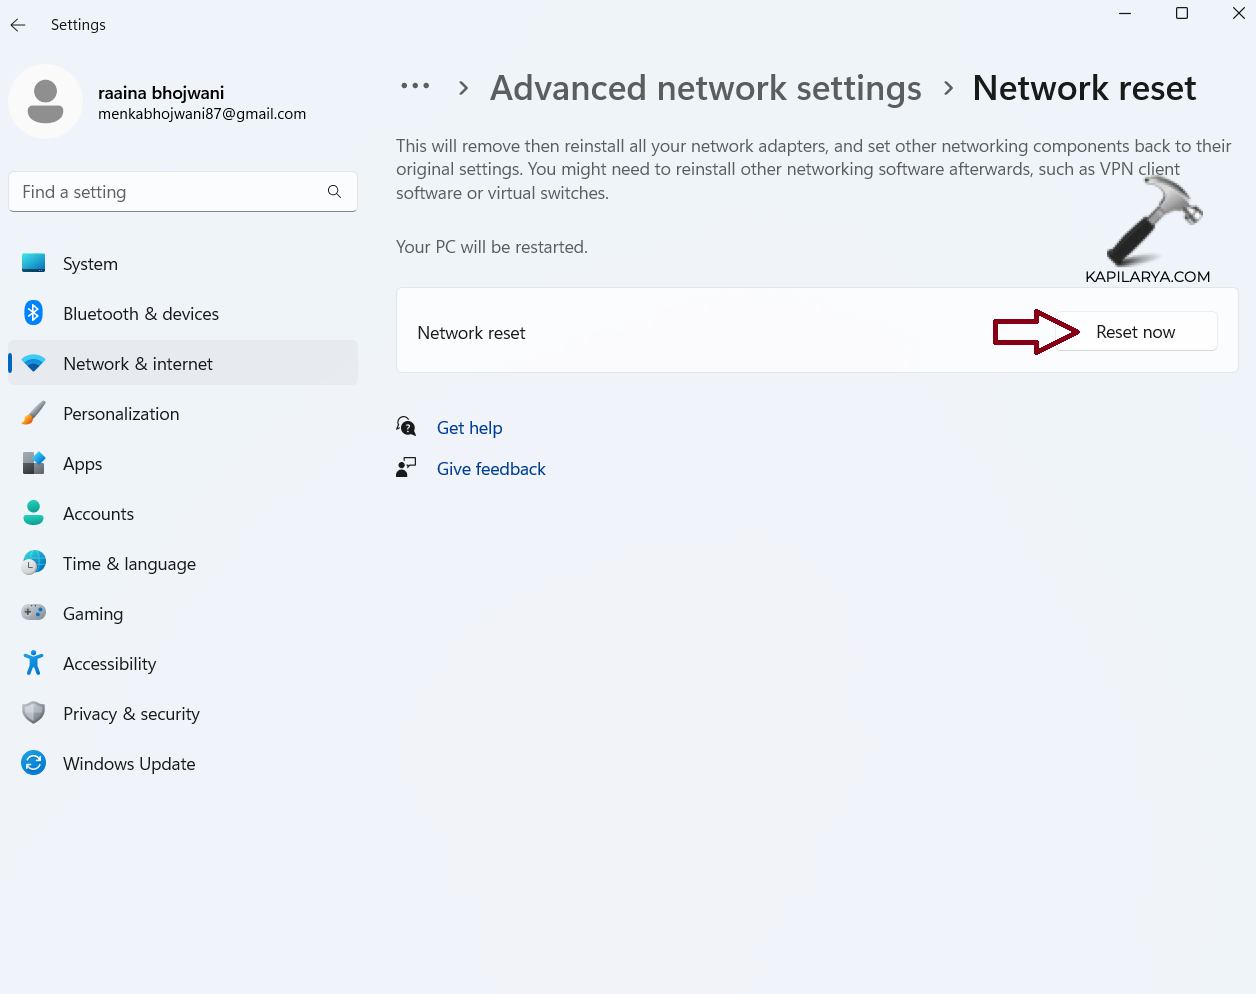
3. Then click on “Advanced network settings”.
4. Click on “Network reset”.
5. Click on “Reset now”.
Fix 9: Flush DNS and reset IP
1. Copy and paste the below code in the text editor and save the file with the name and .bat file extension.
ipconfig /release
ipconfig /renew
arp -d *
nbtstat -R
nbtstat -RR
ipconfig /flushdns
ipconfig /registerdns
2. Run this file as an administrator (right-click on file and choose “Run as administrator”). This will reset the network.
Fix 10: Make sure WiFi physical switch is on
Some laptops and computers have physical switches or buttons to enable or disable WiFi connectivity. Ensure that this switch is in the “on” position or that the WiFi button is pressed, depending on your device’s configuration. This step will ensure that the WiFi radio button is activated, allowing your Windows 11 system to detect and connect to available networks successfully.
That’s it!


![The mapped network drive could not be created [Detailed fix]](https://www.kapilarya.com/assets/Network-Drive-768x511.jpg)

![Stop sharing a folder in Windows 11 [Guide]](https://www.kapilarya.com/assets/Network-768x522.png)