
In Windows, you can set a network profile type for the network connection you’re connected to. Different network profile types can fit different type of use cases. You can have Public, Private or Domain network profile types in your Windows system. In this article, we’ll see how to change network profile type in Windows 11.
Following are the network profile types you can use in Windows 11:
- Private network: You can use this for networks you trust, such as a network at home or work. When a network is set to private, your PC is discoverable to other devices on the network, and you can use your PC for file and printer sharing.
- Public network: You can use this for networks you connect to when you’re out and about, such as a Wi-Fi network at a coffee shop. Your PC will be hidden from other devices on the network, and you can’t use your PC for file and printer sharing.
- Domain network: This network location type is used when your Windows 11 is a member of an Active Directory domain.
Here’s how to change your network profile type in Windows 11.
Page Contents
How to change network profile type in Windows 11
Method 1 – Using Settings app
1. Press  + I keys to open Settings app.
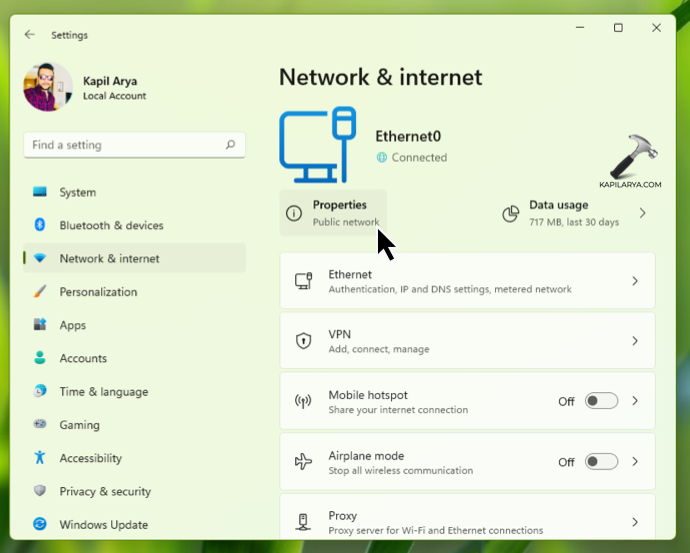
2. In the Settings app, go to Network & internet.
3. In the right pane, you’ll be finding the currently connected network connection information. The Properties mentions here the existing network profile type. You can click on it to modify this setting.
4. Next, you can select the Network profile type from either Public, Private or Domain. The Domain profile option can be only be selected when your system is connected to a AD domain.

Your settings should now be saved and applied.
Method 2 – Using Security Policy
1. Press + R and put secpol.msc in Run dialog box. Click OK to open Security Policy snap-in.
2. Go to Security Settings > Network List Manager Policies.

3. In the right pane, double click on the network you want to modify. In the property sheet, switch to Network Location. Here you can select Network profile type from Not configured, Private and Public. Click Apply, OK to save settings.

4. Close Security Policy snap-in.
 Information:
If you want to modify network profile type using registry, you can apply the method shared in this guide as it works on Windows 11 as well.
That’s it!


![The mapped network drive could not be created [Detailed fix]](https://www.kapilarya.com/assets/Network-Drive-768x511.jpg)

![Stop sharing a folder in Windows 11 [Guide]](https://www.kapilarya.com/assets/Network-768x522.png)