In Windows 10, if you’ve setup your audio input device i.e. microphone, you can use online speech recognition with Cortana and other apps. These apps can recognize your voice and act upon. All you need is a working microphone and you have to allow apps to use microphone. See this fix, if microphone not working on your system.
If you’re concerned about your privacy, you can disable online speech recognition feature anytime at your wish. Here’s how you can configure online speech recognition in Windows 10.
Page Contents
How To Enable/Disable Speech Recognition In Windows 10
FYI: These steps are illustrated on Windows 10 V1903.
Method 1 – Via Settings App
1. Right click Start Button or press  + X keys and select Settings.
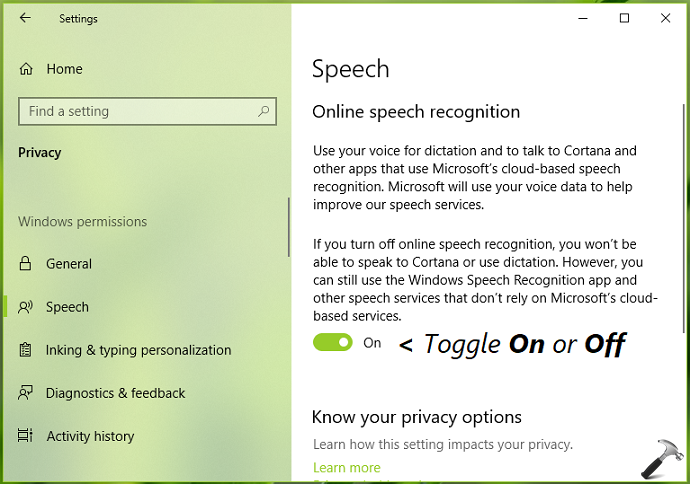
2. In the Settings app, navigate to Privacy > Speech.
3. Now in right pane of Speech, under Online speech recognition, toggle the option to On or Off to enable or disable speech recognition feature in Windows 10, respectively.
4. Close Settings app and return to Desktop, if you like.
You can also configure online speech recognition via registry manipulation as mentioned in Method 2 below.
Method 2 – Via Settings App
Registry Disclaimer: The further steps will involve registry manipulation. Making mistakes while manipulating registry could affect your system adversely. So be careful while editing registry entries and create a System Restore point first.
1. Press + R and put regedit in Run dialog box to open Registry Editor (if you’re not familiar with Registry Editor, then click here). Click OK.

2. In left pane of Registry Editor window, navigate to following registry key:
HKEY_CURRENT_USER\Software\Microsoft\Speech_OneCore\Settings\OnlineSpeechPrivacy
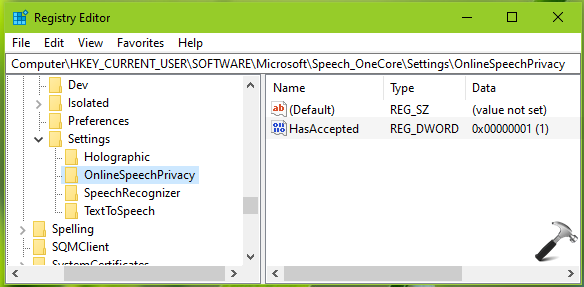
3. Now in the right pane of OnlineSpeechPrivacy registry key, look for the registry DWORD (REG_DWORD) as HasAccepted. This registry DWORD can be used to enable/disable online speech recognition in Windows 10. Double click on this registry DWORD to modify its Value data:
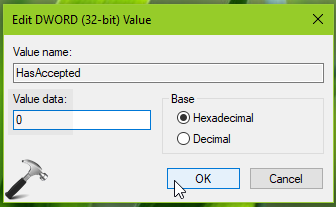
4. Set the Value data to 0 to disable online speech recognition. To enable online speech recognition, set Value data to 1. Click OK, close Registry Editor, reboot the machine to make changes effective.
So this is how you can manage online speech recognition in Windows 10.
That’s it!