The Windows Modules Installer Worker is a major Windows system process which checks and installs Windows updates automatically. It has administrator permissions and can work without any user interference. However, there might arise situations when Windows Modules Installer Worker shows 100% disk usage in the task manager in Windows 11. This leads to various unwanted consequences leading to improper functioning of the PC. Though the Windows Modules high disk issue may look like a big trouble, it can be solved easily using some fixes.
Page Contents
Fix: Windows Modules Installer high disk issue
Now, let us check the main fixes which will allow the users to fix the Windows Modules high disk issue in detail.
Fix 1: Running Malware Scan
Presence of any malware or virus in the PC system can be one of the main reasons for the existence of the issue. Therefore, follow the steps for scanning any malware in the PC.
Step 1- Open Windows Security.

Step 2- Next go to Virus & threat protection > Current Threats > Scan options.

Step 3- Now, select Full Scan > Scan now. Then, wait for Windows to finish the scan.

Fix 2: Deleting SoftwareDistribution Folder
If the above fix is not working, the users can also try deleting all the files in SoftwareDistribution folder. Thus, follow the steps below to do the same.
Step 1- Firstly, write services in the Search box. Open the first resultant.
Step 2- Now, right-click the Windows Update in Services window and select Stop.

Step 3- Again, press Windows + R and open the Run dialog box. Thereafter, copy and paste the prompt given below and press Enter.
C:\Windows\

Step 4- Next, go to SoftwareDistribution folder and delete it.

Step 5- Further, go back to Services and right-click the Windows Update once again. Lastly, select Start from the dop-down menu.
Apart from the SoftwareDistribution folder, the users can also delete other temporary files for clearing any unwanted files.
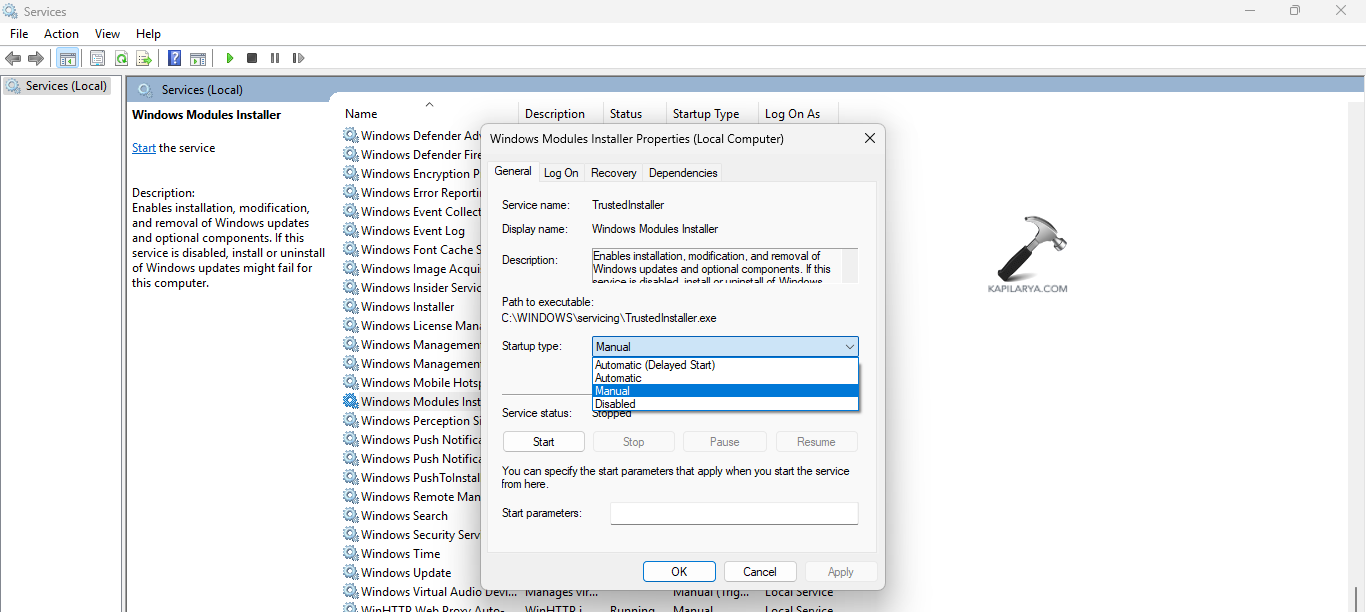
Fix 3: Setting Windows Modules installer Worker to Manual
When the Windows Modules installer is not set to the default startup type, it may cause the Modules installer to use 100% CPU. Thus, setting it to Manual can aid in fixing the issue. Follow the steps for doing the same.
Step 1- At first, open Windows Services.
Step 2- Next, go to Windows Modules Installer. Right-click it and select Properties.

Step 3- Lastly, change the Startup type to manual and press Apply > OK.
Fix 4: Windows Update Troubleshooter
Windows Update Troubleshooter is another built-in feature of Windows which aids in scanning solving any kind of problem related to Windows. Thus, to run this troubleshooter, follow these steps-
Step 1- First go to Start > Settings.
Step 2- Next go to System > Troubleshooter > Other troubleshooters.

Step 3- Lastly, below Most frequent, click Windows Update and Run.

Fix 5: Performing Clean Boot
Performing a clean boot is another fix which the users can try when the above fixes are not working. To perform a clean boot, follow the steps given below-
Step 1- At first, press Windows + R and open the run dialog box. Now, copy and paste the command given below and open System Configuration.
msconfig
Step 2- Now, go to General tab of the System Configuration windows and deselect Load startup items under Selective startup. Additionally, select Load system services and Use original boot configuration.

Step 3- Further, visit the Services tab and select Hide all Microsoft Services.
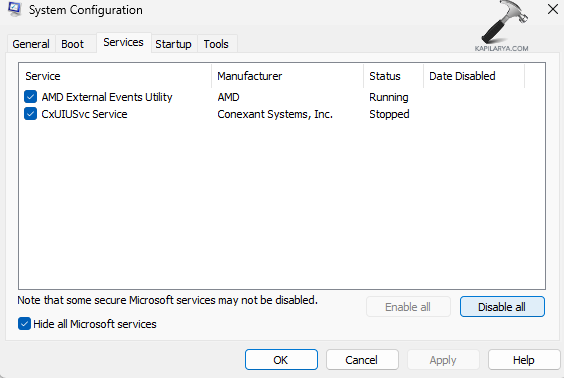
Step 4- Next, select Disable all and disable all Microsoft services.
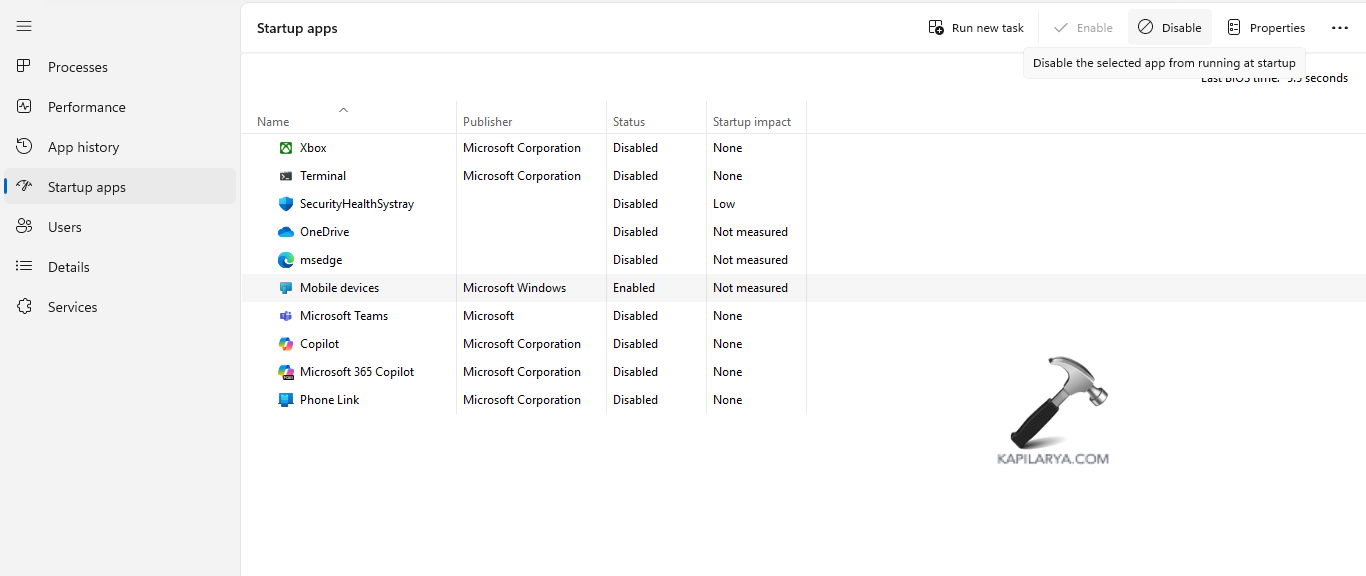
Step 5- Again, navigate to Startup > Task Manager > Startup apps. Thereafter, disable all the startup items.

Step 6- Lastly, select Apply > OK and save all the changes. Also, reboot the PC if necessary.
Fix 6: Running Memory Diagnostics
The users can also try running Windows Memory Diagnostic for fixing the issue. Follow the steps for doing the same.
Step 1- Firstly, type Windows + R and open the Run dialog box.
Step 2- Next, copy and paste the prompt below and select OK.
mdsched.exe

Step 3- Now, select any of the options appearing on the window screen as per requirement. Finally, restart the PC and wait for the memory check to run.
Fix 7: Setting PC performance to the Best
The last probable solution which the users can try is setting the PC performance to the Best. This should fix the issue. Follow the instructions below for doing the same.
Step 1- Go to This PC. Next, right-click on the empty space and select Properties.

Step 2- Now, select Advanced system settings. This will open the System Properties window.

Step 3- Below, Advanced, visit Performance section and select Settings.

Step 4- Now, in window of Performance Options, below Visual Effects, select Adjust for best performance and press Apply > OK.

Hoping that these fixes help the users in fixing the issue!